Pollard - Ideas for Organic Gardening & Urban Gardening
Here you can read online Pollard - Ideas for Organic Gardening & Urban Gardening full text of the book (entire story) in english for free. Download pdf and epub, get meaning, cover and reviews about this ebook. year: 2012, genre: Children. Description of the work, (preface) as well as reviews are available. Best literature library LitArk.com created for fans of good reading and offers a wide selection of genres:
Romance novel
Science fiction
Adventure
Detective
Science
History
Home and family
Prose
Art
Politics
Computer
Non-fiction
Religion
Business
Children
Humor
Choose a favorite category and find really read worthwhile books. Enjoy immersion in the world of imagination, feel the emotions of the characters or learn something new for yourself, make an fascinating discovery.

Ideas for Organic Gardening & Urban Gardening: summary, description and annotation
We offer to read an annotation, description, summary or preface (depends on what the author of the book "Ideas for Organic Gardening & Urban Gardening" wrote himself). If you haven't found the necessary information about the book — write in the comments, we will try to find it.
Container Gardening Designs & Woodworking Plans - Volume 2 - Ideas for Organic Gardening & Urban Gardening
If youre a new at container garden designs who wants to know to make and build using woodworking plans then youre about to discover how to get started right now!
In fact, if you want to know use woodworking plans to build nice looking planting boxes, then this new Kindle Book - Container Gardening Designs & Woodworking Plans - Volume 2 Ideas for Organic Gardening & Urban Gardening- gives you the answers to five important questions and challenges every First-time container gardener faces, including:
-How to make and build nice looking planter box stands
-You discover just how easy it is to make great looking cedar planting boxes
... And more!
So, if youre serious about having a great looking container garden made from wood on your patio or deck and you want to know all the steps to do it, then you need to grab a copy Container Gardening Designs & Woodworking Plans -Volume 2 Ideas for Organic Gardening & Urban Gardening right now, because wood working Expert, Jack Pollard, will reveal to you how every First-time wood worker, regardless of experience level, can succeed - Today!
Pollard: author's other books
Who wrote Ideas for Organic Gardening & Urban Gardening? Find out the surname, the name of the author of the book and a list of all author's works by series.


Ideas for Organic Gardening & Urban Gardening — read online for free the complete book (whole text) full work
Below is the text of the book, divided by pages. System saving the place of the last page read, allows you to conveniently read the book "Ideas for Organic Gardening & Urban Gardening" online for free, without having to search again every time where you left off. Put a bookmark, and you can go to the page where you finished reading at any time.
Font size:
Interval:
Bookmark:
More Great Reading from Jack Pollard: Visit My Book Listings Page
"To get more ideas and tips just click the link below to visit my website..." Jacks-Website.com
LEGAL NOTICE
The Publisher has strived to be as accurate and complete as possible in the creation of this report, notwithstanding the fact that he does not warrant or represent at any time that the contents within are accurate due to the rapidly changing nature of the Internet.While all attempts have been made to verify information provided in this publication, the Publisher assumes no responsibility for errors, omissions, or contrary interpretation of the subject matter herein. Any perceived slights of specific persons, peoples, or organizations are unintentional.In practical advice books, like anything else in life, there are no guarantees of income made. Readers are cautioned to reply on their own judgment about their individual circumstances to act accordingly.This book is not intended for use as a source of legal, business, accounting or financial advice. All readers are advised to seek services of competent professionals in legal, business, accounting and finance fields.Copyright 2012 by Jack Pollard Jacks-Website.com All rights reserved. No Part of this book may be reproduced in any matter including reselling for a profit without the written permission of the publisher.Table of Contents
Tools Needed Power Chop SawPower Drill or Cordless DrillRulerSand paper1 black markerPencilSpeed square1/8 inch drill bit1 pound of 1 5/8 inch exterior screwsJust a Notice The tool lists will apply to all plant stand plans; now you will find some of the sentences will have been repeated. The only change is the size of board cuts based on the planter box. When it comes to making projects with wood the basic steps to make that box are the same.Please read all safety instructions when using power tools. Using a chop saw can be dangerous if you do not take the time to read the owners manual. Chop Saw Setup for Double Beveled Cutting You will need to use a chop saw to make these cuts at a double beveled 5 degree angle. It is not as hard as it sounds once you get a feel for it. As seen in the picture below, set your shop saw at 5 degrees to the right and lock it in place; this is the first step.
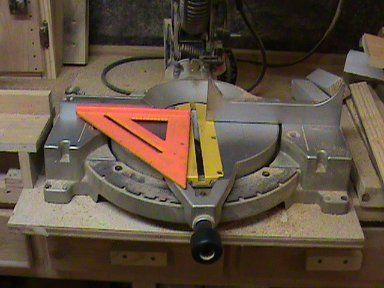 As shown in the pictures below, set your shop saw at 5 degrees beveled; this is the second step. Once done, leave your saw at these angles then make your cuts for - four of the 2 x 2 x 24 leg supports.
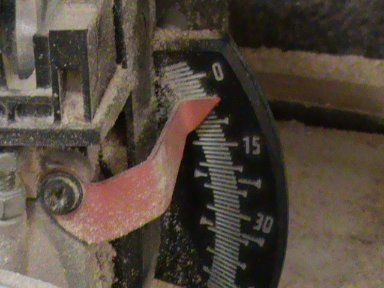
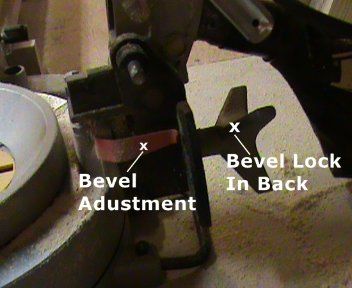
The bevel lock is located on the back of most chop saws; the bevel numbers are on the side as well. Check your saw to see where the adjustments are located.
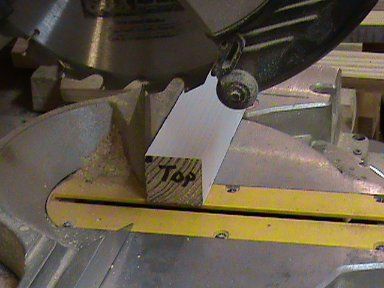
Place your 2x2 and make the first cut; after making the first cut leave the 2x2 leg in place and mark it with a black marker as seen in the picture below. You will need to mark all four of the leg supports like this.
 All four of the little black dots will face to the inside of the 2x2 leg; this means that this part of the leg will be on the inside of the stand as seen in the picture below. There will be more details within each planter support plan.
 In my shop I have a straight rail next to my chop saw with a fence; the rail is on the left side. By having the fence and rail on it you can use a stop block; using this stop block means that all of your cuts will be the same.
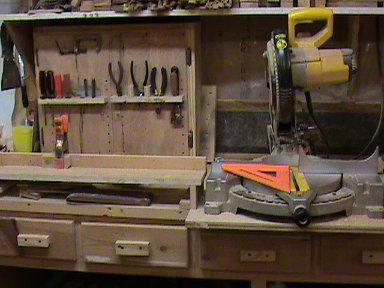
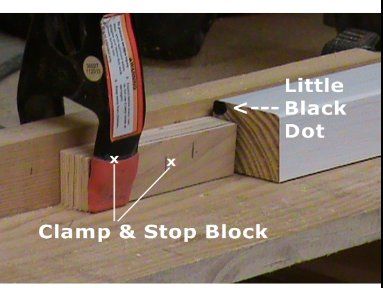 Once the first cut is made slide the board down to your stop block as seen in the picture above. Do not flip or turn the board at all; if you do flip or turn the board the cut will be wrong and you will have problems putting the stand together.
1x4 and 1x2 Chop Saw Setup Set your chop saw at 5 degrees only with no bevel as seen in the two pictures below. You will need to leave the shop saw at this setting.
As you can see in the picture below, the shop saw is set at zero bevel.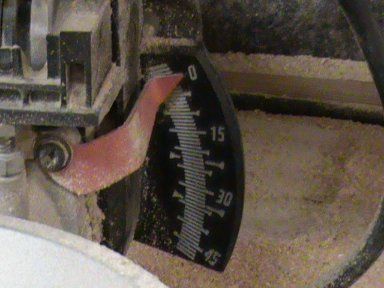
Optional - Double Sided Cedar Planting Boxes This planter box will fit the planter stand that is mentioned in chapters 1, 2 and 4 just follow the directions below. In , there are some notes for making this side planting box, read them before starting.
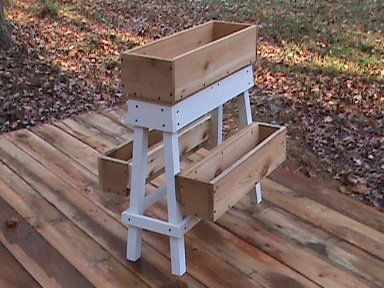 You can add these two smaller planting boxes for maximum plant growth. Both side planters measure at 24 inches long and are about 6 inches wide at the top. I do recommend adding planters on both sides; if you have any small children around they might be able to pull on it if there is only one side planter added. This is the only plant stand that I recommend adding both side planting boxes to in chapter 4 of this book.The material cuts listed below are for two of the side planter boxes. Wood Needed Two 1x6x 8 foot long cedar or pine, this is your choice.One 1x4x8 foot long cedar pine, this is your choice. Board Cuts You will need two boards that are 1x 6 x 23 long which will be the back of the planter.You will need two boards that are 1x 4x 23 long for the bottom.You will need two boards that are 1x 4x 24 3/4 long to secure the planters to the stand.You will need two boards that are 1x 6x 24 3/8 long for the front.You will need four boards that are 1x6x 4 5/8 long for the ends.
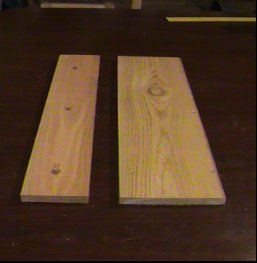
Step 1:Take one of each of the 1x6x23 and 1x4x23 inch long pieces. Drill three 3/8 or holes in the 1x4x23 inch long piece as seen on the left board in the picture below.
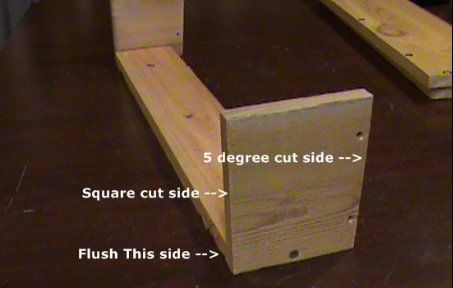
 Step 2:Take the 1x6x4 5/8 and cut at a 5 degree angle; also predrill the hole for the 1 5/8 screws as shown in the picture below.
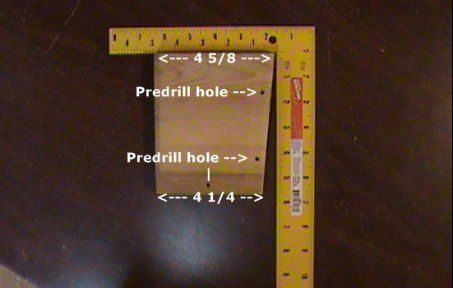
Step 3:Now take the two end pieces and attach them to the 1x4x23 bottom. Make sure to flush the front side with the square cut side as seen in the picture below.
 Next page
Font size:
Interval:
Bookmark:
Similar books «Ideas for Organic Gardening & Urban Gardening»
Look at similar books to Ideas for Organic Gardening & Urban Gardening. We have selected literature similar in name and meaning in the hope of providing readers with more options to find new, interesting, not yet read works.
Discussion, reviews of the book Ideas for Organic Gardening & Urban Gardening and just readers' own opinions. Leave your comments, write what you think about the work, its meaning or the main characters. Specify what exactly you liked and what you didn't like, and why you think so.