Copyright 2005 Filipacchi Publishing USA, Inc. First published in the United States of America by Filipacchi Publishing 1633 Broadway New York, NY 10019
Womans Day Specials and
Womans Day Special Interest Publications are registered trademarks of Hachette Filipacchi Media U.S, Inc. All rights reserved. No part of this book may be reproduced or transmitted in any form or by any means, electronic or mechanical, including photocopying, recording or by any information storage and retrieval system, without permission in writing from the publisher. First eBook Edition: February 2010 ISBN: 978-1-933231-83-9
 DECORATING A HOME IS ABOUT
 finding personal styledefining an environment that sustains your spirits and reflects who you are and what you value. It is not so much an exercise in creating a certain look or style as it is a process of self-discovery.
When faced with the blank slate of an empty room or one thats loaded down with layers of unrelated furnishings, choosing the ingredients for a tasteful space and figuring out how to put them together can be bewildering. But breathing life into a stale or empty room doesnt have to involve an expensive overhaul. An honest assessment of your daily routines and some judicious editing of the things you have can yield fresh insight into how to build character into your rooms. When you preserve only what is important and conscientiously add what is missing, you create a room that is as practical as it is comfortable and pleasing to the senses. Turning your attention toward refinishing an old table, repurposing an unmatched shutter, or creating a cluster of comfortable cushions rewards you not just with the pleasure of adding new, useful, and attractive elements to your room, but also gives you the satisfaction that creative self-expression brings. Such resourcefulness also helps you save money.
If improving your rooms on a budget is your goal, the years worth of weekend projects in this book is sure to provide the help and inspiration youll need to achieve it.
 WANT TO BREAK FREE OF A
 cookie-cutter look in your rooms? Then liven up the atmosphere with a one-of-a-kind piece of furniture. If you craft it yourself, a made-to-order table or dresser wont just make a personal statementit will save you a bundle, too. You dont necessarily need a workshop full of tools to create a customized piece. Many of the projects on the pages that follow require little more than a paintbrush or a pair of scissors and a staple gun to complete. You can make some of them using items you may already have on handor can easily find at a flea market or salvage shop.
Others can be fashioned from scratch using low-cost staples like wallpaper remnants or lattice strips. Its easy to add some cheer to a kitchen by simply reupholstering old barstools or to freshen a family room by resurfacing a tired side table. You can also redefine a dining room or give a bedroom a whole new look with more substantial pieces, like a crackle-finished sideboard or a brand-new headboard. Whether your style is cool and contemporary, down-to-earth country, traditional or dyed-in-the-wool romantic, theres a project here for you. Painted Decoupage Dresser [SKILL LEVEL: BEGINNER]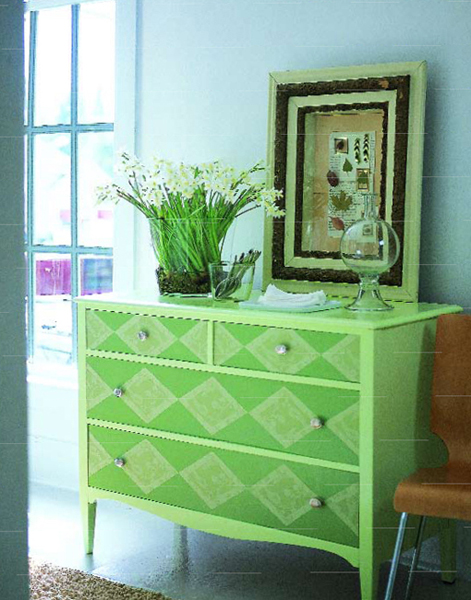 MATERIALS dresser screwdriver 180-grit sandpaper tack cloth primer paintbrushes semigloss latex paint in two colors tape measure wallpaper scissors liquid adhesive or all-in-one sealer foam brush satin polyurethane DIRECTIONS Remove drawers from dresser. Using screwdriver, remove drawer hardware.
Sand dresser to smooth previous paint or finish, and wipe off dust with tack cloth. Apply a coat of primer. Let dry. Apply two coats of the lighter shade of paint to the dresser, letting dry between coats. Apply two coats of the darker shade of paint to the drawers, letting dry between coats. Measure height and width of drawers.
The width of the wallpaper diamond patterns should equal width of drawers, height should equal height of drawer. Note:The top of our unit contains two drawers that are shorter than the bottom drawers. For consistency, we cropped the diamonds on the top level to align with the patterns on the lower drawers. Measure, mark, and cut four diamonds of wallpaper for each drawer. Cut one diamond for each row in half to position at ends of drawers. Prior to applying cutouts, lay them on the drawer front, centering one diamond, flanking it by two others, and placing the cut halves of one diamond on the ends. Use foam brush to apply adhesive to back of cutouts.
Position cutouts in place on drawer fronts and hold several minutes, smoothing out bubbles. Let dry. Apply a coat of polyurethane to drawer fronts. Reattach hardware. Country Sideboard [SKILL LEVEL: BEGINNER]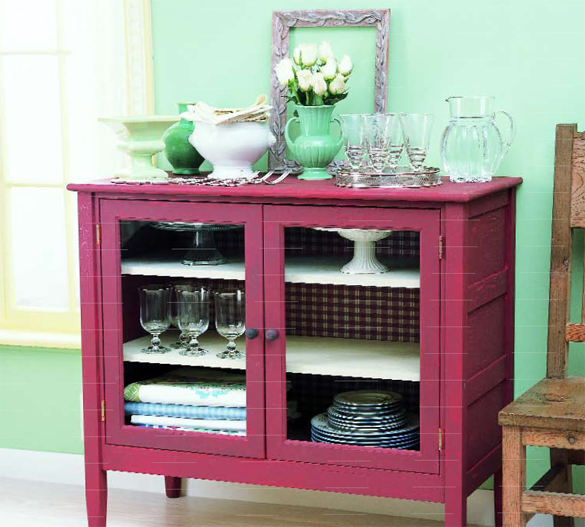 MATERIALS glass-doored sideboard or hutch 180-grit sandpaper tack cloth disposable plastic plates acrylic paint in yellow, red, cream and burgundy 2-inch foam brushes crackle medium checked contact paper, wrapping paper or wallpaper remnant pencil craft knife metal ruler spray glue adhesive satin interior varnish foam brush satin polyurethane DIRECTIONS Remove shelves and glass from doors of sideboard or hutch. Sand inner and outer surfaces and both sides of shelves lightly, then remove dust with tack cloth.
Pour yellow and red paints (or the paint colors of your choice) onto separate plates. Using foam brush, paint shelves yellow. Let dry. Paint rest of cabinet, except for inside back, red. Pour crackle medium onto plate. Let dry. Let dry.
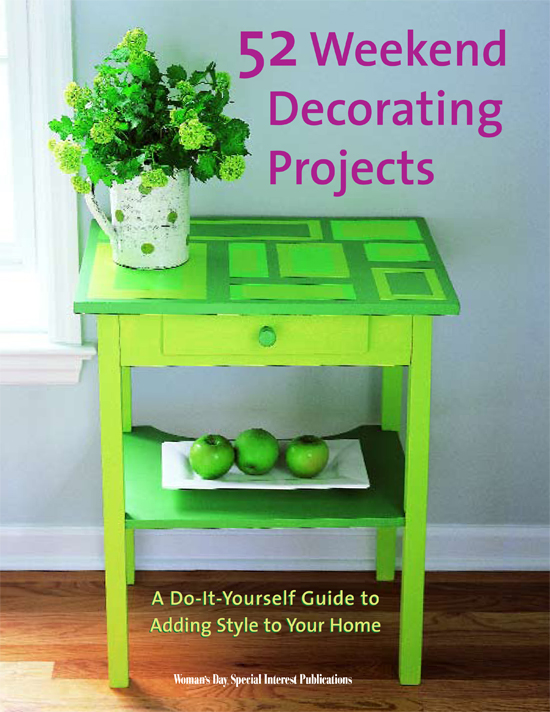
Pour cream and burgundy paints (or the paint colors of your choice) onto separate plates. Paint shelves cream, and the sideboard, except for inside back, burgundy. Let dry. Using a pencil, metal ruler and craft knife, measure, mark, and cut wallpaper or other paper to fit interior back of sideboard; apply spray glue to back of paper and press into place in back of cabinet, carefully smoothing to avoid wrinkles. Varnish the entire cabinet, except for the papered surface, to finish. Bold Table [SKILL LEVEL: BEGINNER]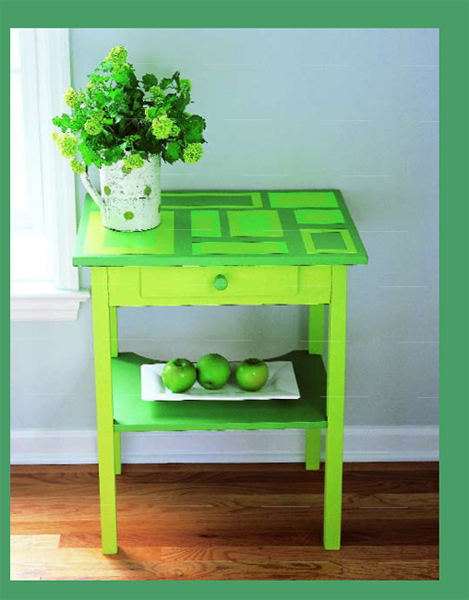 MATERIALS table screwdriver 180-grit sandpaper tack cloth acrylic paint in three shades of green paintbrushes 1-inch-wide painters tape acrylic sealer DIRECTIONS If table has a drawer, remove it.
Using screwdriver, remove drawer hardware. Sand table; wipe off dust with tack cloth. Apply two coats of lightest paint to sides, legs, and drawer front. Apply two coats of darkest paint to top, shelf, and drawer pull. Let dry. Apply 1-inch-wide tape along outer edges of tabletop.
Apply tape across tabletop to form rectangles in assorted sizes. Paint insides of some rectangles with medium-tone paint; paint remaining rectangles with light paint. Remove tape while paint is wet. Let rectangles dry. Apply tape near edges of each rectangle to create irregular borders between inch and 1 inches wide. Paint borders to contrast with center of rectangle.





 DECORATING A HOME IS ABOUT finding personal styledefining an environment that sustains your spirits and reflects who you are and what you value. It is not so much an exercise in creating a certain look or style as it is a process of self-discovery.
  WANT TO BREAK FREE OF A cookie-cutter look in your rooms? Then liven up the atmosphere with a one-of-a-kind piece of furniture. If you craft it yourself, a made-to-order table or dresser wont just make a personal statementit will save you a bundle, too. You dont necessarily need a workshop full of tools to create a customized piece. Many of the projects on the pages that follow require little more than a paintbrush or a pair of scissors and a staple gun to complete. You can make some of them using items you may already have on handor can easily find at a flea market or salvage shop.
  MATERIALS dresser screwdriver 180-grit sandpaper tack cloth primer paintbrushes semigloss latex paint in two colors tape measure wallpaper scissors liquid adhesive or all-in-one sealer foam brush satin polyurethane DIRECTIONS Remove drawers from dresser. Using screwdriver, remove drawer hardware.
 MATERIALS glass-doored sideboard or hutch 180-grit sandpaper tack cloth disposable plastic plates acrylic paint in yellow, red, cream and burgundy 2-inch foam brushes crackle medium checked contact paper, wrapping paper or wallpaper remnant pencil craft knife metal ruler spray glue adhesive satin interior varnish foam brush satin polyurethane DIRECTIONS Remove shelves and glass from doors of sideboard or hutch. Sand inner and outer surfaces and both sides of shelves lightly, then remove dust with tack cloth.
 MATERIALS table screwdriver 180-grit sandpaper tack cloth acrylic paint in three shades of green paintbrushes 1-inch-wide painters tape acrylic sealer DIRECTIONS If table has a drawer, remove it.