

Planting Containers
As soon as youve prepared your containers , its time to plant them up. It really is a good idea to decide on the location for each container first before you plant them because youll find larger ones very difficult to move once they are filled with potting mix.
What you need
- Container
- Drainage material
- Potting mix (suitable for the type of planting)
- Moisture-retaining granules
- Selection of plants
- Slow-release, general-purpose fertilizer pellets
Perfect potting
From experience, Ive found that its best to plant containers in the early morning or late afternoon when its a little cooler. I give the plants plenty of water and some suitable plant food when planting.
1 Put some drainage material over the holes and then fill the container one-third to two-thirds full with potting mix. Saturate the mix with water. You can also add moisture-retaining granules, which will absorb and gradually release water.
2 Carefully remove the plants from their pots, gently teasing the roots apart, and place them in the container. Make sure that the tops of the rootballs are below the rim of the pot. Avoid packing plants right up to the rim and arrange them in different ways until you find the composition you like best.
3 Fill in the gaps between the plants with more potting mix and firm down gently, leaving about 1in (2.5cm) at the top so that you can water the plants easily. Container- grown plants are under stress to produce flowers in a small space and quickly use up the nutrients in the potting mix. So, mix some fertilizer pellets into the top of the mix (according to the manufacturers instructions) to release nutrients throughout the growing period.
4 Give the container a really good watering again. Remember to water daily in summer until water runs out of the drainage holes.
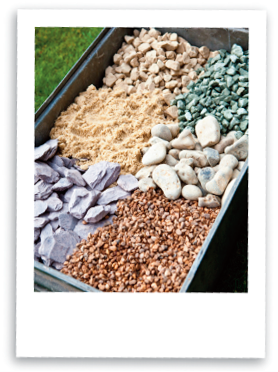
Give your pots a finished look Add a mulch of slate, gravel, pebbles, shells, stone chippings, moss, or sand to give your container a more finished look. These decorative mulches also stop water evaporating too quickly from the container in hot weather.
Aftercare
Container-grown plants are more prone to the effects of cold and drought, for example, than garden plants, but a regular maintenance routine, particularly during the growing season, will ensure your plants put on a spectacular show.

Watering
Regular watering is the most important task for any gardener, so remember to water your plants daily from late spring to early fall. You may even have to water twice a day in very hot weather. You can use either a watering can or a garden hose, if you have an outdoor faucet (tap). Look out for useful attachments that fit on a kitchen or bathroom faucet (tap) if you are happy to run the hose through an open window. Of course, installing an automatic irrigation system to drip water at set times into your containers is another solution if you find watering a real chore. Also available are self-watering containers and adjustable water reservoirs that turn ordinary pots into self-watering planters.
Feeding
After watering, feeding is another crucial aspect of container growing. The nutrients in soil-less potting mixes will last for a month or so, while those in soil-based potting mixes should last for around two months. After these time periods, youll need to start watering in a diluted liquid general-purpose fertilizer (according to the manufacturers instructions) every week or two. Feed during the growing season (i.e. from mid-spring to early fall) and not during the winter. You can also add some slow-release general-purpose fertilizer pellets on planting that will last the growing season. Note that there are specially formulated fertilizers for specific plants such as roses and tomatoes, which have a different balance of nutrients to promote better flowering or fruiting.
Repotting, top-dressing, and potting on
You may be using the same containers for a number of displays each year, once for spring bulbs and then again for summer bedding plants or seasonal crops. Its a good idea to replace the potting mix completely when you replant each container. However, I suggest that you simply top-dress plants such as small trees and shrubs that you are growing permanently in a container instead of repotting them completely. To do this, remove about 2in (5cm) of the potting mix from the top of the container and replace it with new potting mix. Of course, if your plant has outgrown its pot, then youll need to pot it on to a larger container.

Dead-heading
Try to get into the habit of removing spent flowers and old leaves regularly, a process known as dead-heading. Not only does this keep your container displays looking tidy and encourage further flowering, but it also helps reduce the prevalence of pests and diseases that can linger in dead flowers and leaves.
Winter protection
Permanent plants are vulnerable to severe frosts, so move any containers with long-term occupants to a sheltered position. You can buy special container protectors for really sensitive plants,which will help insulate them against the cold.
Pests and diseases
Various pests and diseases can be a problem for balcony gardeners in spite of their elevated position. Aphids and grey mold are both common problems, while some pests and diseases will attack particular vegetables and fruits. For ornamental plants, try using a spray bottle (clearly labeled) with diluted insecticide or a diluted solution of water and dish-washing detergent to control aphids. Where possible, use organic pesticides, insecticides, and fungicides. In severe cases, you may have to dispose of the affected plant altogether. If you dont want to use any chemicals at all on flowers or crops, use organic methods of pest control such as companion planting: for example, try growing marigolds with tomatoes and borage with strawberries to deter particular pests.
taking stem cuttings Propagate shrubs and herbaceous plants by taking stem tip cuttings. Take the cuttings from the tips of the plant's stems (a length of 4in/10cm is sufficient). Trim the cuttings just below a leaf node and remove all the side shoots and leaves, apart from two at the top. Dip the ends of the cuttings into hormone rooting powder and insert into a small pot of potting mix. Water well and cover with a plastic bag secured with an elastic band or the cut-off bottom of a plastic drinks bottle. Keep on a windowsill while your cuttings take root.

Seasonal Care
One of the advantages of container gardening in a small urban space is that you have only a relatively limited area to maintain . You dont want those all-important seasonal tasks to become a chore, so try to regard caring for your plants as a means of relaxing and unwinding .
Next page
