ISBN 978-1-4950-3021-5
7777 W. Bluemound Rd. P.O. Box 13819 Milwaukee, WI 53213
Copyright 2008 by HAL LEONARD
International Copyright Secured All Rights Reserved
In Australia Contact:
Hal Leonard Australia Pty. Ltd.
4 Lentara Court
Cheltenham, Victoria, 3192 Australia
For all works contained herein:
Unauthorized copying, arranging, adapting, recording, Internet posting,
public performance, or other distribution of the printed or recorded music
in this publication is an infringement of copyright.
Infringers are liable under the law.
Visit Hal Leonard Online at
www.halleonard.com
Contents
Before You Begin
ABOUT THIS METHOD
Welcome to the Hal Leonard Classical Guitar Method. This book will give you a step-by-step approach to the basic techniques of playing the classical guitar and present in a practical way certain fundamentals, such as music reading and harmony, that any novice guitarist needs to learn. Keep in mind that these beginning stages of your playing are most important, as they lay the groundwork of your future success in music. It is recommended that you carefully practice each section of this book in its presented order, as one technique or concept will lead into the next. Listening to the audio tracks included with this book will give you a clear idea of how each exercise or song should sound, which will in turn help teach your ear to teach your fingers. Finally, while this method will present the essential concepts that a beginning guitarist must have, it is advisable to seek the help of a well-trained, experienced teacher who will be able to guide you through your individual learning situations.
WHAT IS CLASSICAL GUITAR?
Learning to play the classical guitar does not necessarily mean playing classical music. It does mean learning to play the guitar in the classical tradition that has been developed for centuries and continues to evolve. As a classical guitar student you will learn to play solo guitar music with melody and accompaniment simultaneously, just as a solo pianist would play. You will learn the techniques to play simple accompaniment parts or more complex music with two, three, or four distinct melodies or parts at the same time, allowing you to play the music of the great master composers, as well as many other styles. It is the approach, not the music, which makes one a classical guitarist. Most exciting about studying the classical guitar is that you are using the methods and techniques that have been refined over the centuries by some of the greatest guitarists who have ever lived.
DO I NEED A CLASSICAL GUITAR?
While you can begin to learn the classical guitar with a steel-string acoustic instrument, a beginner will find the traditional classical guitar easier to play. The nylon strings can be pressed with less effort, and the extra space between the strings gives both hands a little more room to maneuver. Classical guitars are made to play more intricate music. They have a smaller body and are more sensitive to the varieties of color, dynamics, and tone, which you will want to include in your playing.
Sitting Position
The sitting position is very important. It allows your hands to work freely and your guitar to remain stable. Beginning guitarists must always strive for a proper, balanced sitting position. Keep in mind that it is nearly impossible to develop a good technique without it.
You will need either a straight-back chair with no arms or a bench. The seat should be flat and horizontal to the ground. You will also need a footstool that can be adjusted between four and eight inches in height depending on your physique. Instead of a footstool, some guitarists use a cushion or another device which props up the guitar on their left leg; however, for beginning guitarists, it is probably most convenient to work with a footstool.
What to Watch for
- Relaxed shoulders
- The head of the guitar should be about eye levelyour footstool will help elevate this to the proper level
- Relaxed left elbow hanging naturally from the neck; rest your right forearm on the guitar allowing the right hand to fall naturally over the sound hole
- Left foot on footstool
This is a lot to remember at first. The important thing is to be relaxed. Review the preceding illustrations frequently as you progress with your playing. You may find yourself unknowingly changing some of these basic concepts as time goes by.
Because every persons body is different, every guitarist will have some variation in his or her sitting position. It takes a little thought and patience to find what works best for you.
Tuning
The tension of each string on your guitar needs to be adjusted properly so that they sound at the correct pitch when played. Tuning quickly and accurately is a skill that may take a while to learn. So while you are mastering this skill, consider using a battery-operated electronic tuner. They are a small investment and will save you a lot of time and frustration in the early stages of learning. The electronic tuner will hear each string as you play it and indicate whether the pitch should be raised or lowered. However, it is a good idea to practice your relative tuning as described below a little bit every day before you turn to the tuner. This will help develop your ear and your ability to tune without the tuner.
RELATIVE TUNING
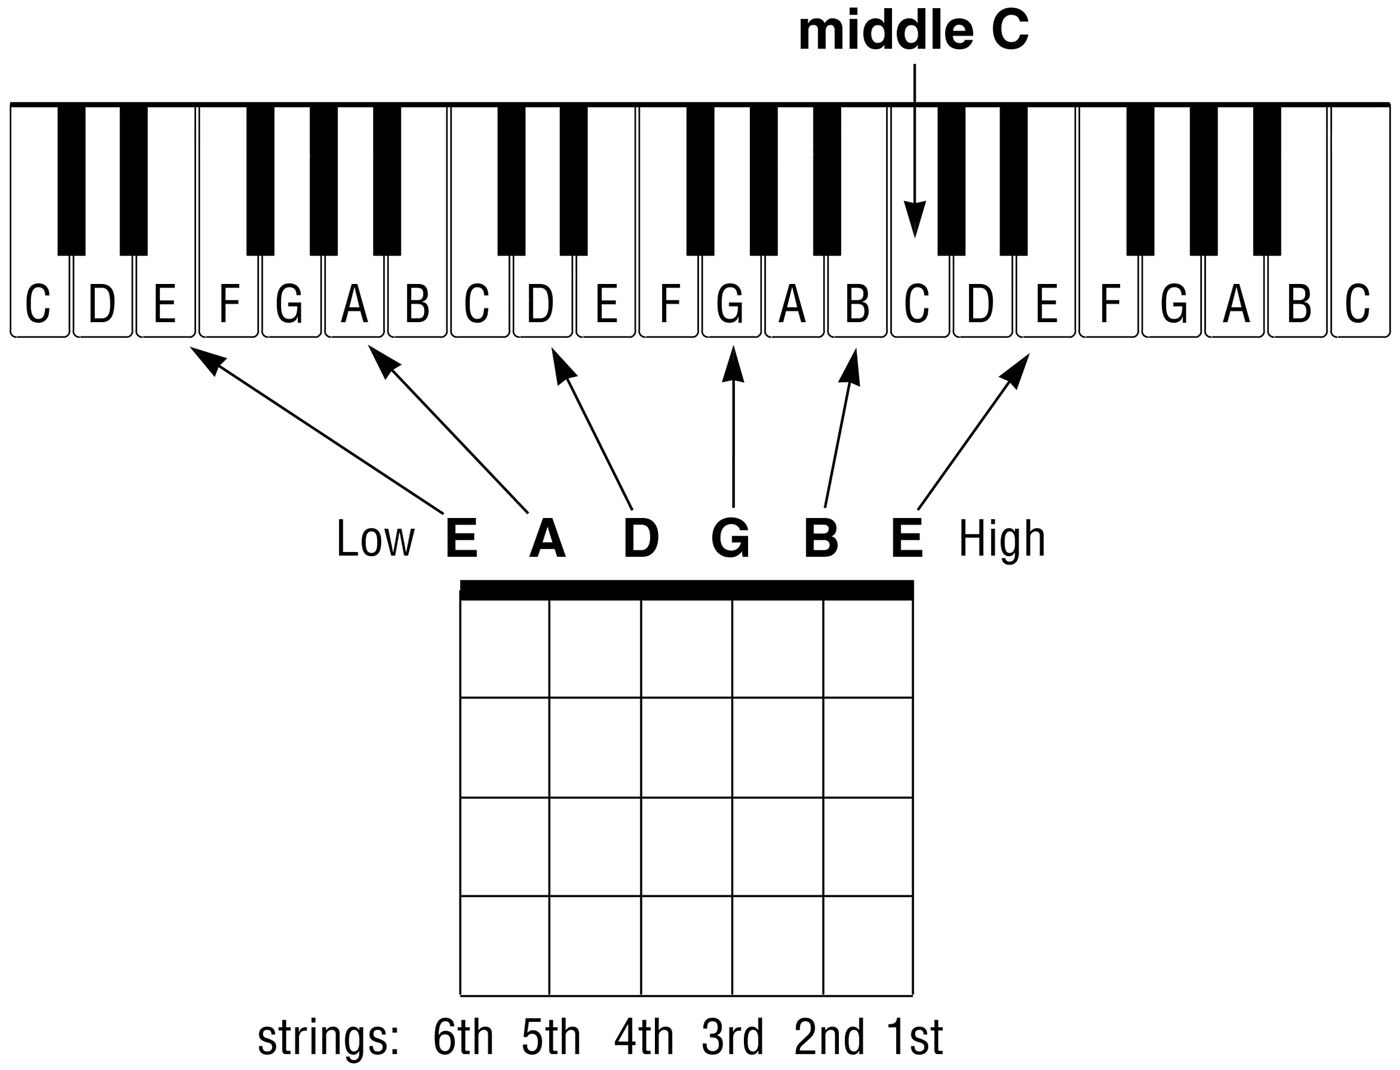
With relative tuning you will tune each string in relation to each other. Your guitar will then be in tune with itself, which is fine for playing and practicing, however you will not necessarily be in tune with the universally-accepted musical pitch, which is fixed at A440 (meaning that the A note will vibrate at 440 vibrations per second). So before you start relative tuning, it is a good idea to match at least one string to the universal standard. Do this by tuning your low E to the correct pitch obtained from an electronic tuner, pitch pipe, tuning fork, keyboard, or the audio tuning track which comes with this method. The keyboard notes for all the open strings are illustrated here.
Assuming that your low E string is in tune, follow these steps:
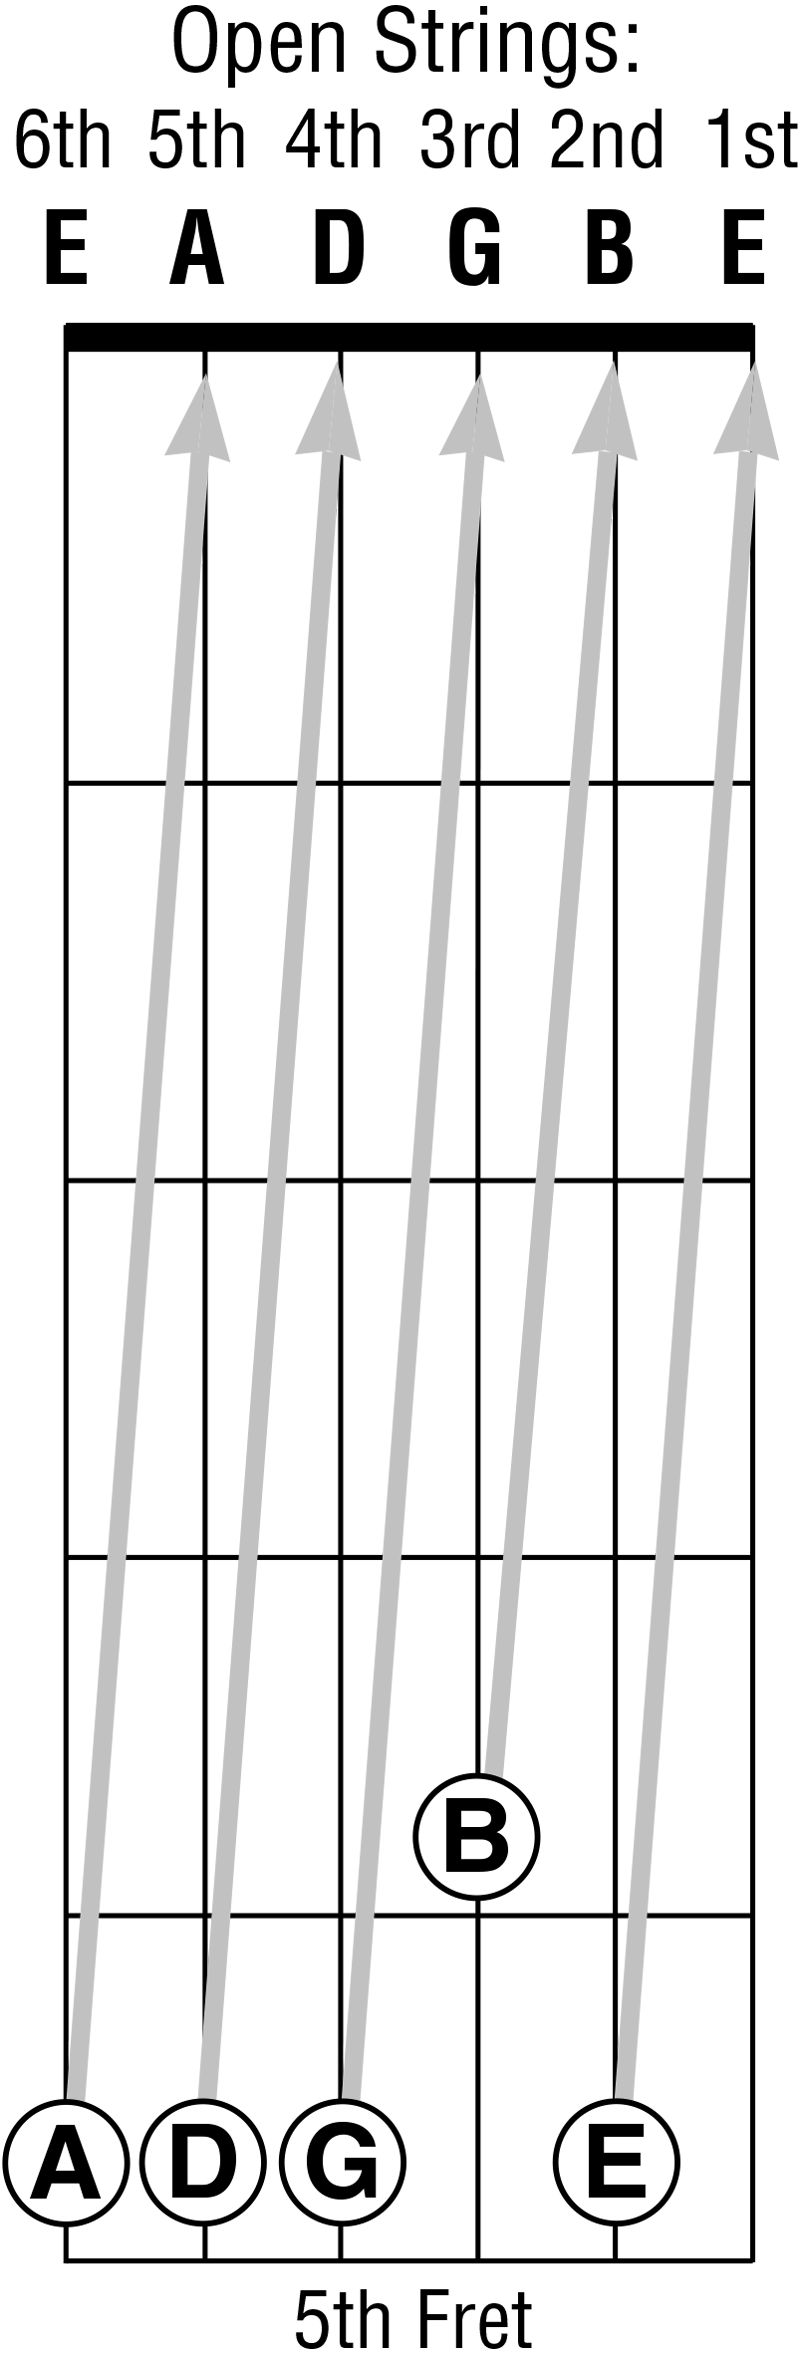
- Depress the low E string behind the 5th fret as shown in the adjacent diagram. Play and listen to this pitch, which is the note A. Adjust the open A or 5th string higher or lower as needed until it sounds the same (or in unison) with the fretted A on the 6th string.

