Page List
A KNITTERS GUIDE TO
Shawl Design
A KNITTERS GUIDE TO
Shawl Design
Emma Vining

First published in 2021 by
The Crowood Press Ltd
Ramsbury, Marlborough
Wiltshire SN8 2HR
www.crowood.com
This e-book first published in 2021
Emma Vining 2021
All rights reserved. This e-book is copyright material and must not be copied, reproduced, transferred, distributed, leased, licensed or publicly performed or used in any way except as specifically permitted in writing by the publishers, as allowed under the terms and conditions under which it was purchased or as strictly permitted by applicable copyright law. Any unauthorised distribution or use of this text may be a direct infringement of the authors and publishers rights, and those responsible may be liable in law accordingly.
British Library Cataloguing-in-Publication Data
A catalogue record for this book is available from the British Library.
ISBN 978 1 78500 964 8
Cover design: Maggie Mellett
ABBREVIATIONS AND CHART SYMBOLS
Abbreviations
decd: decreased
incd: increased
k: knit
k2tog: knit the next two stitches together (1st decd)
k2tog-tbl: knit the next two stitches together through the backs of their loops (1st decd)
k3tog: knit the next three stitches together (2sts decd)
m1 and m1l: make one and make one left make 1 stitch by bringing the tip of the left-hand needle from front to back under the strand of yarn running between the stitches sitting closest to the tips of the left- and right-hand needles and then knitting through the back of this loop (1st incd)
m1r: make one right make 1 stitch by bringing the tip of the left-hand needle from back to front under the strand of yarn running between the stitches sitting closest to the tips of the left- and right-hand needles and then knitting this loop (1st incd)
mrk: stitch marker
p: purl
p2tog: purl the next two stitches together (1st decd)
p2tog-tbl: purl the next two stitches together through the backs of their loops (1st decd)
p3tog: purl the next three stitches together (2sts decd)
patt: pattern, work in pattern
pm: place marker
psso: pass slipped stitch over, often worked as a part of a decrease such as sl1, k2tog, psso or sl1, p2tog, psso
rep: repeat
RS: right side or right-side
sk2po: slip 1st, k2tog, pass slipped st over slip the next stitch from the left-hand needle to the right-hand needle knitwise, knit the next two stitches together (k2tog), and pass the slipped stitch over the first stitch on the right-hand needle (2sts decd)
sl1: slip one stitch (purlwise) slip the next stitch from the left-hand needle to the right-hand needle purlwise, unless working the slipped stitch as part of a sl1, k2tog, psso decrease, in which case slip this stitch knitwise
sl1 wyif: slip one stitch (purlwise) with yarn in front (wyif) slip the next stitch from the left-hand needle to the right-hand needle purlwise while the yarn is held at the front of the work
sl2: slip two stitches (knitwise) slip the next 2sts from the left-hand needle to the right-hand needle, one at a time, knitwise
SR(s): short row(s) or short-row
ssk: slip, slip, knit slip the next 2sts from the left-hand needle to the right-hand needle, one at a time, knitwise; insert the left-hand needle into the fronts of these 2sts at the same time; knit these 2sts together through the backs of their loops (k2tog-tbl) (1st decd)
st(s): stitch(es)
w&t: wrap and turn, used with short-row (SR) shaping; a stitch is wrapped to avoid a gap remaining in the knitting where each short row is worked. This wrapping action is known as wrap and turn. To wrap a stitch, knit to the stitch to be wrapped; slip the next stitch purlwise; take the yarn to the back of the work; slip the slipped stitch back to the left-hand needle purlwise without working it; take the yarn to the front of the work; and turn the work. When the wrapped stitch is reached on the subsequent row, work the wrap loop and the wrapped stitch together, to close the gap between the wrapped stitch and the adjacent stitch
WS: wrong side or wrong-side
wyif: with yarn in front
yo: yarn over take the yarn over the right-hand needle from front to back (1st incd)
yo twice: yarn over twice take the yarn over the right-hand needle twice, and, on the next row, work k1, p1 (or p1, k1, as required for pattern) into the double-yarn-over loop (2sts incd)
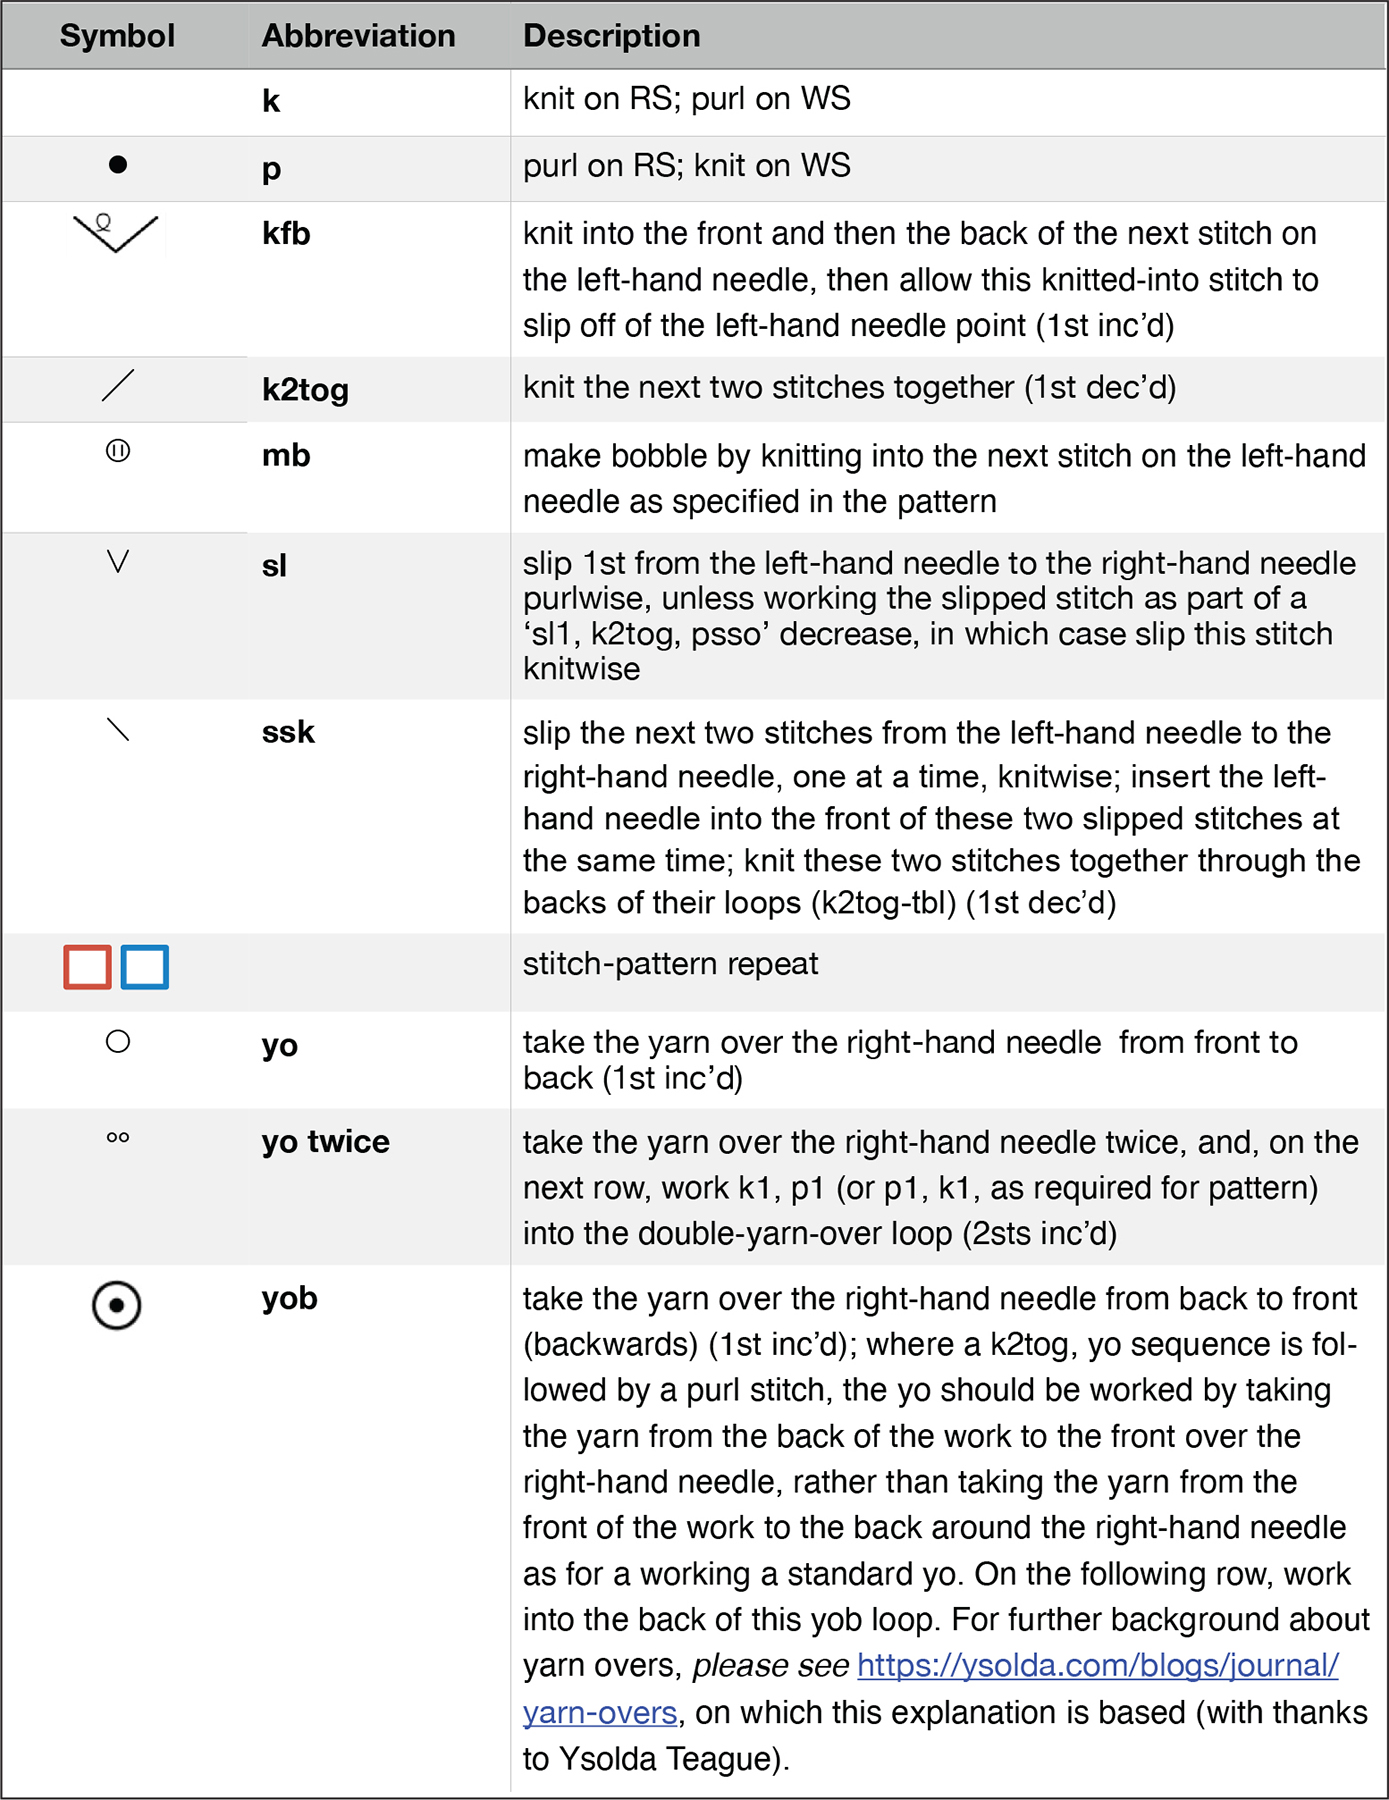
Table of chart symbols.
INTRODUCTION
As a hand-knitting designer, I am fascinated by pattern. My favourite patterns are inspired by the world around me, from nature to the built environment. I capture my ideas through sketches and photographs and use these to help me design knitting stitch patterns. Shawl design is the perfect framework in which to place my designs and to explore stitch patterning through the creation of a beautiful, wearable accessory. There are several complete knitting patterns in this book, with full explanations of how the designs were developed through my design process. However, there is so much joy to be found in creating and customizing designs to suit your own preferences. I encourage you to experiment and explore. In this book, my aim is to inspire you to look for your own design source material and to help you to translate your designs into personalized shawls that can be worn, gifted and treasured.
Each chapter throughout this book contains my photographs and sketches of inspirational sources. Examples include archive research, architecture, infrastructure and decorative ironwork. These sources are used to develop ideas for shawl shapes and stitch patterns. Alongside the inspiration, practical advice includes instructions detailing how to knit individual shawl shapes, building up to working with complex combinations of multiple shapes and stitch patterns. With the emphasis on design development, each section contains examples of how different factors affect shawl design. For example, choosing a different yarn fibre can transform a design.
In of this book, shawl design is put in a historical context, with illustrations from the Knitting and Crochet Guild (KCG) Collection. By taking a close look at shawls knitted in a variety of what can be considered traditional styles, we can see that knitters have always made their own additions and alterations to established design conventions. Building on these fascinating examples, the next section explores a variety of techniques and tools required for knitting shawls, before going on to consider the effect of using different yarn weights and fibres, and to look at options for edgings and borders.

