Device Management: The Linux Boot Process
Unless you end up working exclusively with virtual machines or on a cloud platform like Amazon Web Service, youll need to know how to do techie things like putting together real machines and swapping out failed drives. However, since those skills arent part of the Linux Professional Institute Certification (LPIC) exam curriculum, I wont focus on them in this book. Instead, Ill begin with booting a working computer.
Whether youre reading this book because you want to learn more about Linux or because you want to pass the LPIC-1 exam, you will need to know what happens when a machine is powered on and how the operating system wakes itself up and readies itself for a day of work. Depending on your particular hardware and the way its configured, the firmware that gets things going will be either some flavor of BIOS (Basic Input/Output System) or UEFI (Intels Unified Extended Firmware Interface).
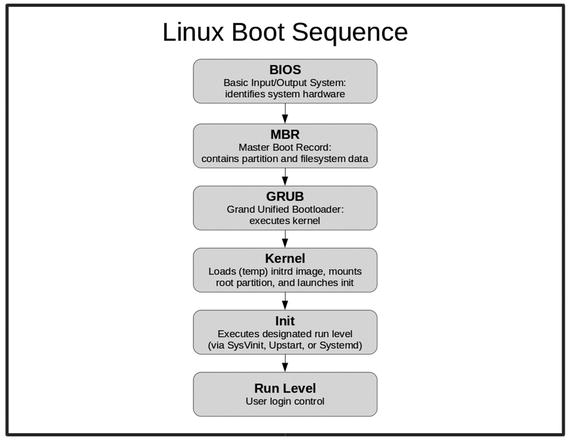
As illustrated in Figure , the firmware will take an inventory of the hardware environment in which it finds itself and search for a drive that has a Master Boot Record (MBR) living within the first 512 (or, in some cases, 4096) bytes. The MBR should contain partition and filesystem information, telling BIOS that this is a boot drive and where it can find a mountable filesystem.
Figure 1-1.
The six key steps involved in booting a Linux operating system.
On most modern Linux systems, the MBR is actually made up of nothing but a 512 byte file called boot.img. This file, known as GRUB Stage 1 (GRUB stands for GRand Unified Bootloader), really does nothing more than read and load into RAM (random access memory) the first sector of a larger image called core.img. Core.img, also known as GRUB Stage 1.5, will start executing the kernel and filesystem, which is normally found in the /boot/grub directory.
The images that launch from /boot/grub are known as GRUB Stage 2. In older versions , the system would use the initrd (init ramdisk) image to build a temporary filesystem on a block device created especially for it. More recently, a temporary filesystem (tmpfs) is mounted directly into memorywithout the need of a block deviceand an image called initramfs is extracted into it. Both methods are commonly known as initrd.
Once Stage 2 is up and running, you will have the operating system core loaded into RAM, waiting for you to take control.
Note
This is how things work right now. The LPI exam will also expect you to be familiar with an older legacy version of GRUB, now known as GRUB version 1. Thats GRUB version 1, mind you, which is not to be confused with GRUB Stage 1, 1.5, or 2! The GRUB were all using today is known as GRUB version 2. You think thats confusing? Just be grateful that they dont still expect you to know about the LILO bootloader!
Besides orchestrating the boot process, GRUB will also present you with a startup menu from which you can control the software your system will load.
Note
In case the menu doesnt appear for you during the start sequence, you can force it to display by pressing the right Shift key as the computer boots. This might sometimes be a bit tricky: Ive seen PCs configured to boot to solid state drives that load so quickly, there almost isnt time to hit Shift before reaching the login screen. Sadly, I face no such problems on my office workstation.
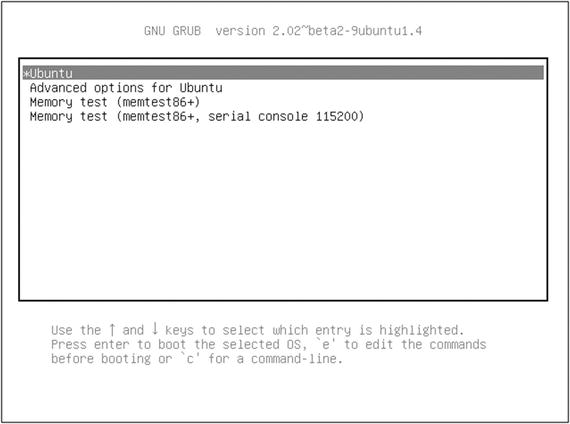
As you can see from Figure , the GRUB menu allows you to choose between booting directly into the most recent Ubuntu image currently installed on the system, running a memory test, or working through some advanced options.
Figure 1-2.
A typical GRUB version 2 boot menu
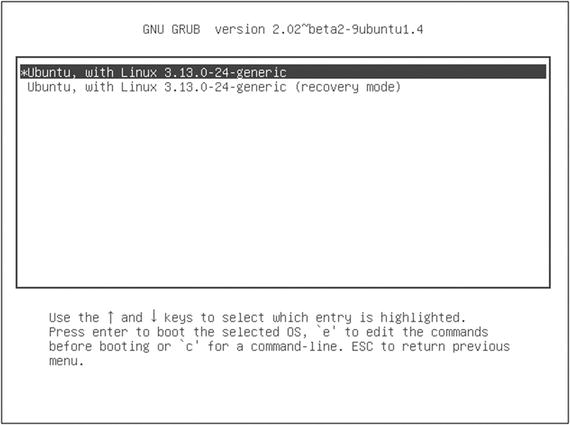
The Advanced menu (see Figure ) allows you to run in recovery mode or, if there happens to be any available, to select from older kernel images. This can be really useful if youve recently run an operating system upgrade that broke something important.
Figure 1-3.
A GRUB advanced menu (accessed by selecting Advanced options in the main menu window)
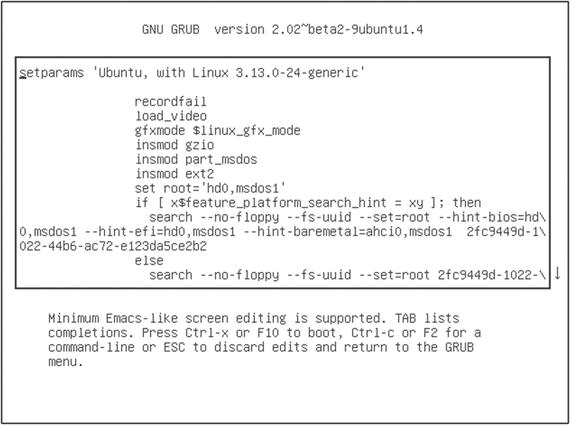
Pressing e with a particular image highlighted will let you edit its boot parameters (see Figure ). I will warn you that spellingand syntaxreally, really count here. No, really. Making even a tiny mistake with these parameters can leave your PC unbootable, or even worse, bootable, but profoundly insecure. Of course, these things can always be fixed by coming back to the GRUB menu and trying againand I wont deny the significant educational opportunities this will provide. But Ill bet that, given a choice, youd probably prefer a quiet, peaceful existence.
Figure 1-4.
A GRUB boot parameters page (accessed by hitting e while an item is highlighted in the main menu window)
Pressing c or Ctrl+c will open a limited command-line session.
Note
You may be interestedor perhaps horrifiedto know that adding rw init=/bin/bash to your boot parameters will open a full root session for anyone who happens to push the power button on your PC. If you think you might need this kind of access, I would advise you to create a secure BIOS or GRUB password to protect yourself.
Troubleshooting
Linux administrators are seldom needed when everything is chugging along happily. We normally earn our glory by standing tall when everything around us is falling apart. So you should definitely expect frantic calls complaining about black screens or strange flashing dashes instead of the cute kitten videos your user had been expecting.
If a Linux computer fails to boot, your first job is to properly diagnose the problem. And the first place you should probably look to for help is your system logs. A text record of just about everything that happens on a Linux system is saved to at least one plain text log file. The three files you should search for boot-related trouble are dmesg, kern.log, and boot.log, all of which usually live in the /var/log/ directory (some of these logs may not exist on distributions running the newer Systemd process manager).
Since, however, these logs can easily contain thousands of entries each, you may need some help zeroing in on the information youre looking for. One useful approach is to quickly scroll through say, kern.log, watching the time stamps at the beginning of each line. A longer pause between entries or a full stop might be an indication of something going wrong.
You might also want to call on some command-line tools for help. Cat will print an entire file to the screen, but often far too fast for you to read. By piping the output to grep, you can focus on only the lines that interest you. Heres an example:
cat /var/log/dmesg | grep memory
