• Complain

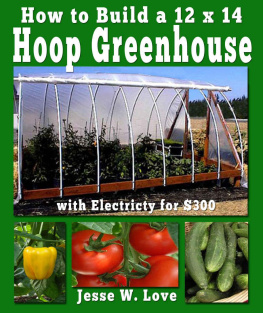
Love - How to Build a 12 x 14 Hoop Greenhouse with Electricity for $300

Here you can read online Love - How to Build a 12 x 14 Hoop Greenhouse with Electricity for $300 full text of the book (entire story) in english for free. Download pdf and epub, get meaning, cover and reviews about this ebook. City: Ashland, OR, year: 2013, publisher: Kaleidoscope Publications;CreateSpace Independent Publishing Platform;Kaleidoscope Productions, genre: Home and family. Description of the work, (preface) as well as reviews are available. Best literature library LitArk.com created for fans of good reading and offers a wide selection of genres:

Romance novel Science fiction Adventure Detective Science History Home and family Prose Art Politics Computer Non-fiction Religion Business Children Humor

Choose a favorite category and find really read worthwhile books. Enjoy immersion in the world of imagination, feel the emotions of the characters or learn something new for yourself, make an fascinating discovery.

Love How to Build a 12 x 14 Hoop Greenhouse with Electricity for $300
  • Book:
    How to Build a 12 x 14 Hoop Greenhouse with Electricity for $300
  • Author:
  • Publisher:
    Kaleidoscope Publications;CreateSpace Independent Publishing Platform;Kaleidoscope Productions
  • Genre:
  • Year:
    2013
  • City:
    Ashland, OR
  • Rating:
    5 / 5
  • Favourites:
    Add to favourites
  • Your mark:
    • 100
    • 1
    • 2
    • 3
    • 4
    • 5

How to Build a 12 x 14 Hoop Greenhouse with Electricity for $300: summary, description and annotation

We offer to read an annotation, description, summary or preface (depends on what the author of the book "How to Build a 12 x 14 Hoop Greenhouse with Electricity for $300" wrote himself). If you haven't found the necessary information about the book — write in the comments, we will try to find it.

The most innovative, functional Hoop Greenhouse Grow your own organic vegetables and enjoy fresh flowers late into the winter and early in the spring with your sturdy, homemade hoop greenhouse. This is a spacious sun room and greenhouse. 7 foot center ceilings and 168 square feet of floor area give you plenty of room to grow a huge abundance of veggies, fruits and flowers. Add to your growing space with hanging plants and tiered shelves. You can even grow small fruit trees inside! Start your seeds early for bumper crops, fully protected from early frosts or freezes Grow warm weather crops and flowers before winters over in the new year, and keep them growing well into the cold weather near the end of the year. Includes 37 clear, close-up photos of the step-by-step construction process
  • Super sturdy with reinforced EMT. Proven to stand up to heavy snow and high winds
  • Comes with complete Material Lists, Scale Drawings and Detailed Directions
  • Easy directions and photos for building, leveling and squaring the base frame
  • Includes detailed cut lists for lumber, pvc pipe and plastic sheeting
  • Can be built by one person in a weekend or two people in a day
  • No construction experience needed. Plans are clear, step-by-step, with lots of pictures.
  • Few tools needed
  • Lumber cuts are simple; or you can have them done for you at the lumber yard.
  • spacious- 12 feet wide by 14 feet long (168 square feet) with a 7 foot center ceiling
  • You can double the size by simply adding another hoop greenhouse butted up to the first
  • Complete instructions to run electricity to the greenhouse for a space heater, or a fan for cooling if you like
  • Includes details for turning to inexpensively turn it into a super insulated greenhouse for a year around garden
Added Bonus Its even easier to disassemble and then reassemble, in case you want to move to a new house and take it with you, or relocate the greenhouse to a different location on your property. Want to know more? Scroll up to the upper left of the page and click on the Look Inside feature

How to Build a 12 x 14 Hoop Greenhouse with Electricity for $300 — read online for free the complete book (whole text) full work

Below is the text of the book, divided by pages. System saving the place of the last page read, allows you to conveniently read the book "How to Build a 12 x 14 Hoop Greenhouse with Electricity for $300" online for free, without having to search again every time where you left off. Put a bookmark, and you can go to the page where you finished reading at any time.

Light

Font size:

Reset

Interval:

Bookmark:

Make

How to Build

a 12 x 14

Hoop Greenhouse

with Electricity for $300

Jesse W. Love

All Rights Reserved

Copyright 2006 by Jesse W. Love

Dedicated to My wife Sumara my co-creator helping the garden of our - photo 1

~Dedicated to~

My wife Sumara, my co-creator;

helping the garden of our lives together

to be abundant and fruitful.

TABLE OF CONTENTS 1 2 4 5 6 7 Assemble the End PVC - photo 2

TABLE OF CONTENTS

1.

2.

4.

5.

6.

7. Assemble the End PVC Hoops

8.

9.

10.

11.

12.

13.

14.

INTRODUCTION Following is the step-by-step procedure to build a 12x14 foot - photo 3

INTRODUCTION

Following is the step-by-step procedure to build a 12x14 foot greenhouse (168 square feet), with electricity for lights, fans and heat that can be built in one day, by one person, using common tools you probably already have in your tool box, along with some simple things like screws and door hinges from your local hardware store.

This is a variation with some important modifications, from a design I believe came originally from North Carolina State University. I built the modified version by myself in 10 hours, including laying the underground conduit for the electricity which had to have a 4-inch deep trench dug and run 60 feet from the house to the greenhouse.

This unit would be considered a small greenhouse compared to commercial greenhouses, but it is actually larger than most greenhouses available at stores for the home gardener. Its really quite spacious. I enjoy relaxing out in mine in a lounge chair reading a book amidst all my flowering plants on cold winter days when its below freezing outside, but bright and sunny and a toasty 80 degrees in the greenhouse. Many bedrooms are about this size. Measure your bedroom and it will give you an idea of the greenhouse size in comparison.

Your greenhouse can be used for a lot of different purposes. In the late winter/early spring you can use it to germinate and start bedding plants and vegetables 30-45 days earlier than would be possible in open exposure without a greenhouse. In the summer it can be used with or without misting or self-timed irrigation to grow a variety of plants that like heat. The roll-up front feature assures it never gets too hot inside. In the fall you can use it to start winter vegetables and during the winter you can use it to protect hardy potted vegetables, flowers and patio plants from the sting of the cold nights.

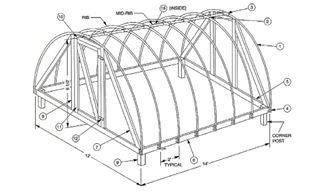
The basic design is the same as the Rib & Frame Overview below with the addition of a 16-foot 2x2 that holds the plastic on one side of the greenhouse. The single sheet of 4 or 6 mil clear plastic that covers the greenhouse ribs is attached to the 2x2. As the greenhouse is 14-foot long, the 16-foot 2x2 will stick out 1 foot beyond the plastic on each end. This becomes the handles for roll-up front which will be detailed later. During the summer, the south wall of the greenhouse is designed to roll up on hot days, providing cooler air, more ventilation and stronger, less diffused sunshine, which is important in the cloudy Northwestern US where I built mine.

The second major modification is simply berming the perimeter base of the finished greenhouse on all sides with at least one layer of straw bales and piling them up 2 to 3 bales high on the north side of the greenhouse that never receives any sun anyway. Straw bales are inexpensive, super insulators, and this in effect makes a partially underground greenhouse, especially if you build up 2 to 3 layers on the north side. This is very effective at helping to maintain the warmth in the greenhouse during the colder days of winter. Place the bales narrow side up so rain drains through them if you want them to keep their shape, or wide side down if you want the rain to soak them so they will decompose in place.

The third modification is a recommendation to use Grip Rite Grip-Caps to fasten the plastic to the wooden frame rather than wide-head roofing nails or staples.

This is a strong structure and has no problem with the frequent 20-40 mph winds and even stronger gusts we often experience in the winter in Sequim, Washington, or the occasional snowfall. It gives me beautiful flowers year-round and delicious tomatoes and big, crunchy cucumbers from March 1st November 1st. It has been a great investment and saved a lot on our grocery bills. Its amazing the quantity of vegetables you can grow in a 12x14 foot space. I love my greenhouse and Im sure youll love yours too!

To save time watering each day, I installed a small, automatic irrigation system for about $50.00 including the automatic timer and all the necessary tubing. This type of drip irrigation system is available at any hardware/garden store.

FRAME AND RIB PLAN Figure 1 Construction Details PVC Pipe PVC Crosses - photo 4

FRAME AND RIB PLAN

Figure 1 Construction Details PVC Pipe PVC Crosses PVC Ts EMT Straps 2x6x14 - photo 5

Figure 1 Construction Details

  1. PVC Pipe
  2. PVC Crosses
  3. PVC Ts
  4. EMT Straps
  5. 2x6x14 Boards
  6. 2x6x12 Boards
  7. 2x4x86 Boards
  8. 2x4x77 Boards
  9. 4x4x15 Boards
  10. 2x4x3 Boards
  11. 2x4x70 Boards
  12. 1 set of Door Hinges
  13. Sheet of 24x20 Plastic
  14. omitted
  15. omitted
  16. x10 EMT Tubing

MATERIALS AND TOOLS NEEDED Quantity Description Sixteen PVC Pipe schedule - photo 6

MATERIALS AND TOOLS NEEDED

Quantity & Description

  • Sixteen PVC Pipe, schedule 80, 10 feet long
  • Six PVC crosses, schedule 80
  • Two PVC tees, schedule 80
  • Two 2x6x14 treated no. 2 pine or hemlock boards
  • Two 2x6x12 treated no. 2 pine or hemlock boards
  • Four 2x4x7 treated no. 2 pine or hemlock boards
  • Four 2x6x6 treated no. 2 pine or hemlock boards
  • Four 4x4x2 treated no. 2 pine or hemlock boards
  • Two 2x4x3 treated no. 2 pine or hemlock boards
  • Two 1x4x12 treated boards (to be cut up for door parts)
  • One 16 2x2 pine or hemlock
  • One x10 galvanized electrical metallic tubing (EMT) (ridgepole)
  • x however long you need, galvanized (EMT) tubing (wiring)
  • One Circular or Hand Cross-cut saw
  • One Electric or Hand-held Phillips Screw Driver
  • One Carpenters Square
  • One Carpenters Triangle
  • One 1 to 3 Level
  • One 6 A-frame Step Ladder
  • One Grommet Tool
  • One Shovel
  • Thirty-two galvanized electrical metallic tubing (EMT) straps
  • One set of door hinges
  • One box 1 Phil Mod Truss Lath Screws
  • One box 7/16 Self-drilling Screws
  • One box 6x3.5 Coarse Deck Screws
  • One box 6x2 Coarse Deck Screws
  • One box Grip-tite Grip Caps
  • One roll Duct Tape
  • Insulated 3 wire electrical cord to reach to GFI outlet from house
  • Thirteen Straw Bales or more if insulating north face
  • One Sheet of plastic, 24x20, 4 mil (6 mil better)
  • One Can of PVC Cleaner
  • One Can of PVC cement

Note on angles: The cuts needed for the various pieces of lumber have the angles indicated. Most are 90 degrees with a few that are 45 degrees. A carpenters square and a carpenters triangle are very helpful tools to quickly insure your 90 and 45 degree angle cuts.

Next page
Light

Font size:

Reset

Interval:

Bookmark:

Make

Similar books «How to Build a 12 x 14 Hoop Greenhouse with Electricity for $300»

Look at similar books to How to Build a 12 x 14 Hoop Greenhouse with Electricity for $300. We have selected literature similar in name and meaning in the hope of providing readers with more options to find new, interesting, not yet read works.


Reviews about «How to Build a 12 x 14 Hoop Greenhouse with Electricity for $300»

Discussion, reviews of the book How to Build a 12 x 14 Hoop Greenhouse with Electricity for $300 and just readers' own opinions. Leave your comments, write what you think about the work, its meaning or the main characters. Specify what exactly you liked and what you didn't like, and why you think so.