Thank you for purchasing this eBook.
Sign up for the Jewelry MakingDaily newsletter and receive special offers, access to free content, and information on the latest new releases and musthave crafting resources!
or visit us online to sign up at
http://jewelrymakingdaily.com
Contents
Introduction
Ever since I started making jewelry many years ago, one of the things that has delighted me the most is using unique and unusual salvaged materials in my designs. As a matter of fact, over the years I have become most known for my jewelry made from broken vintage china.
Making jewelry out of broken china was actually a process that evolved over many years. Ive always loved vintage things and antiques, and going to thrift stores. There I would collect mismatched plates and dishes, mostly orphaned pieces. I would find a cup here, a saucer there, and because most of the items were old, a lot of times they would have imperfectionssmall chips or cracksbut I would think the pattern on the china was so beautiful that it needed to be preserved in some way. It begged to be made into something new. These damaged pieces had great value to me not only because I love old, beautiful things, but also because I saw them as renewable. A chipped or cracked plate may have lost its usefulness, but it still had its beauty. My goal was to preserve that beauty in some unique way, and to give it a new life. I thought, why not create something entirely new out of this? Something beautiful, contemporary and wearable?
I will admit that I am sentimental. One of the reasons that I choose to incorporate old salvaged materials in my jewelry is because of the personal and emotional connections that people have with these objects. I revel in their history. Countless times, individuals have told me, I saw this necklace in your shop, and that was my mothers same china pattern! Or, My grandmother had the same china as in that necklace. Seeing that pattern brought back so many good memories.
Why not carry a piece of the past with you?
And you dont have to stop with one piece of jewelry. Another great thing about making jewelry from an item such as china is that its shareable. Over the years, Ive created many custom orders for people from their own family heirlooms, such as a plate from their mothers wedding dishes or a piece of their grandmothers Depression glass, and turned a single treasured item into multiple matching necklaces for family members, or for bridesmaids in a bridal party.
Inside this book you will find lots of great ideas for incorporating a variety of different materials into jewelry: china, flatware, buttons, leather and lace, to name a few. The items you choose to work with dont necessarily have to hold sentimental meaning for you; they could just as easily be thrift store finds or other items that you happen to like. The key is to try to see ordinary things in new ways, and ask yourself how a certain material could be turned into something completely different and new, yet still be partially recognizable as its original intended form.
So, take a look around your home. Check your attic, the bottom of your jewelry box or the back of a drawer, where you may have stashed a few cherished items or small mementos. You saved them for a reason; now is the time to put them to beautiful use. The result will be jewelry that is not only pleasing to look at, but that has a lot to say, stories to tell and history to share.
Materials and Techniques
These pendants were made with fork tines and purchased glass stones.
FINDING ITEMS TO WORK WITH
Many of the main materials needed to make the projects in this book can be found for free right in your own homesimply look around your house for old china, glassware and silverware pieces. Ask relatives and neighbors if they have any stray damaged dinnerware pieces that they want to get rid of. Peruse local yard sales and flea markets, and dont forget about your local thrift shop! They are some of the best places to find inexpensive orphaned pieces of flatware and china.
Start saving (or digging out) personal mementos and trinkets if you havent already, items that have meaning for you: a seashell from a memorable vacation, a button that belonged to your grandmother, a piece of your daughters treasured baby blanket. These are all the types of things that we will be using in these projects.
Tools and supplies needed
Hammers: Ball peen and household
Soft-ended mallet (such as rubber)
Flush cutters
Bracelet mandrel (optional)
Metal bench block
Wooden block (for drilling into)
Bench vise
Spoon-bending tool
Ring saw
Jewelers hand saw with beeswax for lubrication
Power drill (or Flex shaft) with a variety of small drill bits, such as 18" (3mm) and 116" (1.5mm)
Steel center punch
Hole punch or rotary hole punch (for leather)
Glass grinder and glass cutter
Third-hand tool (optional)
Pliers: Chain-nose, rosary (or round needle-nose), long-nose, grozing and breaking (or running)
Metal file, needle file and fine-grit sandpaper
Stamps: Red rubber and steel letter
Clear, flat glass, approximately 332" (2mm) thick
Permanent markers (broad and fine-tip) and pencil
Scissors, craft scissors (small and sharp) and craft knife (such as X-Acto, with extra blades)
Ruler
Cardstock (to make templates); printed text or image
E-6000 adhesive; dcoupage medium (or white glue)
Water-based acrylic craft paint and clear acrylic spray sealant
Soft-bristle paintbrush, 1" (2.5cm) wide
Painters or masking tape
Toothpicks (for applying adhesive)
Dust mask and ear plugs (when sawing or grinding)
Foiling setup with 14" (6mm) copper foil tape
Soldering setup with silver metal polish
Patina setup with black and copper patina
Resin setup (see Spoonful of Shells Pendant)
Types and sizes are specified in each project when these items are used:
China, pottery, glass and porcelain plates, teacups and broken shards
Silver-plated flatware (forks, spoons and knives)
Remnants of lace, fabric and leather
Leather bracelet blanks or old leather belts
Beads and spacers
Buttons, charms, stones, crystals, glass gems, seashells and findings
Jewelry chains, wire, cording (leather, suede or cotton) and ribbon
Earwires, head pins, jump rings, bails, lobster clasps, pin back with safety clasp and metal snap fasteners (with setter and anvil)
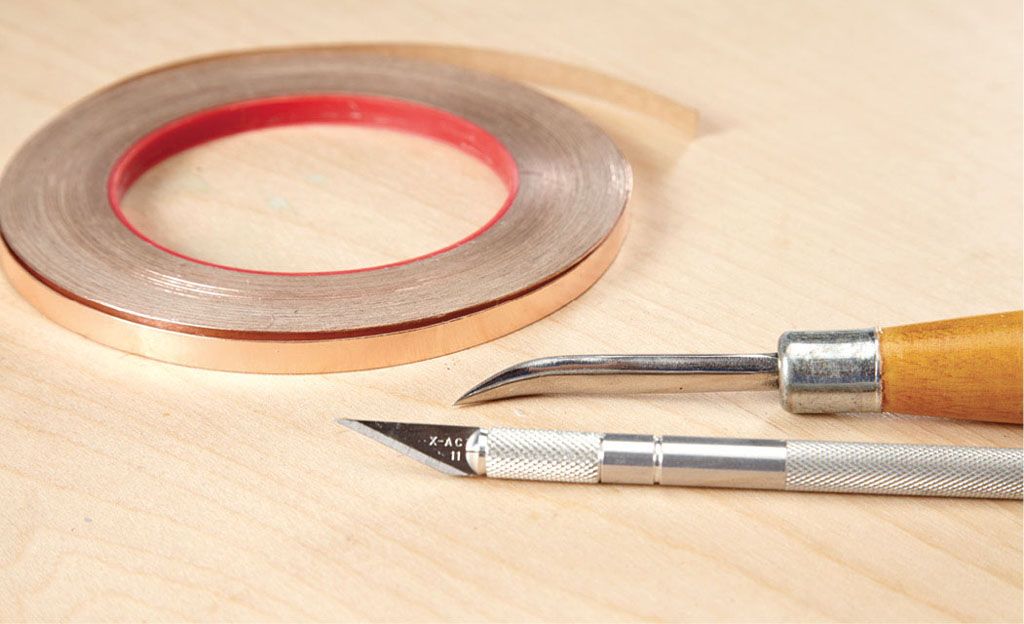
Copper foil tape, a fid (burnishing tool) and a craft knife will be needed to foil the edges of your project piece.
ALL ABOUT COPPER FOIL TAPE
Copper foil tape is extremely thin, pliable copper that has an adhesive side with a paper backing (like a sticker does) that you peel off when you apply the copper foil to a surface. Why use copper foil tape? Because solder adheres to it, and solder creates the bezel for your jewelry piece, finishing the edges of it and enabling you to connect elements such as jump rings. Without copper foil (and flux that helps bind the two; more about flux later), solder will not stick to your project. Neatly and properly applied copper foil is the foundation for a well-made project.


