Although digital technology today seems to have rendered handwriting obsolete, what is not obsolete is the distinct pleasure derived from receiving a beautifully penned envelope and opening a handsome handwritten letter. You may have admired a beautiful piece of calligraphy and wondered how to do it yourself. With a little effort, you can learn to craft lovely letters for every occasion.
This book will provide you with the first steps toward developing a calligraphic hand that is unique to you, attractive, and easy to read. The sample alphabet in these pages will help you learn the proper form of letters as they were created long ago, during the Italian Renaissance. Called italic, this is the hand most commonly seen on wedding invitations, hand-lettered menus, and other artful presentations. I will lead you through a series of exercises that will help you acquire a handsome italic hand, and Ill suggest fun projects that will give you practice in a practical way. Ill encourage you to try a variety of pens, inks, and papers to find the right ones for you. You will also receive guidance with layout and design, advice on addressing envelopes, and ideas for flourishes and other embellishments.
Of course, results are not instantaneous, and your handwriting doesnt come with a spell checker or Delete key, but the more you practice, the faster you will improve! So lets get started.
1.

TOOLS AND MATERIALS

As with any effort, the right tools make all the difference.
PENS
Any ordinary pen can be used to make beautiful letters, but the beauty of italic calligraphy is accomplished by using a broad-edge pen. The ribbonlike appearance of the italic alphabet, with its thick areas and thin areas, is created with a broad-edge pen held at a fairly constant angle. Notice that the end of the pen nib is squared off, much like the end of a screwdriver or a chisel. You can see why its referred to as a broad-edge pen, or sometimes as a square-cut or chisel-edge penthese terms are synonymous.

Broad-edge pens come in a variety of sizes and materials. You can find them made from metal, bamboo, feather, or felt. Some are easier to use than others, and some produce results far superior to others. A broad-edge fountain pen is a good beginning tool. The fountain pen has the advantage of always being ready to write, and the ink flows reliably. A good choice to begin with is a Pilot Parallel Pen. It comes in several sizes, but the exercises in this book will use the 1.5 mm nib, so I suggest that you start there. After youre familiar with that size you can get larger or smaller pens. Its definitely to your advantage to have several sizes.
INK
The pen comes with ink cartridges, but rather than continually replacing cartridges, seasoned calligraphers refill their cartridges with ink of their own choosing. The cartridges can be refilled easily with a pipette or an injector. Try several kinds of ink to find the one(s) you like to work with. I recommend starting with Noodlers inkit comes in a wide range of colors, making your writing that much more fun. You should avoid waterproof inks, though, as they may ruin your fountain pen if allowed to dry inside.
PAPER
The right paper is just as important as the pen you use. Your calligraphy will be enhanced when presented on quality paper, with its subdued color and notable tactile qualities, and writing on quality paper is a pleasure in itself. Ordinary college ruled notebook paper, however, will provide you with an inexpensive way to practice. Its lined with just the right amount of space between the lines for writing with the 1.5 mm pen. After youve had some practice, and when you feel ready, search out the best papers for your projects. An art store, stationery store, or calligraphy supply vendor will have papers you can try to see which work best for you. All kinds of paper, from stationery to printmaking and watercolor papers, are suitable for calligraphy. See , for sources for pens, inks, and papers.
2.

GETTING STARTED

Its a good idea to warm up each time you sit down to do calligraphy. To become acquainted with your broad-edge pen, begin by making loops, spirals, zigzags, ovals, or whatever kind of marks you like. Get used to using a light touch. Bearing down on the nib will do little for the appearance of your writing and will easily tire your hand. The key is to hold the pen lightly and at a constant 30-degree angle. Finding the 30-degree angle is easy.
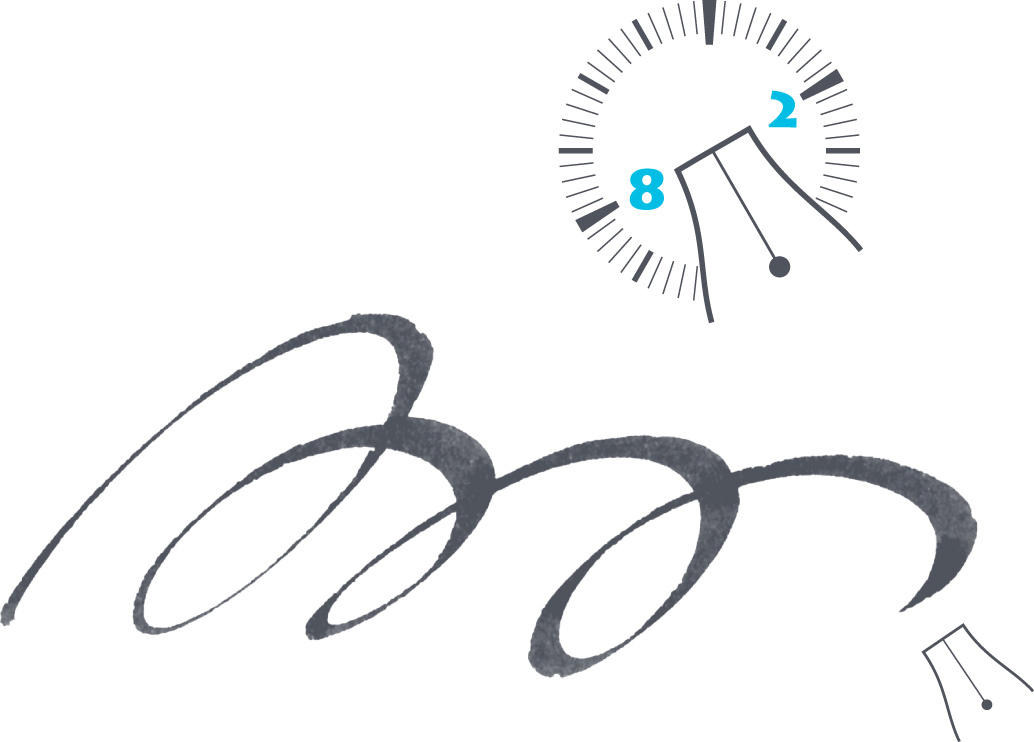
The illustration shows the face of a clock. When the right corner of your nib points at 2 oclock and the left corner at 8 oclock, that is a 30-degree angle. Practice holding your pen at that angle until it feels natural. (Note: The pen is held at a 30-degree angle regardless of whether you are right- or left-handed. Left-handers may have to turn their paper to get in the proper position.) You may need to remind yourself about the 30-degree pen angle as you go along, but it will become second nature to you before you know it. By always holding your pen in that position, you will see thick and thin parts of your doodles emerge reliably, and you are well on your way to learning calligraphy.



 INTRODUCTION
