MIDI and OSC
The first part of the book looks at the MIDI system universally used for passing data between musical systems. MIDI is not concerned with the sounds themselves; rather it is a system of messages that tell other things to generate the sound. Rather like the difference between sheet music and a tape recorder. OSC (Open Sound Control) is a similar idea brought up to date for networked systems.
The data gathered from a keyboard, in a form that is capable of expressing all the subtitles of a performance, to computer generated notes, these can be expressed as MIDI data. On the receive side sound generators can turn this data into sounds of quality that are as deep as your pocket. As well as music, other things can be controlled by MIDI like lights or motors. This part of the book explores in depth the wide possibilities that are on offer with MIDI and other forms of messages.
1. Basic Arduino
This chapter covers:
Arduino models and capabilitieswhat to look for
Understanding and reading a schematic
Some basic prototype construction techniques
Adding extra parts to an Arduino
About this Book
This book is about using the Arduino development platform for audio applications. It is not intended for absolute beginners but for those who have a little experience with the platform, those who have set up the system, have gone through some of the built-in examples, and are wondering what to do next. You should know the basics of the C language, like what a function is and what structures you can put in them ( for loops and if statements). I am not expecting you to be a programming wizard. I know that different people will be coming to this book with different degrees of knowledge and so this first chapter is a sort of foundation level, catching-up chapter to ensure that we all start from the same level. You might already know the majority of what is here in this first chapter, but if you struggle with large parts of it then it is best to do more foundation work before diving into the rest of the book.
This book also contains projectssome are simple and can be completed in an hour or two; others are much longer, cover a whole chapter, and can take months to complete. When projects get to this level then rather than just trying to replicate what I did, it would be great if you put your own input into it by putting your unique twist on the project. There are suggestions to help you do this at the end of the big projects. So lets start by looking at the Arduino itself.
The Arduino
The Arduino project has a long and prestigious linage. Its roots can be traced back to the influential John Maeda who worked as a supervisor for Casey Rease. I first came across both these peoples work in the classic book, Creative Code, by Thames and Hudson, 2004, and it didnt take a genius to spot their talent. Casey and Ben Fry worked on a project designed to make coding accessible to a non-technical artistic audience, as by then, computing has moved away from the home coder that was so much part of the 80s micro-computer revolution. The result was a programming language called Processing , perhaps one of the worst names for a computer language, despite quite steep competition. Then Casey and Massimo Banzi supervised a student named Hernando Barragan to develop a version of Processing that did the same sort of thing for hardware that Processing did for software; it was called Wiring . The last step was in 2005, when Massimo and David Cuartielles took the basic code from these two open source projects and forged it into their own Arduino project, which itself is open source both in software and hardware. It is a testament to the power of the open source concept, it shows how previous work can be built on and extended without the normal commercial constraints and secrecy. And also without the mega bucks development budget that starting from scratch on a project like this would entail.
The brief was simple, so the system had to be simple and accessible both in terms of hardware and software. The fact that all these years later, you are reading this book is testament to how well they achieved that goal. The continued success and evolution of the project speaks volumes about their dedication and insight. They started making the boards in a small factory close to Turin in northwest Italy, today there are manufacturing facilities in Europe, the Far East and the USA, selling under the brand of Arduino in the UAS and Genuino in the rest of the world. A schism in 2015 with the original manufacturer has resulted in a so far unresolved legal disputes over the Arduino name outside the USA.
Arduino Architecture
The number of models or types of Arduino continue to grow by the year and I assume you have at least one. So to enable you to evaluate the existing models and see where the new models fit into picture, I want to look at the architecture of an Arduino and describe how various models enhance one, or more, particular aspects of it.
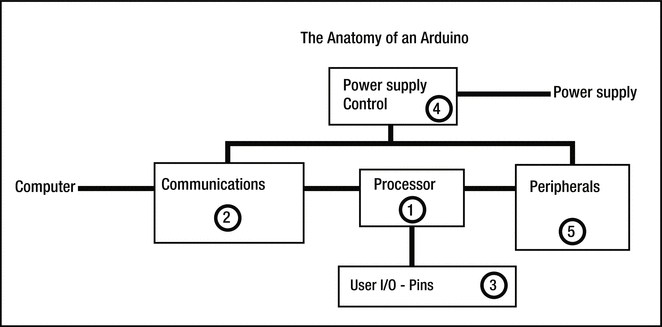
The design philosophy has been to bring out a basic design concept and then add variations to it, building up families of Arduinos some with specialist functions. However, the current basic vanilla Arduino is the Uno, whose name was chosen not the least so that it could be pronounced by non-Italians. Earlier basic models went under the name of Duemilanove, Arduino NG (Nuova Generazione), and Diecimila. These are very close variants of the same basic board, but much harder to pronounce, for me at least. Figure shows the basic anatomy of an Arduino. It consists of five major blocks:
Figure 1-1.
The basic blocks of an Arduino
The processor
Communications
User I/O pins
Power supply control
Peripherals
Arduino models and variants play with, or alter, one or more of these blocks. So to understand the models, you have to understand, or at least appreciate, these basic blocks. Each block is numbered and discussed in the following sections.
The Processor Block
The heart of the Arduino is the processor, and in many ways it defines the capabilities of the whole board. It is based around processor families and the normal philosophy is to have as much of the processors resource available to the user as possible. When a manufacturer makes a processor, they normally make a number of variants that have a basic core functionality but have a different amount of the different types of memory. For example, the basic vanilla Arduino always had an ATmega x8 processor; that isnt the part number but the generic base part number where x is substituted for a number representing the variant. The first Arduino used the ATmega 8 chip but soon moved onto the ATmega 168 and then onto the ATmega 328 used today. The main difference between these is the amount of memory they had for storing the program, known as Flash memory, and the amount of memory for storing data, known as SRAM (Static Random Access Memory). A third, less important, sort of memory is the EEPROM (Electrically Erasable Programmable Read Only Memory), and it provides a small provision for non-volatile storage of data. Non-volatile means that it persists even after the power has been removed.

