Publisher: Amy Marson Creative Director: Gailen Runge Editors: Lynn Koolish and Kathryn Patterson Technical Editor: Nan Powell Cover/Book Designer: April Mostek Production Coordinator: Tim Manibusan Production Editor: Jennifer Warren Illustrator: Linda Johnson Photo Assistant: Mai Yong Vang Style photography by Lucy Glover and instructional photography by Diane Pedersen of C&T Publishing, Inc., unless otherwise noted Published by Stash Books, an imprint of C&T Publishing, Inc., P.O. Box 1456, Lafayette, CA 94549 acknowledgments From Cheryl I would like to thank my wonderful husband, Mike, and my children, Christopher and Sarah, for all their support (and for tolerating quilts in various stages of completion all over the house). Thanks also to my official quilt testers, Abby the cat and Katie the dog. Many thanks to my parents, Mike and Carole, who gave me my first sewing machine and have always supported me in pursuing my interests and dreams. To all my quilting friends, both local and online, thank you so much for all your inspiration, friendship, and encouragement. From Paige I owe my love of sewing to my grandmama Sadie, who had the patience to teach me to sew at a young age. From Paige I owe my love of sewing to my grandmama Sadie, who had the patience to teach me to sew at a young age.
I had the best-dressed Barbie in town. I would like to thank my supportive husband, Jason, who always gave his opinion when asked, knowing all the while it might not be used. And thanks to my parentsespecially my mom, Linda Taylor, who prayed for me every stitch along the way. I would also like to thank my friend and fellow quilter, Linda Cassell; weve traveled many miles together to see the next quilt show. Thank you to Donna Taylor for teaching me to appliqu and to the UpCountry Quilters Guild for always providing inspiration and support through the years. From Both of Us Many thanks to AccuQuilt; Andover Fabrics, Inc.; Aurifil; BackSide Fabrics; BERNINA Sewing CenterWere in Stitches (Greenville, SC); Birch Fabrics; C&T Publishing; Cloud9 Fabrics; Cotton + Steel; Hoffman California Fabrics; Michael Miller Fabrics; Moda Fabrics; RJR Fabrics; Robert Kaufman Fabrics; Sulky of America; and The Warm Company for their generous donations of fabric, batting, thread, sewing machine rentals, and supplies. From Both of Us Many thanks to AccuQuilt; Andover Fabrics, Inc.; Aurifil; BackSide Fabrics; BERNINA Sewing CenterWere in Stitches (Greenville, SC); Birch Fabrics; C&T Publishing; Cloud9 Fabrics; Cotton + Steel; Hoffman California Fabrics; Michael Miller Fabrics; Moda Fabrics; RJR Fabrics; Robert Kaufman Fabrics; Sulky of America; and The Warm Company for their generous donations of fabric, batting, thread, sewing machine rentals, and supplies.
Special thanks to Johellen George for all the wonderful longarm quilting; to Darleen Sanford for the pattern testing and reviewing; to Leslie White, owner of our local BERNINA dealership, who generously supported our book-writing efforts; and to the quilters from across the U.S. and UK who contributed a Plus block for our signature quilt. Thank you, Stash Books, for bringing our vision to print. introduction Plus signs have been a universally appealing design in popular culture for over 100 years, forming some of the most recognizable logos in the world. There is no mistaking the logos of the American Red Cross and Swiss Army. Drawn to this simple and strong geometric shape, quilters have used plus signs extensively throughout history.
Some of the first popular plus sign quilt designs were signature quilts made in the early 1900s to support the Red Cross during World War I. Individuals and businesses would pay a small fee to have their name embroidered on such a quilt, and then the finished project would be raffled off to generate additional funds for the cause. This vintage Red Cross quilt was made in Lake County, Illinois in 1915, with each resident paying 10 cents to have his or her name embroidered on the quilt. Each of the blocks contained 1 red plus sign and about 40 embroidered names on the white background. 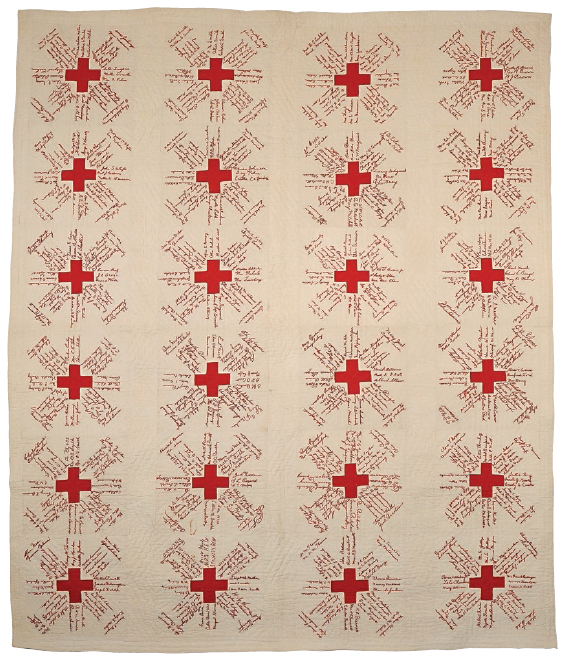 Photo by Mark Widhalm Red Cross signature quilt, circa 1915, from the collections of Lake County Discovery Museum
 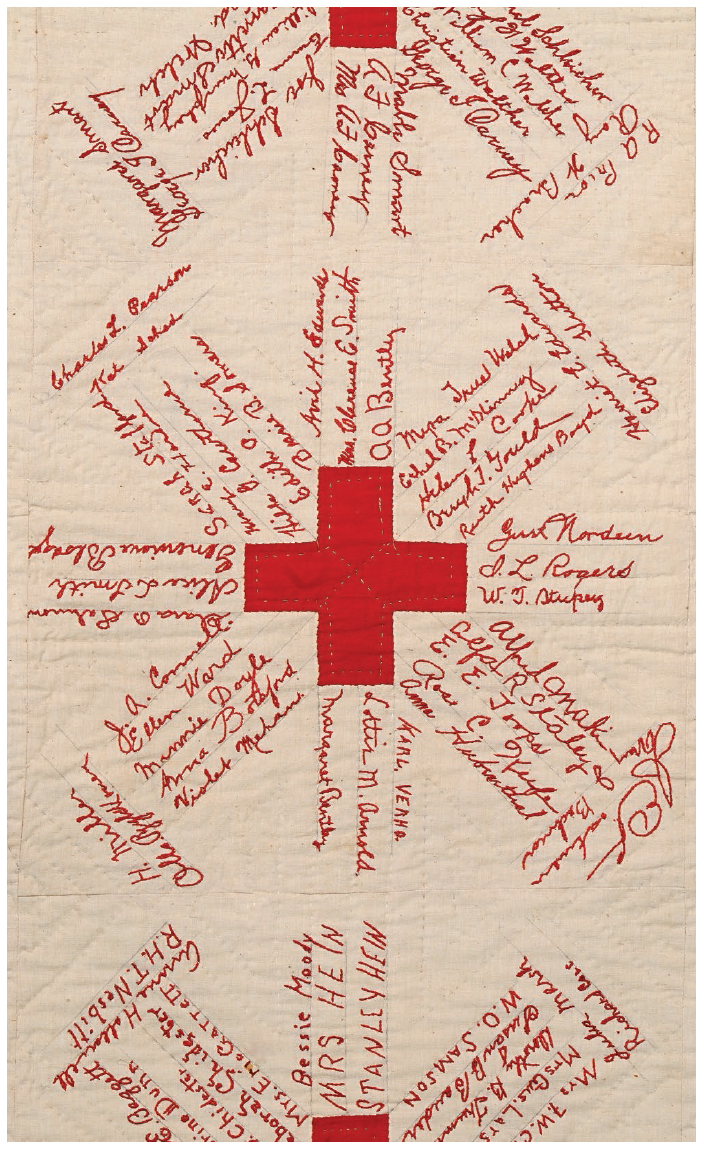 Photo by Mark Widhalm Detail of Red Cross signature quilt You can make your own modern version of the Red Cross signature quilt using the instructions in Signature Plus. Our version was made with the help of 122 quilters, each making and signing a signature block.
It is the perfect pattern for a modern quilting bee. 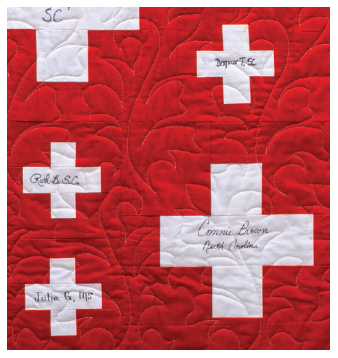 Detail of Signature Plus The plus signs popularity in quilts has withstood the test of time, with new plus sign quilts being made every year. This book contains sixteen different quilt patterns made with a variety of techniques, including traditional piecing, paper piecing, and appliqu. Quilt sizes range from baby through queen. A difficulty rating from + (most beginner friendly) to +++ (more time consuming and challenging) is noted for each pattern. We hope that you enjoy and are inspired by this collection of new and modern twists on the classic plus sign.
We cant wait to see what you make! general instructions fabric preparation An ongoing debate among quilters is whether or not to prewash fabric. Cheryl prefers the crispness from the sizing in the manufacturers processing and usually does not prewash her fabric. Paige, on the other hand, prewashes most everything because she doesnt want any surprises from excess dyes or uneven shrinkage. When using a paper-backed fusible web for machine appliqu, manufacturers suggest prewashing your fabric. If you prewash some of your fabric, prewash it all. abbreviations and definitions Yardages are based on fabric with a usable fabric width of 40. abbreviations and definitions Yardages are based on fabric with a usable fabric width of 40.
The width of fabric, or WOF, is measured from selvage to selvage. Using precuts is a way to include a variety of prints in your projects without purchasing a large quantity of each. Manufacturers label precuts differently, but some examples are 5 charm squares and 10 precut squares. Fat quarters are 18 20. Fat eighths are sometimes cut 9 20 and sometimes 10 18, so pay careful attention to the pattern requirements and how the fat eighths are packaged. directional prints The patterns in this book were written for nondirectional prints and include directions for cutting and piecing that make the most efficient use of the fabric.
If you decide to use a directional print, such as a stripe or a group of houses, you may need additional yardage beyond what is stated in the materials list. You may also need to alter the cutting or piecing instructions. We highly recommend making a test block to see what alterations might be necessary. seam allowances A scant seam allowance (a seam allowance that is a threads width smaller than ) is used for all projects in this bookexcept for piecing quilt backings, when a seam allowance is recommended. It is a good idea to do a test seam before you begin sewing to ensure that your scant is accurate. There is no need to backstitch seamlines where they will be crossed by another seam.
It is helpful, however, to backstitch seams where they fall on the outer perimeter of the quilt top or backing. pressing seams First press the seams as sewn, right sides together. Then press the seams open or toward the darker fabric to prevent the darker fabric from showing through a lighter fabric. Both Cheryl and Paige prefer to press seams open when possible; they find that there is less distortion in the seams and the blocks lie flatter when pressed this way. Press lightly in an up-and-down motion. Be especially careful when pressing bias edges, as they stretch easily.
Next page

 Photo by Mark Widhalm Red Cross signature quilt, circa 1915, from the collections of Lake County Discovery Museum
  Photo by Mark Widhalm Detail of Red Cross signature quilt You can make your own modern version of the Red Cross signature quilt using the instructions in Signature Plus. Our version was made with the help of 122 quilters, each making and signing a signature block.
 Detail of Signature Plus The plus signs popularity in quilts has withstood the test of time, with new plus sign quilts being made every year. This book contains sixteen different quilt patterns made with a variety of techniques, including traditional piecing, paper piecing, and appliqu. Quilt sizes range from baby through queen. A difficulty rating from + (most beginner friendly) to +++ (more time consuming and challenging) is noted for each pattern. We hope that you enjoy and are inspired by this collection of new and modern twists on the classic plus sign.