2. Required tools and materials
This chapter describes the tools andmaterials required for making the cards and making bands using the cards. Youwill need the following:
The playing cards used for making the cardscan be made of either card stock or plastic. Card weaving tablets (as the cardsare also called) are also commercially available, but playing card material isusually dense and stiff enough to work just fine for this purpose. The playing cardsused in the examples in this book were found in a discount bin and cost only acouple of euros. One pack will usually give you several sets of cards for yourprojects, depending on the width of the bands you wish to make.
The hole puncher can be of the regular typeused in an office (such as the one shown in the photos in this book) or thetype used for making holes into leather (if you happen to own one). The mainthing is that you need a tool that will make neat round holes in the cards.
The sewing thread can be made of anymaterial (polyester, cotton, silk, etc.) as long as all threads used in oneband are of the same thickness. It may be a good idea to start with cheaperthreads as you are likely to make mistakes at the beginning. Once you masterthe technique, I recommend using quality materials to get good quality bands asa result for all the effort it takes to make the bands. The threads used in theexamples in this book are made of 100% silk.
3. Making the cards
The first thing to do is to make the cardsneeded for card weaving. The size of the cards is up to you. Bigger cards maybe easier to handle, but with smaller cards, less thread goes to waste. Thesize of the cards made in this chapter's example is determined by the size ofthe playing cards used for making them. If you want smaller cards, you justneed to make smaller squares, the rest of the steps are the same for all sizes.
Making a template
First you need a template for the cards. Itwill help you cut cards of equal size and make the holes in correct positions.Do the following:
1. Take two cards and use one of them tomeasure where the other one needs to be cut to form a square. Use the markerpen to draw the line where you need to cut the card.
2. Cut the card along the marked line.
3. Draw two diagonal lines on the squarecard.
4. Use a round object to draw a circle onthe card. There should be some space between the circle and the card's sides.
5. Mark the places for the holes on thediagonal lines, just inside the circle.

Figure 3.1 Making a template, steps 15
6. Round the sharp corners of the card.
7. Use a hole puncher to make the holes inthe marked positions. If you use the kind of puncher shown in the next picture,it may be a bit tricky to position the card just right. Press the vertical bar(the part making the hole) down a bit, so you can see its position clearly.Then move the card so that the marked hole position is exactly below the barand press the bar down to make the hole. Repeat for the rest of the holes.

Figure 3.2 Making a template, steps 67
Now you have a template you can use to makethe cards.
Making the cards
The number of cards you need depends on howwide bands you want to make. I recommend starting with 8 cards for practice andto get an idea of the measurements of the finished band. You can then adjustthe number of cards as desired for subsequent projects. However, using an evennumber of cards produces most symmetrical results.
Start by cutting the cards to the correctshape. Place the template on a card and cut along the template's side, roundingthe corners.
Next, you need to make the holes. Place thetemplate on top of a card, place the card in the hole puncher the same way asfor making the template, and make the holes. This time, there are no markers inthe card to be punched, but you need to make the hole where the template has ahole, as shown in the next picture.

Figure 3.3 Punching holes into a card
When you have made holes into all cards,arrange the cards so that they are facing the same way and the pictures are inthe same direction. Then color the upper edge of each card with the marker pen.All these actions will later help in determining that you have turned all thecards the same amount.
As you can see in the next picture, theholes in this set are not quite symmetrical. Accurate placement of the holes isdifficult with the kind of a hole puncher I was using, but fortunately, that isnot a problem. As long as the holes are approximately at the diagonal lines andinside the circle, the cards are perfectly usable.
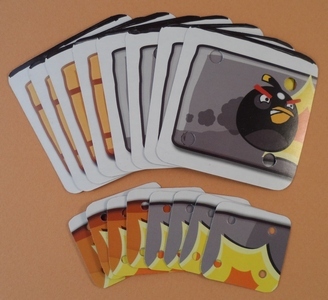
Figure 3.4 Card sets ready for use
The smaller set in the picture was made ofthe pieces left over after cutting the bigger cards. The holes in these cardsare smaller and were made with a hole puncher meant for making holes intoleather. Also, there was no need to color the upper edges as they were alreadydifferent color from all the other edges.
4. Setting up the cards and threads
The basic bands described in this book aremade by using one color per card. This produces lengthwise stripes of singlecolors. In the following example, the first two cards have red threads, thenext four yellow, and the last two red again.


