How to Tune the Ukulele
Few things sound as bad as an out of tune musical instrument,
so be sure your uke is in tune each time you begin to play.
There are three ways to tune your ukulele:
Tuning with a uke pitch pipe
Tuning with a piano
Relative tuning
The tuning we use in this book is referred to as C tuning, which is the most widely used ukulele tuning (G-C-E-A).
All stringed instruments must be frequently re-tuned. You should tune your uke each time you play.
Tuning with a Uke Pitch Pipe
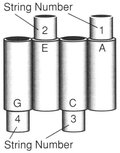
The pitch pipe is made up of four tuned pipes that coincide with the four strings of the uke. Blow lightly into the pipe and adjust the strings by turning the tuning keys until the sound made by the string is identical to the sound made by the pitch pipe.
The numbers indicate the string name from bottom to the top of the ukulele, as the uke is held in playing position.
Tuning with a Piano
Adjust the strings by turning the tuning keys until the sound made by the string is in the same pitch as the sound made by the piano.
Carefully tune as follows:
Relative Tuning
Whenever a pitch pipe, piano or another tuned ukulele is not available to you for tuning, the relative tuning method can be used. The following method will allow the uke to be in tune with itself, but not necessarily in tune with another instrument.
To tune up your uke with relative tuning:
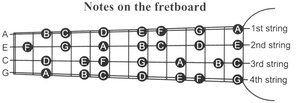
Turn the tuning peg of the 1st string (A) until it is fairly tight and produces a high tone.
Press the 5th fret of the 2nd string (E) and tune the 2nd string (E) to equal the pitch of the 1st string (A).
Press the 4th fret of the 3rd string (C) and tune the 3rd string (C) to equal the pitch of the 2nd string (E).
Press the 2nd fret of the 4th string (G) and tune the 4th string to equal the pitch of the 1st string (A).
Check your tuning each time you practice or play. Be sure your tuning pegs are tight. To keep the tuning pegs from slipping tighten the screws in the back of the pegs with a small screwdriver.
Holding the Ukulele
Keep both hands in an easy position without the slightest
rigidity or strain upon any of the muscles.
The Left Hand
Place the tip of the thumb at about the center of the back of the Ukulele neck. Do not rest the neck of the Ukulele in the palm of your hand. Keep forearm and hand in an easy position. The fingers should curve naturally over the fingerboard and be able to press down lightly with the tips. Fingernails should be cut short, never allow the nails to come in contact with the strings as they have a tendency to cut them.
The Right Hand and Forearm
Let the middle of the forearm press the back edge of the ukulele to your body, holding it firmly but not too tight, so that you may be able to play either in a standing or sitting position.
Explanation of Strokes
There are many STROKES for the ukulele but the Common Stroke is the base or foundation for all.
The numerals 1,2, and 3 indicate the number of fingers used in the stroke and the U and the D indicate the up and down movements. When marked thus: 1/D means the up-stroke with one finger. When marked 3/D, it means a down stroke with three fingers.
The following strokes are suggested only, feel free to make up your own stroke to match the song.
The Common Stroke
A full round tone is best achieved by strumming the fingers at an angle to the upper part of the body of the Ukulele, this will bring the wrist directly above the sound hole.
The Stroke is made with the fore-finger of the right hand running it rapidly across all the strings with a down and up movement of the wrist, which must be perfectly free and keeping all the other fingers in readiness for another position. The down-stroke should be made squarely on the nail of the finger and the up-stroke with the fleshy part of the finger, but not on the side. There are two strokes to the beat, down and up. Make the down and up strokes even and smooth. Avoid jerkiness.
The Tremolo Stroke
This stroke is made in the same manner as the Common Stroke (down and up) but twice as fast. It must be played rapidly in order to produce a Tremolo effect.
The Triple Stroke
The stroke is made with the first finger only. There must be one stroke on the first, third and fourth beats, but the second beat demands three strokes, without interfering with the time.
The Waltz Stroke
This stroke is made, first with the Up stroke of the thumb, followed by the first and second fingers about an inch apart.
Tablature
All of the music in this book is written in standard musical notation and tablature. In tab, there are 4 lines, each representing a string on the uke. Numbers are placed on the lines corresponding to the frets on which you place your fingers.
Roll Stroke
General Directions
The Roll Stroke is one of the most commonly used ukulele strokes and every good player should be able to use it properly. At the outset, the beginner may find his fingers a little stiff and clumsy but this disappears quickly after a little practice. There are only two steps to the Roll Stroke, but it is very important that each be mastered thoroughly. Start slowly and then gradually increase the speed of your fingers.
Start with Little Finger down ( )
Start the little finger down across the four strings at the point where the neck joins the body. (See ). It is very important that the down stroke be made on the fingernail. Otherwise the finger will catch and will not glide smoothly over the strings.


