Contents
Guide

Photo credits: Dwayne Gosnell: , and all step-by-step photos Mike Mihalo: , and all photos of finished chess pieces Courtesy Shutterstock: FOTOKITA (spider web) 2020 by Dwayne Gosnell and Fox Chapel Publishing Company, Inc., 903 Square Street, Mount Joy, PA 17552.
Woodcarving a Halloween Chess Set is an original work, first published in 2020 by Fox Chapel Publishing Company, Inc. The patterns contained herein are copyrighted by the author. Readers may make copies of these patterns for personal use. The patterns themselves, however, are not to be duplicated for resale or distribution under any circumstances. Any such copying is a violation of copyright law.
For a printable PDF of the patterns used in this book, please contact Fox Chapel Publishing at , quoting the ISBN and title of this book, as well as the pattern or patterns required. Print ISBN 978-1-4971-0082-4
eISBN 978-1-6076-5773-6 To learn more about the other great books from Fox Chapel Publishing, or to find a retailer near you, call toll-free 800-457-9112 or visit us at www.FoxChapelPublishing.com. We are always looking for talented authors. To submit an idea, please send a brief inquiry to .
Contents
Acknowledgments I want to extend my deepest thanks to everyone along the way who told me to keep carving and never give up.

Before You Carve
Basic Carving Instructions
All you really need in order to carve is a space to complete your project, a comfy chair, some wood, and the carving tools of your choice.

Before You Carve
Basic Carving Instructions
All you really need in order to carve is a space to complete your project, a comfy chair, some wood, and the carving tools of your choice.
Ive never met a carver who wasnt also a tool collector. If you have it, use it. If I use a certain tool in the instructions, but you can accomplish the same thing with a different tool, do it. Here are some points to remember: Make sure that your tools are as sharp as they can be. You shouldnt force dull tools into the wood. Carve as much as you can every day.
Dont be afraid to challenge yourself. Dont carve while tired, as this can lead to miscutseither in the wood or your hand. Always use protective gear, such as gloves and finger guards. Remember that everyone makes mistakesits only a block of wood! Dont expect to create a perfect carving right away; the fun is in the journey.
Getting Started
Just like in chess, you need to plan and think ahead when carving a chess set. Luckily, I have taken some of the planning out of it by providing a list to get you started (see ).
All of the pieces are cut from 2" (5.1cm) square basswood stock. You will need a bandsaw or access to one due to the number of carvings. You can cut the pieces out with a coping saw, but with thirty-two pieces per chess set, it could take a while. For expediency, I cut out all of the pieces in the set prior to carving.  Always protect your hands while carving. To keep your knife blade sharp, apply stropping compound to a piece of leather.
Then, with the bevel facing away from you, pull the knife toward you across the stropping compound in a reverse shaving-type motionyou dont want the blade to dig into the leather.
Cutting Out the Blanks

Place the front and side patterns on the basswood blank. You can draw around the pattern (like I have done), attach the pattern with repositionable spray adhesive, or use graphite paper and a pencil to transfer the pattern onto the wood.
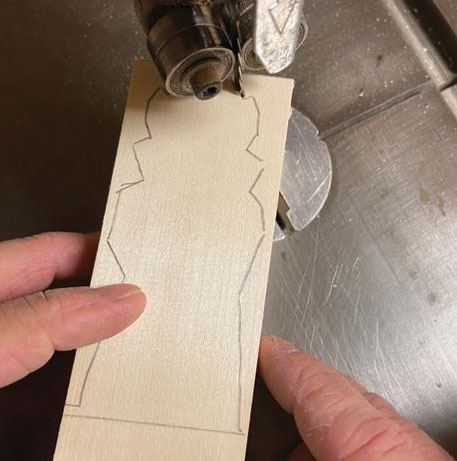
Cut the front view. Tape the waste wood back in place; this will provide stability and a reference point when cutting the adjacent view.
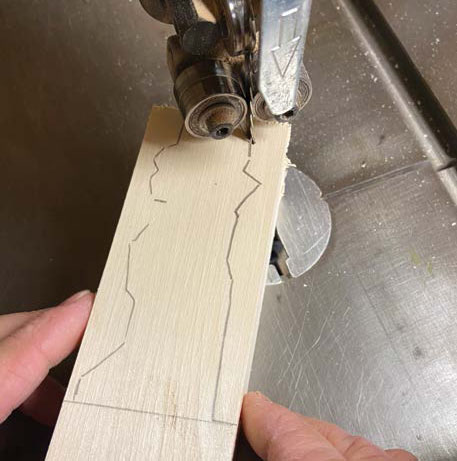
Cut the adjacent side.
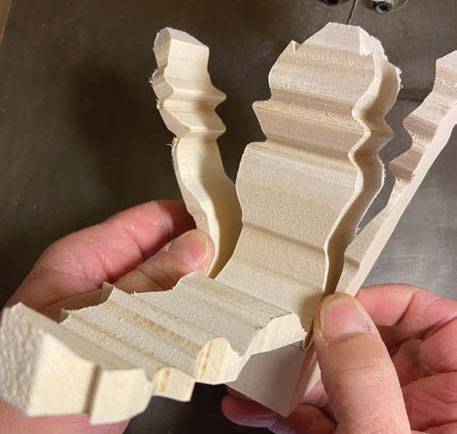
Remove the blank from the waste wood.
Note: Take your time! Speed is not your friend in these steps.
I used a 1/4" (6mm)wide blade with six TPI (teeth per inch); however, you could use a smaller blade if desired.
Materials and Tools
MATERIALS:
Basswood, 2" (5.1cm) square (quantities given are for one complete chess set): - Pawns: 16 blocks at 3" (9.5cm) tall - Rooks: 4 blocks at 4" (10cm) tall - Knights: 4 blocks at 4 " (11cm) tall - Bishops: 4 blocks at 4 " (12cm) tall - Queens: 2 blocks at 5" (13cm) tall - Kings: 2 blocks at 5 " (14cm) tall Patterns and graphite paper, stylus, or pencil Carving glove: Your choice, but make sure that your carving glove fits snug to your hand. A loose carving glove will allow the tool to grab and possibly slice into your hand or fingers.
TOOLS:
I used the following tools to create the chess set. Feel free to use the tools you have available or what works best for you. Bandsaw (I use a " [6mm] blade with six TPI [teeth per inch]) Carving knife of choice Detail knife of choice Hole punch (eye punch), " (6mm) 45 V-tool, " (3mm) 45 V-tool, " (6mm) 90 V-tool, " (13mm) V-tool, soft, " (10mm) #7 gouge, " (19mm) #9 gouge, " (3mm) #9 gouge, " (6mm)
PAINT:
A paint chart is provided , with individual paint colors listed after each project.
V-Tool Layers Lay the V-tool on its side to create layers in wood easily.
V-Tool Layers Lay the V-tool on its side to create layers in wood easily.
This helps separate clothing and prevents the need to make a lot of knife stops and relief cuts on your project. It also saves time; instead of having to make and carve up to a bunch of stop cuts, you can relieve certain areas in just one pass. 

Practice
Carving Eyes
Carving the eyes is easily the most stressful challenge to a carver of any skill level. After all, the eyes are the first thing that everyone sees when looking at a carving. However, with this easy approach, I hope to show you that carving eyes is nothing to be afraid of and can even be quite simple.







 Photo credits: Dwayne Gosnell: , and all step-by-step photos Mike Mihalo: , and all photos of finished chess pieces Courtesy Shutterstock: FOTOKITA (spider web) 2020 by Dwayne Gosnell and Fox Chapel Publishing Company, Inc., 903 Square Street, Mount Joy, PA 17552. Woodcarving a Halloween Chess Set is an original work, first published in 2020 by Fox Chapel Publishing Company, Inc. The patterns contained herein are copyrighted by the author. Readers may make copies of these patterns for personal use. The patterns themselves, however, are not to be duplicated for resale or distribution under any circumstances. Any such copying is a violation of copyright law.
 Always protect your hands while carving. To keep your knife blade sharp, apply stropping compound to a piece of leather.
 Place the front and side patterns on the basswood blank. You can draw around the pattern (like I have done), attach the pattern with repositionable spray adhesive, or use graphite paper and a pencil to transfer the pattern onto the wood.
  Cut the front view. Tape the waste wood back in place; this will provide stability and a reference point when cutting the adjacent view.
 Cut the adjacent side.
  Remove the blank from the waste wood. Note: Take your time! Speed is not your friend in these steps.

