Weaving Country Baskets
Maryanne Gillooly
CONTENTS
A Word to New Basket Makers
The ancient art of basket making continues to delight crafters today. Its combination of function and beauty make this craft particularly rewarding. The flower-gathering basket and herb basket are unique projects for those interested in creating new and original baskets.
Although these projects are recommended for those with some basket-making experience, with careful reading and attention to the diagrams a beginner may also be successful. Basketry is an acquired skill, but its methods are simple and straightforward. There are no real rules or limitations, so do not hesitate to alter these designs, materials, and methods. Develop your own personal style to make your baskets unique works of art.
A list of sources, tools, and basket-making kits can be found on .
There are two basic processes you will need to understand before you begin weaving. The first is four-fold lashing, the weaving that binds hoops together to form the most basic framework of a basket. The second is dyeing, the process of coloring reed. Mastering these two techniques will allow you to weave sturdy and colorful country baskets.
Four-Fold Lashing
Four-fold lashing is a relatively simple form of weaving baskets that creates a classic diamond pattern in the structure of the basket. The step-by-step instructions and diagrams below outline the basic pattern of this weaving technique. You will use this technique for both the flower-gathering basket and the herb basket.
Step A. Reed has both a right side and a wrong side. The right side is smooth and the wrong side is rough. If one end of the reed is bent back and forth, the wrong side can quickly be identified as it will split and fray.
Begin by having one of the crossed sections of the hoops facing you. Be sure the handle is in the upright position. Then, with the wrong side of the reed facing out, place the piece of pliable reed behind the oval handle hoops. Leave about an inch at the end so that it may be tucked into the weaving as the lashing progresses. Fold at point 2 so that the right side of the reed now faces up. Bring the reed across and up to the rim on the right hand side of the handle to point 3, then straight down and behind the rim to point 4.

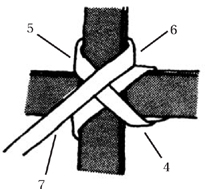
Step B. From point 4, bring the reed up and across to point 5, then behind the two oval handle hoops to point 6. You have now formed an X across the hoops. Keeping the reed next to the previous row, bring the reed down and across to point 7.

Step C. From point 7, bring the reed straight up and behind the rim to point 8. Then, bring it down and across to point 9, and behind the handle bottom to point 10.

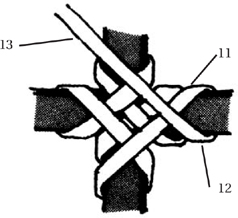
Step D. The reed must then be brought up and across to point 11, then straight down and behind the rim to point 12. Bring the reed up and across to point 13.

At this point you can see the diamond shape of the four-fold lashing. Continue this process of wrapping, making sure that each row overlaps the other slightly and that the reed always lies flat against the hoops. It helps to push down hard with your fingertips at every crossover.

Completed four-fold lashing.
Finish the lashing by cutting the end of the reed at an angle with scissors and inserting it under the last row at one of the corners. Wrap the reed behind the oval hoops, leaving about 1 inch at the end of the reed. Then bend the reed so that the wrong side is facing out and firmly tuck the end into the base of the lashing. Then repeat the lashing on the other side of the basket.
How to Dye Reed
The easiest and the fastest way to dye reed is with packaged commercial fabric dye. One small package of dye (1 ounces) will dye about 1 pound of reed. Mix the dye according to package instructions, using hot water right from the tap. You can mix the dye in a stainless-steel kitchen sink, old pot, or any other metal container. Stir until well dissolved. You must wet the reed before placing it in the dye bath. Leave the material in until it is the shade you want (dont forget that it will look lighter when it dries).
If you like, leave some reed in the dye for about 30 minutes, replace it with some that you leave in for about 15 minutes, and then replace that with some that you dye for just a few minutes. That will give you three shades of the same color.
Remove the reed from the dye bath with a stick or an old wooden spoon, rinse it in clear water, and place it on lots of paper towels to drain. Then hang it to dry completely. You may hang it inside or outside, as long as it is out of the sun.
When dyed reed is soaked later for weaving, some color may come out. Use separate soaking buckets for each color.
If you have a large pot, you can dye a finished basket. First, try a test piece of reed to make certain the color is right. Then wet the basket, place it in the dye bath, and stir it gently with a stick. Take the basket out when it reaches the right shade, pat it with paper towels, and hang it up to dry. Leave some towels underneath to catch the drippings.
Natural Dyes. Using dyes from natural materials requires time and patience, but is rewarding. The only dyeing material that I know of that does not call for a mordant (fixative) to keep a permanent true color is black walnut hulls. The colors obtained from other natural materials, without using a mordant, are not as long-lasting or vivid as the colors of commercially packaged dyes, but paler and more subtle. I prefer them that way and feel better not using the many chemicals required in mordanting.
To use black walnut hulls as a dye, soak pound of the hulls overnight in 3 to 4 gallons of water. The next day, boil the hulls in the water for an hour. Let the mixture cool, and then strain through cheesecloth to separate the dye from the hulls.
To get a darker brown dye, try using more hulls or less water. This procedure can also be used with coffee, tea, or any other natural materials you may wish to experiment with.
Definition of Terms
Breaking down, weaving over a series of tightly spaced ribs as if they were one rib until there is enough space between them to weave through.
D-hoop, hoop with one flat edge.
Filling in, weaving incomplete rows to fill the basket framework so that the weaving from one side of the basket to the other can progress in a straight line. Also called stepping.
Handle, the top portion of the vertical hoop.
Handle bottom, the bottom portion of the vertical hoop.
Lashing, the weaving used to bind two hoops together.


