Silk Ribbon Embroidery
a beginners guide
by J. Marsha Michler
Copyright Information
Copyright 2013, J. Marsha Michler. All rights reserved.
Kindle edition
The content of this ebook is for the readers personal use only and not to be reprinted or republished in any form. If you are using a borrowed copy, please consider purchasing your own in respect of the authors work.
http://www.jmarshamichler.com
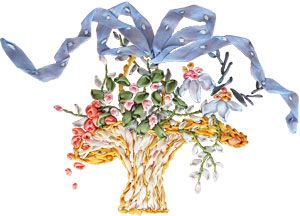
Title page photo: This whimsical bow-tied floral is made of embroidered and sewn silk ribbons. 9-1/2 x 8-1/2 in.
TABLE OF CONTENTS
Like an exuberant flower garden, a massed grouping of floral forms demonstrates one of many ways to approach the art of ribbon embroidery. 7-1/2 x 5 in.

Introduction
A dimensional needle art, silk ribbon embroidery seems to be a knockout wherever it is worked. Silk, first of all, is a wondrous substance. The luster of this fiber lends pizzazz, if not a touch of opulence to the stitches. And, the varied forms of embroidered stitches create appealing texture, dimension, and variety. What's not to like?
It won't take you years to perfect the art; it's simple and it's quick. You will find that ribbon stitches cover fabric with greater efficiency than thread. Learning to form the stitches is the same as for thread embroidery, and even the simplest of stitches can produce pleasing results. In no time at all you may find yourself adding touches of ribbon embroidery to linens and clothing.
Stitches of silk ribbon are at their best when mimicking flowers, and florals are what they are most often used for. One simple stitch can make a leaf or flower bud. Use combinations of stitches to create artful, unique flower forms. Silk ribbon is adaptable to other objects as well, such as the woven baskets you will see throughout this ebook. You might find yourself challenging the limits of your imagination as you get started in exploring silk ribbon embroidery.
Add to this the appeal of forming gorgeously dyed wide bias silk ribbons into larger, more emphatic flowers to use in your embroideries. Instructions are included for making beautiful folded or gathered sewn flowers. Follow the short tutorial, Step-by-Step Floral Embroidery, to learn how to combine sewn and embroidered florals to create a motif. And, I show you how to make your own bias silk ribbons, and how easy it is to dye ribbons. All of these topics are covered within this ebook.
Throughout, you will find photos of many different silk ribbon motifs and floral designs. Use them for ideas and inspiration for your own projects. I hope that you enjoy your stitching adventure with ribbons of silk!
A Tip for Beginners: If you have not done embroidery before, use cotton threads and scrap fabric to learn the basic embroidery stitches. After you feel comfortable with the stitches, try them in silk ribbon. My ebook, A Beginners Guide to Embroidery offers basic stitches and how tos for getting started with embroidery (see Ebook Excerpt at the end of this ebook).
This colorful basket of flowers is embroidered of 4mm and 7mm silk ribbons. 6-1/2 x 4-1/2 in.
Tools and Materials
To get started with ribbon embroidery you will need a few simple tools. These are needles, scissors, and an embroidery hoop. You may already have some basic items in your sewing kit for doing embroidery and hand sewing. Needles, and the size of hoop needed for ribbon embroidery may differ from those in your collection. Read on to learn about recommended tools.
There are a few things to know about fabrics, ribbons, and caring for embroideries, and those topics are covered below. Tools and materials for making bias ribbons, and for working with dyes are given in the chapters covering those topics.
Here is a "quick start" list of the bare essentials to begin with ribbon embroidery. Read on for items needed for thread embroidery, sewing bias ribbon flowers, dyeing, and so on.
You will need:
- Size 18 Chenille needle
- 4mm silk ribbons
- 4-inch Embroidery hoop, or a supported hoop
- Embroidery scissors
- Fabric to embroider on
Needles
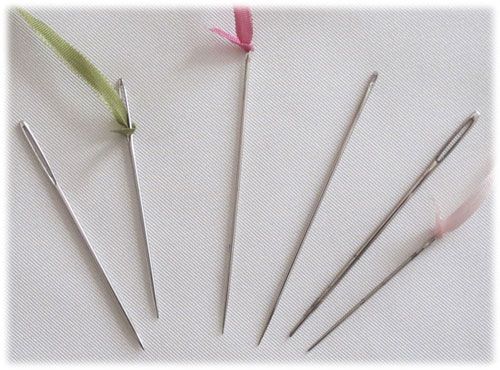
Needles for embroidering with ribbons include Chenille, Milliners, and Tapestry. Each has its own purpose in ribbon embroidery. A Chenille needle is the most important of these while the other two are optional.
A size 18 Chenille needle is recommended for stitching with the common widths of silk ribbons: 4mm, 2mm, and 7mm. A Chenille needle has a large shaft and a long eye. The bulky shaft of this needle is essential to the survival of your ribbons. The large-ish hole it makes in the fabric minimizes the amount of abrasion that the ribbon is subjected to. You might prefer a slightly smaller needle, such as size 20 if you are using mostly 2mm ribbons.
A package of assorted sizes of Tapestry needles is good to have on hand for weaving, woven roses, and wrapping previously made stitches. Although a Chenille needle can be used for the same things (by turning the needle around and using the eye end first), a Tapestry needle is easier and more efficient. Similar in shape to a Chenille, it has a blunt end that is less likely to catch on fabrics, threads and ribbons.
A Milliners needle is useful for making one stitch, and that is the Bullion stitch. This dimensional stitch is useful for creating texture and flower petals, and is a wonderful stitch to know for either ribbon or thread embroidery. The needle has an extra-long shaft that is evenly shaped, and a small eye. Trim the ribbon on a sharp diagonal before feeding it through the eye. Keep a range of sizes on hand for working with different thread types and ribbons.
Shown here are (from l. to r.), two each of Chenille, Milliners, and Tapestry needles.
Scissors
A small, sharp scissors is a must in an embroiderer's toolkit. There are two basic kinds to choose from. One has a set of small blades that are made for simply trimming threads. The other is a multi-purpose embroidery scissors made for snipping threads, trimming fabrics, and ripping out stitches- a narrow blade for picking stitches loose, and a wide one to slide under stitches before cutting them. Either kind of scissors will be fine for ribbon work, but be sure to buy the best quality you can find, and then maintain the tool by oiling or sharpening according to the manufacturers recommendations.
Next page


