Bruno Skvorc [Bruno Skvorc] - Build Your First Ethereum DApp
Here you can read online Bruno Skvorc [Bruno Skvorc] - Build Your First Ethereum DApp full text of the book (entire story) in english for free. Download pdf and epub, get meaning, cover and reviews about this ebook. year: 2018, publisher: SitePoint, genre: Romance novel. Description of the work, (preface) as well as reviews are available. Best literature library LitArk.com created for fans of good reading and offers a wide selection of genres:
Romance novel
Science fiction
Adventure
Detective
Science
History
Home and family
Prose
Art
Politics
Computer
Non-fiction
Religion
Business
Children
Humor
Choose a favorite category and find really read worthwhile books. Enjoy immersion in the world of imagination, feel the emotions of the characters or learn something new for yourself, make an fascinating discovery.
![Bruno Skvorc [Bruno Skvorc] Build Your First Ethereum DApp](https://litark.com/uploads/posts/book/119691/bruno-skvorc-bruno-skvorc-build-your-first.jpg)
- Book:Build Your First Ethereum DApp
- Author:
- Publisher:SitePoint
- Genre:
- Year:2018
- Rating:3 / 5
- Favourites:Add to favourites
- Your mark:
Build Your First Ethereum DApp: summary, description and annotation
We offer to read an annotation, description, summary or preface (depends on what the author of the book "Build Your First Ethereum DApp" wrote himself). If you haven't found the necessary information about the book — write in the comments, we will try to find it.
In this book well walk through the creation of a complete distributed application (DApp) based on the Ethereum platform. Well be building The Neverending Story, a crowdsourced choose-your-own-adventure story with crowd curation and community censorship.
This book is for anyone interested in using the Ethereum platform for development. Its advised that you read The Developers Guide to Ethereum before reading this book if you are not familiar with blockchain technology.
Bruno Skvorc [Bruno Skvorc]: author's other books
Who wrote Build Your First Ethereum DApp? Find out the surname, the name of the author of the book and a list of all author's works by series.


![Chris Dannen [Chris Dannen] - Introducing Ethereum and Solidity: Foundations of Cryptocurrency and Blockchain Programming for Beginners](/uploads/posts/book/119690/thumbs/chris-dannen-chris-dannen-introducing-ethereum.jpg)
![Kenny Vaneetvelde [Kenny Vaneetvelde] - Ethereum Projects for Beginners](/uploads/posts/book/119688/thumbs/kenny-vaneetvelde-kenny-vaneetvelde-ethereum.jpg)
Build Your First Ethereum DApp — read online for free the complete book (whole text) full work
Below is the text of the book, divided by pages. System saving the place of the last page read, allows you to conveniently read the book "Build Your First Ethereum DApp" online for free, without having to search again every time where you left off. Put a bookmark, and you can go to the page where you finished reading at any time.
Font size:
Interval:
Bookmark:
In of this tutorial series on building DApps with Ethereum, we wrote the TNS tokens code. But we havent yet compiled it, deployed it, tested it or verified it. Lets do all that in this part so that were ready for what comes next.
At this point we have a file containing some Solidity code. But to make the Ethereum Virtual Machine understand it, we need to turn it into machine code. Additionally, in order to communicate with it from a web application, we need an ABI (application binary interface), which is a universally readable description of the functions that exist in a certain smart contract be it a token or something more complex. We can create machine code for the EVM and the ABI all at once by using Truffles compiler.
In the project folder, run:
truffle compileThis command will look inside the contracts subfolder, compile them all and place their compiled version into the build subfolder. Note that if you used the alternative development flow from the last part, all the parent contracts from which our TNSToken contract is inheriting functionality will also be compiled one by one each in its own file.
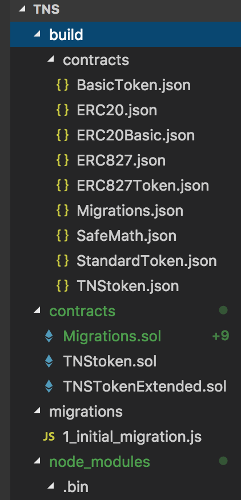
Feel free to inspect the contents of the generated JSON files. Our TNSToken should have over 10000 lines of JSON code.
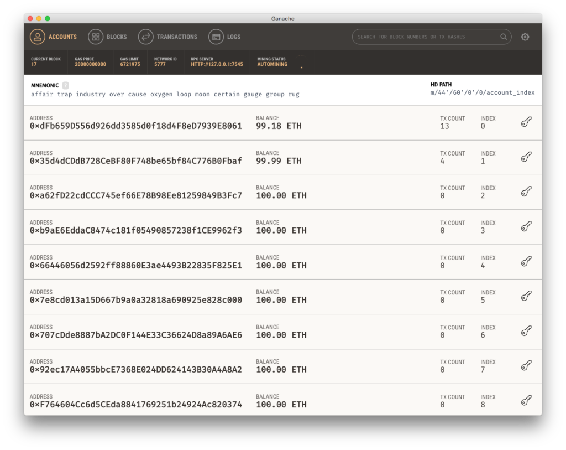
Now lets see if we can deploy this to our simulated Ganache blockchain. If Ganache isnt running already in a tab of your terminal or among your operating systems applications, run it with:
ganache-cliOr run the app to get a screen like this one:
Then, back in the folder where we just compiled the contracts, we have to add a migration. Create the file migrations/2_deploy_tnstoken.js. If youre not familiar with migrations in the Truffle ecosystem, see this guide.
Lets put the following into that file:
var Migrations = artifacts.require("./Migrations.sol");var TNSToken = artifacts.require("./TNSToken.sol");module.exports = function(deployer, network, accounts) { deployer.deploy(TNSToken, {from: accounts[0]});};First the ability to do migrations at all is imported by requesting Migrations.sol. This is required in every migration. Next, deploying a token means we need to import its Solidity code, and we do this by pulling in TNSToken.sol, the code we wrote in the previous part. Finally, this is cookie cutter migrating with only the part between function(deployer, network, accounts) { and the last } changing.
In this case, we tell the deployer to deploy the TNSToken and pass in the from argument in order to set the initial token holder. The address used here is a random one generated by Ganache, but by using the accounts array automatically passed to the deployer, we make sure we have access to the list of accounts present in the running node (be it a live Geth node or Ganache). In my particular example, the account[0] address was 0xdFb659D556d926dd3585d0f18d4F8eD7939E8061, also evident in the screenshot above.
Lets also not forget to configure a development environment in truffle.js:
module.exports = { networks: { development: { host: "127.0.0.1", port: 7545, network_id: "*" } }};Take care of the port and IP; yours might be different!
Finally, in the project folder, run truffle migrate. You should see something like this:
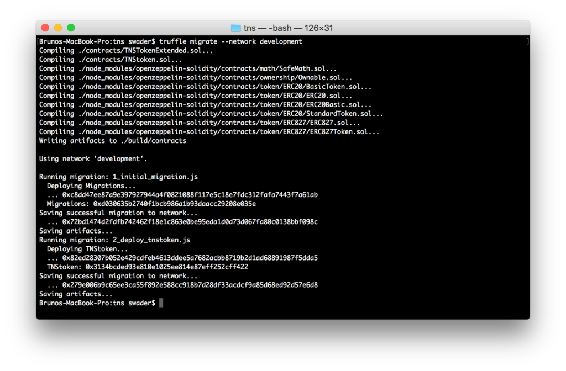
Notice the Ethereum address next to TNStoken: 0x3134bcded93e810e1025ee814e87eff252cff422. This is where our token was deployed. Now lets see it in action.
Automated tests are not necessary in this case. Token contracts are highly standardized and battle tested. If we had used some functionality that goes beyond the scope of a traditional token, then automated tests would have come in handy. As it is, though, testing it by sending it around to and from addresses is quite enough.
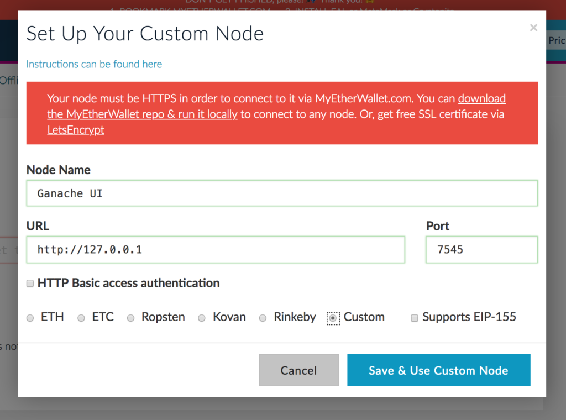
Open a wallet UI like MyEtherWallet and in the top right menu select a custom network. In the dialog, enter the information given to you by your private blockchain either Ganache or an actual PoA blockchain, whichever youre running based on part 1 of this tutorial series. In my example, thats 127.0.0.1 for the address, and 7545 for the port.
Open the wallet which you set as the from value in the deployment script. If youre using Ganache, youll see its private key printed on screen in the Ganache UI or the ganache output in the terminal.

Finally, MEW needs to be told that this token exists. We do this by adding a custom token.
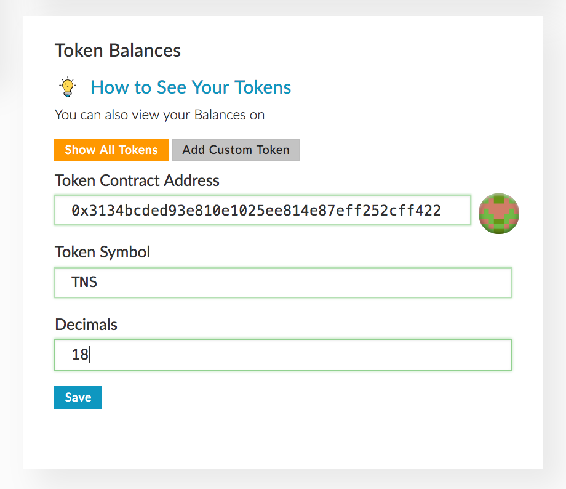
Immediately after having added the token, youll notice that the account now has a balance of 100 million of them, and that its able to send them in the currency dropdown selection menu. Lets try sending some to another address.
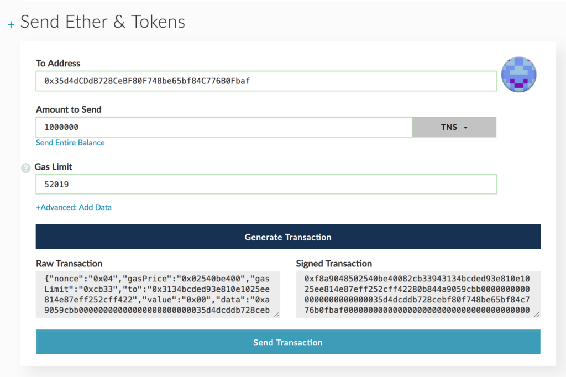
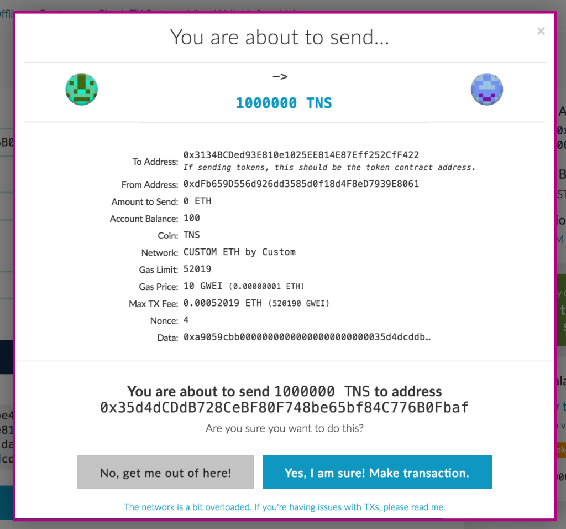
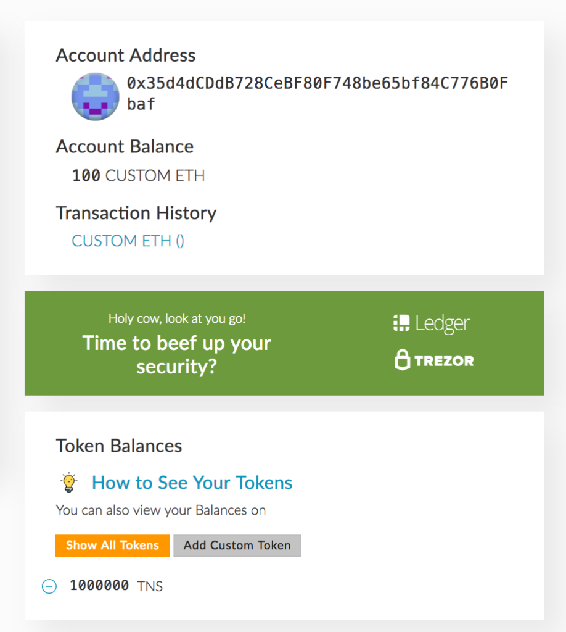
Go ahead and send those back now to get the original account back to 100 million again. Weve just made sure our tokens basic functionality works as intended.
This wouldnt be a real token test without also deploying it on a live network. Lets not use the mainnet, though, but a testnet like Rinkeby.
In truffle.js, lets add a new network rinkeby so that our file looks like this:
require('dotenv').config();const WalletProvider = require("truffle-wallet-provider");const Wallet = require('ethereumjs-wallet');const Web3 = require("web3");const w3 = new Web3();const PRIVKEY = process.env["PRIVKEY"];const INFURAKEY = process.env["INFURAKEY"];module.exports = { networks: { development: { host: "127.0.0.1", port: 7545, network_id: "*" }, rinkeby: { provider: function() { return new WalletProvider( Wallet.fromPrivateKey( Buffer.from(PRIVKEY, "hex")), "https://rinkeby.infura.io/"+INFURAKEY ); }, gas: 4600000, gasPrice: w3.utils.toWei("50", "gwei"), network_id: "3", }, }};Font size:
Interval:
Bookmark:
Similar books «Build Your First Ethereum DApp»
Look at similar books to Build Your First Ethereum DApp. We have selected literature similar in name and meaning in the hope of providing readers with more options to find new, interesting, not yet read works.
Discussion, reviews of the book Build Your First Ethereum DApp and just readers' own opinions. Leave your comments, write what you think about the work, its meaning or the main characters. Specify what exactly you liked and what you didn't like, and why you think so.