How to draw female bodys
Here you can read online How to draw female bodys full text of the book (entire story) in english for free. Download pdf and epub, get meaning, cover and reviews about this ebook. genre: Romance novel. Description of the work, (preface) as well as reviews are available. Best literature library LitArk.com created for fans of good reading and offers a wide selection of genres:
Romance novel
Science fiction
Adventure
Detective
Science
History
Home and family
Prose
Art
Politics
Computer
Non-fiction
Religion
Business
Children
Humor
Choose a favorite category and find really read worthwhile books. Enjoy immersion in the world of imagination, feel the emotions of the characters or learn something new for yourself, make an fascinating discovery.

- Book:How to draw female bodys
- Author:
- Genre:
- Rating:3 / 5
- Favourites:Add to favourites
- Your mark:
How to draw female bodys: summary, description and annotation
We offer to read an annotation, description, summary or preface (depends on what the author of the book "How to draw female bodys" wrote himself). If you haven't found the necessary information about the book — write in the comments, we will try to find it.
Unknown: author's other books
Who wrote How to draw female bodys? Find out the surname, the name of the author of the book and a list of all author's works by series.

How to draw female bodys — read online for free the complete book (whole text) full work
Below is the text of the book, divided by pages. System saving the place of the last page read, allows you to conveniently read the book "How to draw female bodys" online for free, without having to search again every time where you left off. Put a bookmark, and you can go to the page where you finished reading at any time.
Font size:
Interval:
Bookmark:
I am going to begin this tutorial by addressing one of the most commonly asked questions
that I receive: how to draw women's breasts (heh, I never thought I'd actually be making a tutorial about this.... ^_^). One of the most important things you should consider is to make your subject look natural; you can draw an attractive female without making her look like a "silicon implant ad," as a friend of mine put it. ^_^
The main problems people seem to have with drawing breasts are the shape and the
placement. A lot of artists (professionals as well as ametuers) make them look like
balloons that have been taped onto the
subject's chest; this is hardly a natural look. If you look through figure drawing books, you'll see that they are more like halves of a sphere or overturned teacups rather than balloons.
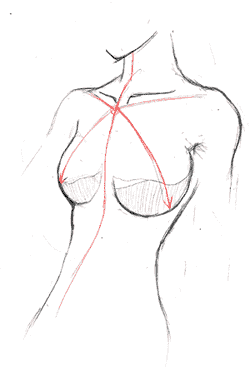
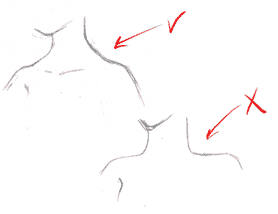
Now, note the position. Imagine a central guideline that runs down the center of your subject's body, as shown at the left. The breasts are at 45 degree angles from that center line, and are about halfway down the chest (shown by the red diagonal guidelines). Be very careful not to draw them too close together or too far apart, or too high on the chest; these are commonly made mistakes. As you will see in examples below, this basic rule of the 45 degree placement will apply to pretty much whatever pose you are using.
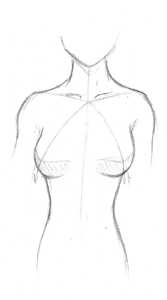
Here is another pose, showing the torso from a front view.
Note how the breasts are still located at 45 degree angles from the center line of the body. Oh, also take note of the shading. After looking at various examples, I find that shading in this fashion (rather than just following the lower curves as you would shade a sphere) makes them look more natural.
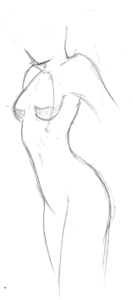

Here is one last pose to go over the size and placement. It's harder to see here, but the breasts are still at the 45 degree angle from the center line (which isn't draw in this picture; sorry about that ^_^;). Notice that the leftmost breast is drawn as a half-sphere, not as a full sphere. If you want to exaggerate the size, that's your choice, but I personally don't think its necessary.
Now, lets move on to the neck and shoulders.
When you draw the shoulders, notice that
they are slope down smoothly, they aren't flat.
Try to take the musculature structure of the neck and shoulders into consideration,
especially if you are going for a more realistic look. They should be shaped more like a
clothes hanger, and not drawn flat an hard.
Here are some more examples of various
shoulder positions. Notice that the shoulders are never drawn flat and dull.
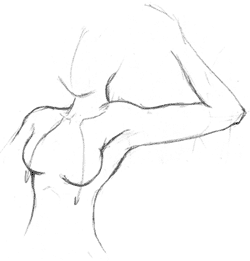
One more thing I wanted to cover regarding the torso is how to draw it if an arm is lifted. ^_^ I have personally found this difficult sometimes, so I figured it was a good thing to go over. If the arm is lifted, then the back of the torso will be exposed. Although a female's torso isn't as round and full as a males, it should still stick out in the back. Don't make the upper torso too narrow.
Notice also how the top of the right-most breast doesn't just keep curving inwards in a circle; remember that it is not a full sphere, so it is attached to the muscles of the shoulder.
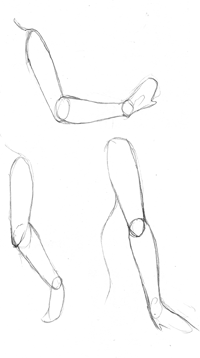
Next, let's move on to the arms. The arms consist of three basic sections: the upper arm, the foream, and the hand. Each can be represented in prelimiary sketches by oval shapes. Now, I know some people don't like using the shapes; you do not have to do it this way, this is just one possible way to go about sketching arms. Some books recommend using cylinders, but it's better to use flat ovals because they more closely match the shape of the arm. It isn't shown here, but if the arms are held loosely at the side, the hands should come down to the middle of the thigh. The elbows should be at about waist length.
Once you have your basic shapes of the arms down, you can refine them and make them look more realistic. This is a little more difficult. ^_^ When drawing the arms, don't make them straight and flat; arms have muscles, after all. ^_^ Never draw a straight arm as just a long cylinder (unless you are doing a super-deformed/chibi pic). ^_^ The arm starts at the shoulder. Notice how the shoulder bulges out slightly, then curves back down. The arm tapes slightly inwards until you reach the elbow. At the elbow, the arm widens again just after the elbow where the biceps are (as shown in the topmost picture here). The elbow itself can be a little daunting to draw.
Remember that the arm doesn't just start curving in 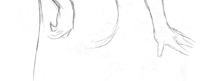
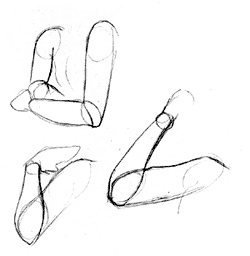
the other direction; there is a joint, and it should be shown (as in the top and bottom left pic). There are more examples below.
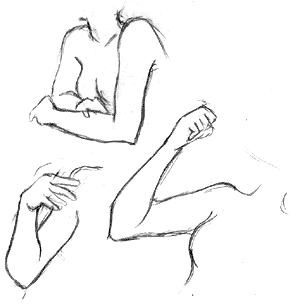
Here are some more poses for arms, this time showing how the parts of the arm overlap. It is sometimes easier to visualize the overlapping or foreshortening if you use basic oval shapes first, but again, you do not have to use them if you do not want to. Notice how in the topmost picture, the arm that is moving away from us tapers and grows smaller the further away
from us it is.
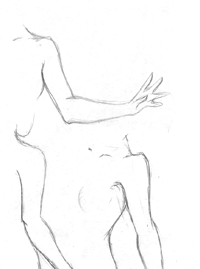
These poses are a little more difficult to refine. It is very important that you pay
close attention to the way each par of
the arm is facing, and how the elbow is
to be positioned. Try to imagine the arm
as two different shapes stuck together:
the cylindrical upper arm, and the
forearm, which is sort of shaped like a
bowling pin with a bump on the bottom.
^_^ That should help you in determining
the position of the elbow.
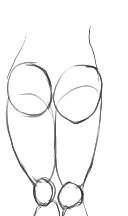
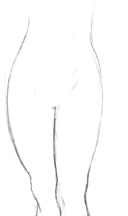
Legs can be another problem area for artists.
It's hard to make them shaped properly
(especially when you don't practice very
much, like me... ^_^;) Just like with the arms, it is important not to make them perfectly straight like cyliders. It is especially helpful to use ovals to help you get the shape right
Next pageFont size:
Interval:
Bookmark:
Similar books «How to draw female bodys»
Look at similar books to How to draw female bodys. We have selected literature similar in name and meaning in the hope of providing readers with more options to find new, interesting, not yet read works.
Discussion, reviews of the book How to draw female bodys and just readers' own opinions. Leave your comments, write what you think about the work, its meaning or the main characters. Specify what exactly you liked and what you didn't like, and why you think so.