Introduction
Content and Readership
This book documents the fifteen ITF (International Taekwon-Do Federation) Taekwon-Do patterns (tul) taught at 1st to 7th Degree black-belt level, the initial nine patterns taught at coloured-belt level having been covered in Master Hogans earlier book, Taekwon-Do Patterns: From Beginner to Black Belt. The intended readership is therefore primarily ITF Taekwon-Do practitioners holding the rank of 1st Degree black belt and above.
ITF Taekwon-Do is the Korean self-defence art created by General Choi Hong Hi and spread around the world with the formation of the International Taekwon-Do Federation in 1966. It is now frequently referred to as ITF Taekwon-Do to clearly differentiate it from its principal Taekwon-Do variant, the WTF (World Taekwon-Do Federation), which was founded in 1973. Although sharing a common foundation, the Taekwon-Do that is taught under the umbrellas of the two organizations differs in a number of areas, but most significantly in that of patterns, where each teaches a completely different pattern set. With the death of General Choi in 2002, the ITF split into three separate organizations the authors subscribe to the ITF under the leadership of President Choi Jung Hwa, the son of the founder, and the pattern descriptions in this book conform to the teaching of that organization. Whilst there are a few differences in patterns across the ITF and other organizations teaching Taekwon-Do as formulated by General Choi Hong Hi, they are limited to a small number of similar moves, e.g. executing a reverse hooking kick instead of a reverse turning kick or applying a technique at high section rather than middle section. This book should therefore be of interest to, and hopefully of value to, all ITF Taekwon-Do practitioners, regardless of their organizational affiliations.
Structure
Chapters
The rest of this book is divided into fifteen chapters covering each of the fifteen ITF Taekwon-Do patterns in the black-belt examination syllabus. Each chapter has the same structure:
An opening introduction to the pattern giving its meaning, a brief commentary on the pattern, the number of moves, its place in the grading syllabus, the pattern diagram and a list of new techniques introduced. |
Running across the top half of the remaining pages there is a move-by-move description of the pattern comprising photographs and captions for each move and for some transitions between moves. |
Underneath the pattern description photographs on the bottom half of the page, there is a mixture of self-defence applications and teaching tips relating to the pattern moves shown on that page and comprising photographs with captions. |
Throughout the book, photographs with captions are the principal medium for explaining techniques and they are formatted according to their functions as either pattern or application photographs.
Pattern Photographs
Pattern photographs run in strict sequence of the execution of the successive moves of the pattern. After every three, or sometimes six, photographs a short succession of combat applications or teaching tips follow. Each photograph shows Master Hogan against a white background and having completed a move, as well as some additional pictures of the transition between moves, as appropriate, e.g. as shown in these photographs and captions for moves 4 and 5 from pattern Kwang-Gae.

Move the left foot forward to double step into right walking stance, staying on the ball of the left foot until completing
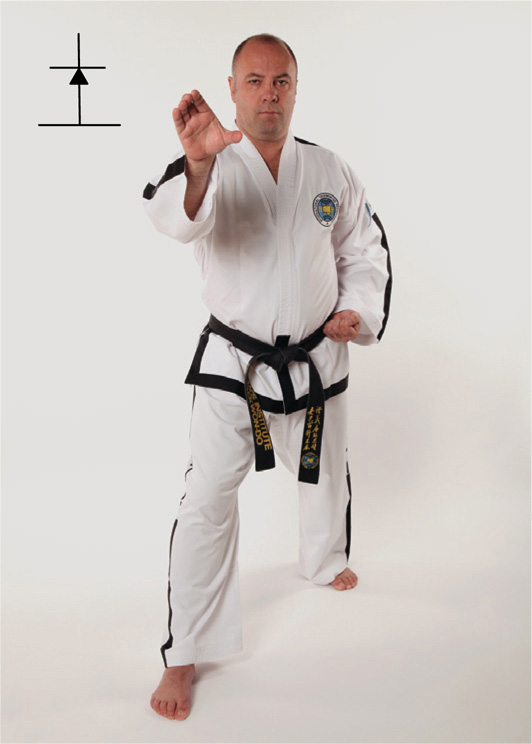
right walking stance right palm high section hooking block (gunnun so sonbadak nopunde golcho makgi).
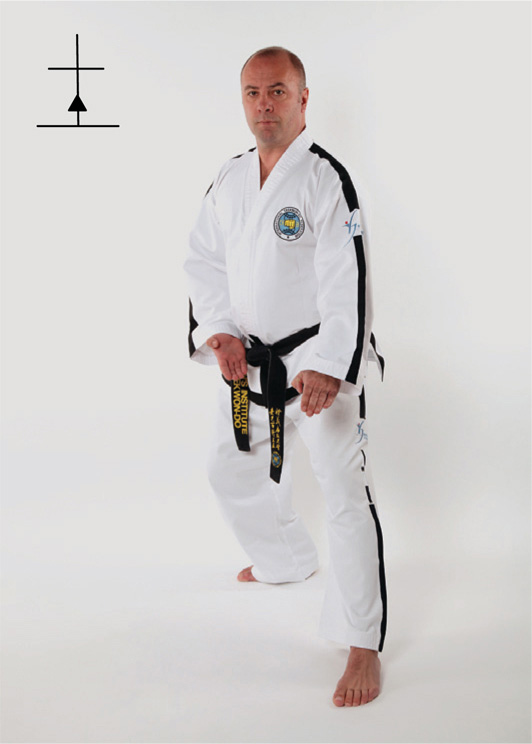
Step back with the right foot in a sliding motion into right l-stance knife hand low section guarding block (niunja so sonkal najunde daebi makgi).
Note that the number in bold in the caption is the designated number of the specific move in the pattern; where a move is covered by more than one photograph, as in move 4, the first photograph in the sequence shows the number of the move. Each designated move is given its full name in English in the following sequence:
name of stance, e.g. left walking stance, following the convention that if the stance distributes the body weight evenly across both feet (as in walking stance), and if one foot is forward relative to the other, then that foot determines whether it is a left or right stance; where neither foot is forward (as in sitting stance), then neither term is used; where the stance does not distribute the body weight evenly across both feet (as in l-stance or one leg stance), then whichever foot bears the most weight determines the description of the stance |
name of the attacking or blocking tool (where appropriate), e.g. right palm |
name of the section of the body that the technique is applied to (where appropriate), e.g. high section |
name of the technique, e.g. hooking block. |
The Korean name (in italics) follows the English and conforms to the same convention, although left and right are not included.
Every pattern photograph has a small black diagram, an orientation icon, in the top left-hand corner that is structured as follows:
Every pattern starts from a given point, progresses in various directions and ends at the starting point. The path travelled away from, and returning to, the starting point is represented by the pattern diagram that forms the unbroken lines of the orientation icon. Where the actual path travelled goes beyond the formal pattern diagram, dashed lines may be incorporated into the pattern diagram to better illustrate the total range of the pattern. |
The performer of the pattern is represented in the icon by a solid black triangle. At the start of the pattern, the base of the triangle is placed horizontally across the start point of the pattern and the apex points in the direction that the performer is facing at the start; the lines representing the path travelled are laid out relative to this starting position and orientation (note that in a few cases, this results in the icon diagram path appearing inverted with respect to the formal pattern diagram, where differing performer perspectives were sometimes used). As the pattern progresses, the base of the triangle continues to represent the position of both feet in a stance or movement, where they are parallel, or the rear foot, where one is forward relative to the other, or a single foot, where the other is held off the ground; the apex continues to represent the direction that the performer is facing. Movement along the path of the pattern is shown by adjusting the position of the triangle in two ways: |
by degrees of rotation to represent changes to the direction that the performer is facing (sometimes enhanced by a directional arrow) |
by movement along the lines of the pattern diagram to represent the performers advance and retreat along the path travelled in the pattern. |
This simple device not only allows you to see instantly where a given photograph and a given move fits in the pattern, but also allows complete flexibility in the camera angle of the photograph. Rather than taking all of the photographs from a single perspective, since you know the exact position of the performer in the pattern, the photograph can be taken from whichever perspective best illustrates the technique. |


