Part I Typical Mating Patterns with One Piece
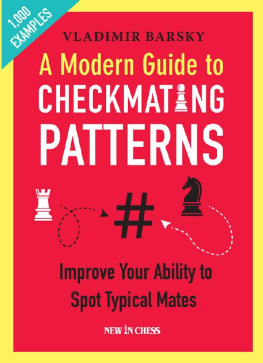
Each piece and each pawn on the chessboard can give check or checkmate to the opponents king except of course the kings themselves, who are, after all, not allowed to touch each other. The properties of the pieces are obviously quite different due to their strengths and the way they move. For example, for the mighty queen, helped by her king, it is easy to give mate, whereas the knight cannot do this at all without more support not even a pair of knights together can give mate by force.
It is important that we know what the individual mating positions, also called mating patterns or mating motifs , look like, and what the strengths and weaknesses of our pieces are.
Firstly, in the given exercises you are almost always asked to give mate in 1 move. However, by and by we will sometimes make things a little more complicated, and we will also show a few positions where the mate may take a few more moves.
Notation in bold (e.g. 1.Ra1-a8#) indicates the main variation of the solution (also called text variation). Alternatives, i.e. other possible moves, are indicated by moves in normal print (e.g., 1.Ke1-f1).
Moves in bold italics (e.g..R g3-g8+) mark the beginning of an alternative solution , or of another interesting variation.
Sometimes a piece can give mate in two different ways from the starting point. We will indicate this in abridged form (e.g., 1.Qd5-b7/g8#) .
Unless explicitly stated otherwise, it is always Whites turn to move. This is indicated by a small white square under the diagram.
W/B under a diagram means that both sides have a tactical opportunity and you are required to find the solution for both sides.
Every mating pattern starts with an introduction, which demonstrates typical mate situations. This is followed by a quiz where, in addition to modified versions of the demonstrated mating patterns, new, as yet unknown positions, are also shown. It is not the aim of the quiz that you solve as many exercises as possible, but that you have a go at the positions, you look for solutions without help and regardless whether the exercise is solved or not learn from the solutions with their extensive comments. The reader will be better able to remember a solution he has found himself than one that is brought to him on a silver plate and, above all, he will improve his understanding of the principles underlying the solutions.
If you cannot find the solution to an exercise, its best to look it up in the solution part in the back of the book and then continue with the next position.
Mate with the Rook
The rook cannot give mate to the opponents king on its own. It needs the help of another piece or its king.
Moreover, the rook can only give mate to a king that is on the edge of the board .
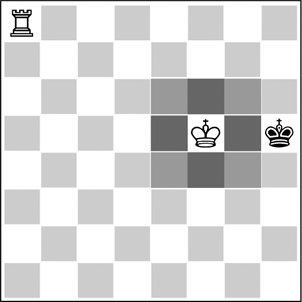
Since no king may walk into a check, every king has a kind of protection zone around him, which cannot be entered by the enemy king. We can see this in D1 . The marked squares around the white king make up his protection zone.
In D1 the white king is standing directly opposite his enemy. We call this situation opposition . The white kings protection zone deprives his opponent of three out of his five possible escape squares (g4, g5, g6). Therefore, the latter can only move on the h-file, to the squares h4 or h6.
D1 The protection zone of the king
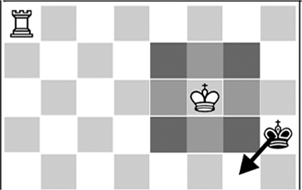
If the white king isnt directly opposite his enemy (i.e., they are not standing in opposition), the black king can escape to the side ( D2 ).
D2 The white king does not have the opposition
Now we have learned everything we have to know about the mate with King + Rook:
- The opponents king must be at the edge of the board;
- Our own king must be standing right opposite the enemy king (in opposition).
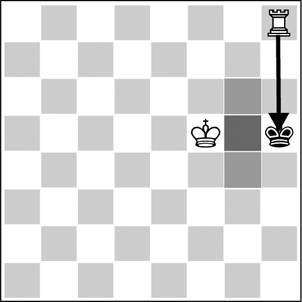
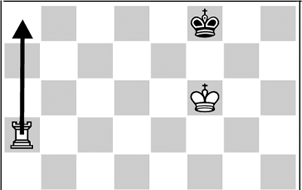
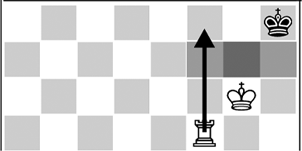
Then, if the rook gives check from a safe distance (arrow), where it cannot be captured, then we immediately have mate , as is shown in D3 .
All the squares where the black king could go to, are controlled by the rook. There is no escape MATE!
D3 Mating position
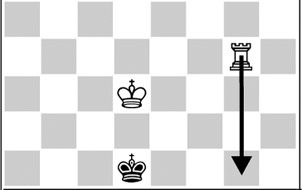
Of course, this mate is not only possible at the side edge, but also at the upper and lower edges of the board (i.e. the back ranks), as shown in the next two diagrams D4 and D5 :
D4 Mate on Blacks back rank
D5 Mate on Whites back rank
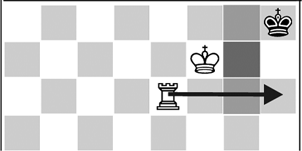
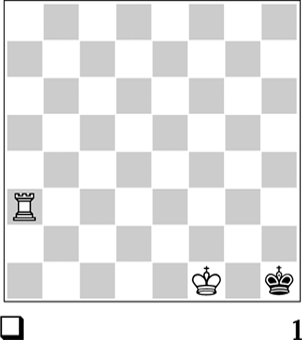
It is even easier when the enemy king is standing in the corner ( D6/D7 ), since in that case our king does not have to have the opposition. The reason is quite simple: the black king cannot escape to the side. The hole in our protection zone (see the marked squares) lies outside the board. Again, this position can occur in the left hand or the right hand corner, and upwards or sidewards.
D6 The king in the corner
D7 Mate on the h-file
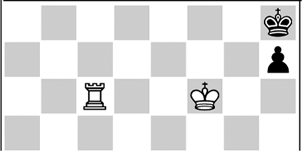
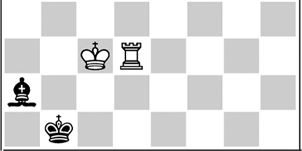
The mate becomes even easier if the opponent also has a pawn (D8) or a piece ( D9 ) that blocks his escape square. In that case we can also win in positions where the mate would otherwise be far away or perhaps even impossible. In our examples Blacks own pieces prevent their king from escaping via h7 or a2 respectively.
D8 The pawn blocks the h7-square
D9 The bishop blocks the a2-square
Quiz 1: Mate with the Rook
In all the exercises White is to move, and he must if possible immediately give mate to the black king. Some of the exercises are already a little more complicated than our examples, but that shouldnt be a problem.
Always look which squares the protection zone of the white king is taking from the opponent. Also look which other squares the latter cannot move to. This way you will recognize if the black king can be mated, and how. A small tip: not every exercise requires you to give mate in one move otherwise it would be much too simple and boring! This will also be the case in the other quizzes in this book. Sometimes they contain a few such special positions. It doesnt really matter if you cannot solve these at the first stroke.
And now, good luck with our first test!


