Loyd Blankenship - Woodworking for Young Makers: Fun and Easy Do-It-Yourself Projects
Here you can read online Loyd Blankenship - Woodworking for Young Makers: Fun and Easy Do-It-Yourself Projects full text of the book (entire story) in english for free. Download pdf and epub, get meaning, cover and reviews about this ebook. year: 2017, publisher: Maker Media, genre: Children. Description of the work, (preface) as well as reviews are available. Best literature library LitArk.com created for fans of good reading and offers a wide selection of genres:
Romance novel
Science fiction
Adventure
Detective
Science
History
Home and family
Prose
Art
Politics
Computer
Non-fiction
Religion
Business
Children
Humor
Choose a favorite category and find really read worthwhile books. Enjoy immersion in the world of imagination, feel the emotions of the characters or learn something new for yourself, make an fascinating discovery.

- Book:Woodworking for Young Makers: Fun and Easy Do-It-Yourself Projects
- Author:
- Publisher:Maker Media
- Genre:
- Year:2017
- Rating:4 / 5
- Favourites:Add to favourites
- Your mark:
Woodworking for Young Makers: Fun and Easy Do-It-Yourself Projects: summary, description and annotation
We offer to read an annotation, description, summary or preface (depends on what the author of the book "Woodworking for Young Makers: Fun and Easy Do-It-Yourself Projects" wrote himself). If you haven't found the necessary information about the book — write in the comments, we will try to find it.
Learning to be a maker has never been more fun. Full-color cartoons and drawings lead you through the steps needed for making a wizard wand, a sanding block, a charging station for your phone or tablet, and a sturdy box with a hidden compartment. Youll learn how to choose and use the right tools, measure and cut properly, sand, glue, and finish your woodworking projects to make them look great.
This is the perfect guide for young people who want to do woodworking at home, at school, or at a local makerspace. It teaches fundamental skills and unlocks creativity. No prior experience or knowledge of tools is required. Everything you need to know is explained in the text and cartoons.
This easy-to-follow guide is suitable for all ages. It features:
Lavish cartoons and line artStep-by-step instructions with full-color artProjects that are fun and usefulBasic skills, handy tips, and safety precautions
Woodworking is the most universally useful of crafts. In this book, young adults will learn to work successfully with standard hand tools found in any garage or basement workshop and in any school shop class. The skills learned here will unlock a lifetime of useful skills and satisfying accomplishments.
Loyd Blankenship: author's other books
Who wrote Woodworking for Young Makers: Fun and Easy Do-It-Yourself Projects? Find out the surname, the name of the author of the book and a list of all author's works by series.


Woodworking for Young Makers: Fun and Easy Do-It-Yourself Projects — read online for free the complete book (whole text) full work
Below is the text of the book, divided by pages. System saving the place of the last page read, allows you to conveniently read the book "Woodworking for Young Makers: Fun and Easy Do-It-Yourself Projects" online for free, without having to search again every time where you left off. Put a bookmark, and you can go to the page where you finished reading at any time.
Font size:
Interval:
Bookmark:

Do you like stories about fantastic adventures, fabulous creatures, and magic artifacts? Lets make a wizards wand that you can use with costume play, as a prop for a play, or just as a fun decoration for your room. Making a wizards wand is a great place to begin woodworking because you can make it as simple or as fancy as you want.

There is no right or wrong way when it comes to crafting a wand. In later projects you will have to be precise in your cuts and measurements. Here, though, the only limits are your imagination!

For this project, you can choose to use a wood carving (or whittling) knife or a rotary tool. Either will work, and both are fun to use!

You can find many at arts & crafts stores and hardware stores. Use a steel blade that is less than 4 inches long and fairly narrow ( / inch or smaller) for fitting into tight spaces.
 wood carving knife
 or
 rotary tool
 handsaw
 or
 dovetail saw
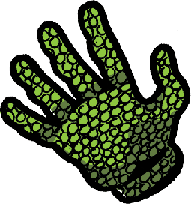
When working with any sharp tool, you should be extra careful. Cut away from your hands and body. Wear a protective glove on the hand that is holding the wand while you carve. And have an adult around at all times!
 wood for the wand
 fine steel wool
 sandpaper
(60, 120, and 220 grit)
 tung oil
Select a piece of wood that is slightly larger than the size of your desired wand. You can use a handsaw or dovetail saw to cut a dry, solid tree branch that you found on the ground to size. Or you can go to a craft or lumber store and buy a blank. A 12-inch blank of hardwood from the craft store is a great starting place.
 Blanks
 Lumber stores and craft and hobby shops usually carry an assortment of wood that has already been cut into sections that range from 620 inches long. These pre-formed shapes are ideal for creating a straight, heavy wand, though you will have to sand it down to the right diameter. Some stores may do this for you.
A rotary tool is a handheld power tool that can be used for sanding, grinding, and polishing. A clamp called a collet holds different bitsor removable pieces that do a variety of thingsin place at one end, making it very versatile!
To go with your rotary tool, I recommend the following bits:
-inch drum sander mandrel
60-grit to 240-grit sanding band
/ -inch, 80-grit flapwheel sander
sanding discs
abrasive brushes
abrasive buffs
engraving bits

Use the rubber drum mandrel, which is one of the grippers that goes on your rotary tool, to put on a sanding band. The screw at the tip will expand the mandrel to make the drum fit tightly. If your wand is being made from a tree branch, start sanding at a low speed until you get the feel for it. Make light passes instead of trying to take all the bark off in one go.

Trace the shape of the wood on a large piece of paper (old grocery bags are perfect). Lay the wood on the paper and trace the outline.
The hilt is the part of the wand you hold onto. It should be the widest part of the wood, and it should be designed to give you a comfortable grip.
The shaft stretches from the hilt to the tip. The wand should taper a bit so that the tip is thinner than the base. The shaft can feature whatever designs your imagination can come up with.
Draw lines on the traced sketch to indicate where you will carve and sand away wood to form your unique design features.
Create several designs using different features or spacing until you are satisfied with the look.
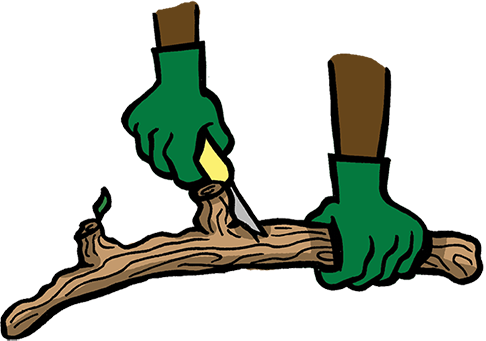
If you are using a tree branch as the basis for your wand, you will need to strip the outer bark to expose the sapwood beneath.
Next pageFont size:
Interval:
Bookmark:
Similar books «Woodworking for Young Makers: Fun and Easy Do-It-Yourself Projects»
Look at similar books to Woodworking for Young Makers: Fun and Easy Do-It-Yourself Projects. We have selected literature similar in name and meaning in the hope of providing readers with more options to find new, interesting, not yet read works.
Discussion, reviews of the book Woodworking for Young Makers: Fun and Easy Do-It-Yourself Projects and just readers' own opinions. Leave your comments, write what you think about the work, its meaning or the main characters. Specify what exactly you liked and what you didn't like, and why you think so.