ACKNOWLEDGMENTS Florence Temko and I began work on this book before she passed away. She left an international community of admirers. She was a delightful friend and a brilliant artist. All who knew her will miss her. She popularized the word "Kirigami," that is now a common term for cutting folded paper. Ever forward thinking, Florence became interested in finding the best way to create folded fabric.
We both tried various techniques and found the perfect stiffening formula to apply to fabric so that it could be folded like paperthe result is the BEAUTIFUL ART of FABRIGAMI. We now introduce FABRIGAMI! Pre-stiffened fabric can be used for all of the paper craft techniques that we love such as origami, kirigami, and scrapbooking. I am enormously grateful for the tremendous support from Robert Lang a distinguished origami artist who took the time to encourage the completion of this book and make suggestions for collaborations and proper origami techniques. Scott Stern the illustrator is a most gifted young man who designed his first model at the age of six, and, at eighteen, published his own book of original origami creations. Not only did he illustrate all of the models here, but also folded them for the photographs and designed several of the models in the book himself. A special thank you to David Cooper who was able to create beautiful photographs using Scotts models.
Finally, I am most grateful to my family and friends for their support and encouragement. Folding doesnt have to be confined to paper and cloth, you can also fold won ton wrappers or even tortillas. David Lister, an origami artist, author, and creator, compiled a list of materials that are origami compatible. These materials include rubber balloons, metal, rayon mesh, celluloid, fruit leather and other material that you would not associate with origami. FABRIGAMI is just one more creative adventure into the world of folding crafts that has brought so much fun to all ages and cultures.  Special thanks to my wonderful, creative, and reliable test team at Transition Services, Inc.
  Special thanks to my wonderful, creative, and reliable test team at Transition Services, Inc.
Las Vegas, NV. TSI provides meaningful work for people with developmental disabilities. Visit www.tsilasvegas.com
BILLFOLD AND
BUSINESS CARD HOLDER This simple wallet with two compartments can be made in two different sizes to suit dollar bills or business cards. The folding procedure is identical for both.
You will need: A 13 inches (33 cm) stiffened fabric square for a billfold, or An 8 inches (20 cm) stiffened fabric square for business cards


Begin with the inside of the fabric facing up. Valley fold in half vertically.
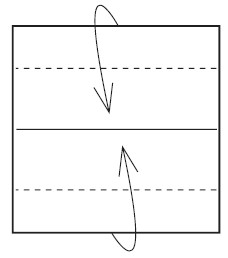
Valley fold the top and bottom edges almost to the crease.

Valley fold the top and bottom edges almost to the crease.
Leave a little gap in between the two edges.  Flip the model over. Valley fold the model in half. Then unfold.
  Valley fold the two edges to the center crease.
 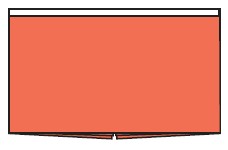 The completed billfold and business card case.
  The completed billfold and business card case.
Tip: If the billfold does not open at the top, then check step 5 to make sure you folded in half in the right direction.
Other currencies: For other bill denominations, begin with a square with sides twice the width of the bill, plus inch (1 cm) extra.
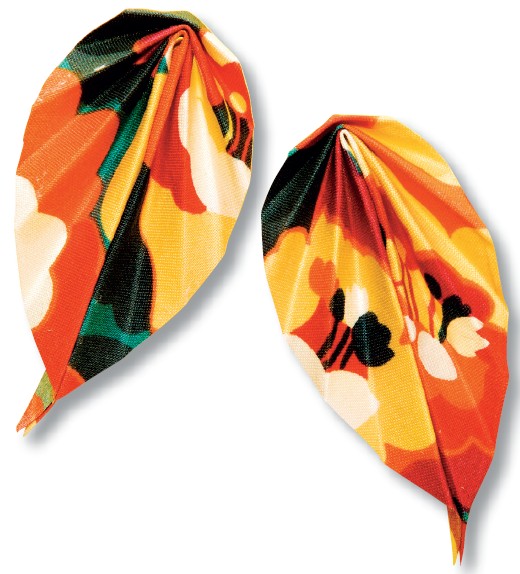
EARRINGS These earrings are simply fan-pleated from small squares. They can be made in just a few minutes from fabric scraps to coordinate with any outfit or to be wrapped up as a gift. Hardware for creating earrings can be found in most craft stores.
You will need: A 3 inches (9 cm) stiffened fabric squares
Earring fittings
Glue
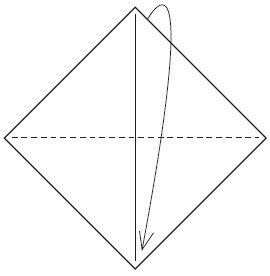
With the paper side facing up, fold the square on the diagonal into a triangle.
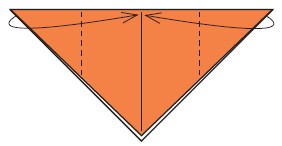
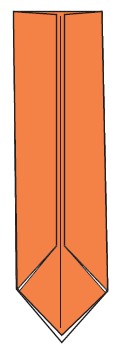
Valley fold both top corners to the middle of the top edge.
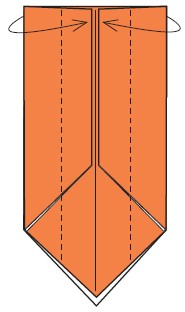
Valley fold the left and right edges to the center.
Completely unfold the model.
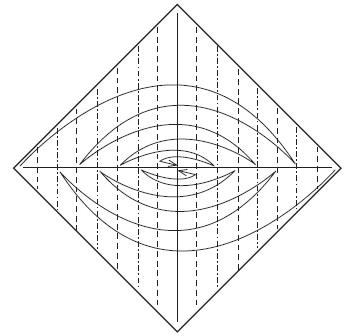
Fan pleat back and forth on the existing creases with alternating valley and mountain folds.
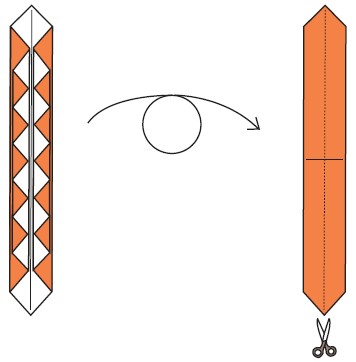
Flip the model over.

Flip the model over.
Cut the model in half along the longest crease. You will have two pleated triangles. 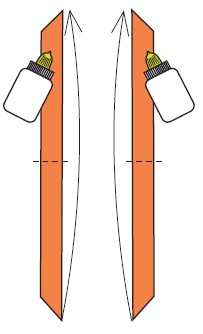 Fold vertically in half, gluing the top half to the bottom half, allowing the pleats to spread.
  Attach earring fittings with glue.











 Special thanks to my wonderful, creative, and reliable test team at Transition Services, Inc.


 Begin with the inside of the fabric facing up. Valley fold in half vertically.
  Valley fold the top and bottom edges almost to the crease.
  Flip the model over. Valley fold the model in half. Then unfold.
  Valley fold the two edges to the center crease.
  The completed billfold and business card case.
 With the paper side facing up, fold the square on the diagonal into a triangle.
  Valley fold both top corners to the middle of the top edge.
  Valley fold the left and right edges to the center.
  Completely unfold the model.
  Fan pleat back and forth on the existing creases with alternating valley and mountain folds.
  Flip the model over.
  Fold vertically in half, gluing the top half to the bottom half, allowing the pleats to spread.
  Attach earring fittings with glue.