
 TABLE OF CONTENTS VOCABULARY T he word rope is the generic term for any line on a boat. Yet the words rope and line are almost never used. Each rope has its own name, according to its place and purpose on board. A mooring or a hawser serve to moor the boat, and a halyard is for raising a sail. A sheet adjusts the sail angle. On the boom youll find the topping lifts and the boom vang.
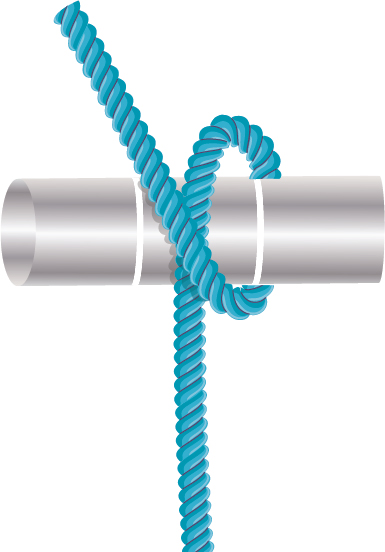
When making a knot, we distinguish between running and standing . Running refers to the part of the rope you manipulate to tie the knot, and standing refers to the part that remains unmoving. By folding a rope in two, you form a bight .  If the strands cross, it becomes a loop . Below are the basic forms:
  Simple knot.
 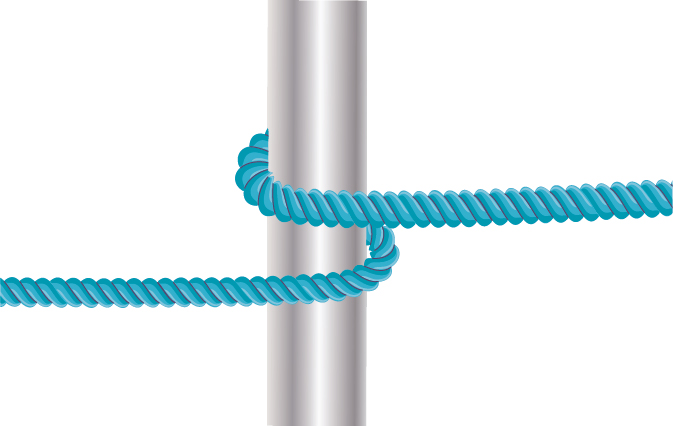 Half hitch, which refers to wrapping the line around a support with its strands crossing.
  KNOTS BOWLINE This is a classic nautical knot with multiple uses.
  KNOTS BOWLINE This is a classic nautical knot with multiple uses.
It is solid and does not slip, but nevertheless, its easy to tie and untie. STEP 1 Make a loop.  STEP 2 Pass the running end (or running part) through the loop.
  STEP 3 The running end goes around the standing end (or standing part) and then back through the loop. To tighten the knot, pull the standing end and the running end at the same time.
  VARIATION BOWLINE BEND Using two bowlines, you can make a bowline benda handy way of connecting two ropes, especially if they have different diameters!
  RUNNING BOWLINE The running bowline is very useful for making a sliding loop, which is often used to tie a vessel to a mooring buoy.
STEP 1 Fold the rope to make a bight. Form a loop along the left strand and pass the running end over the standing end. 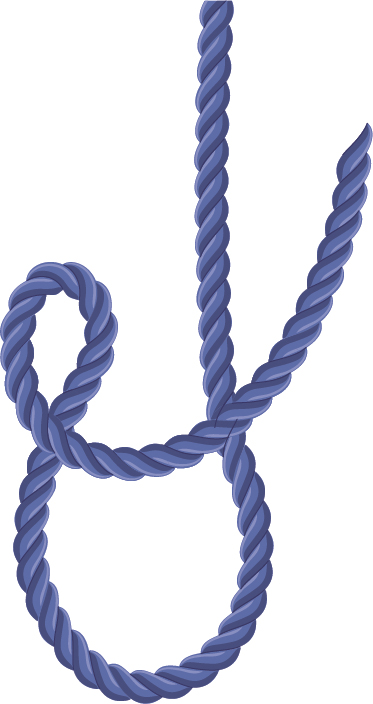 STEP 2 Take the running end, pass it behind the standing end, and then through the loop you made in the beginning. Finish by going back though the large loop from behind, then through the small one.
 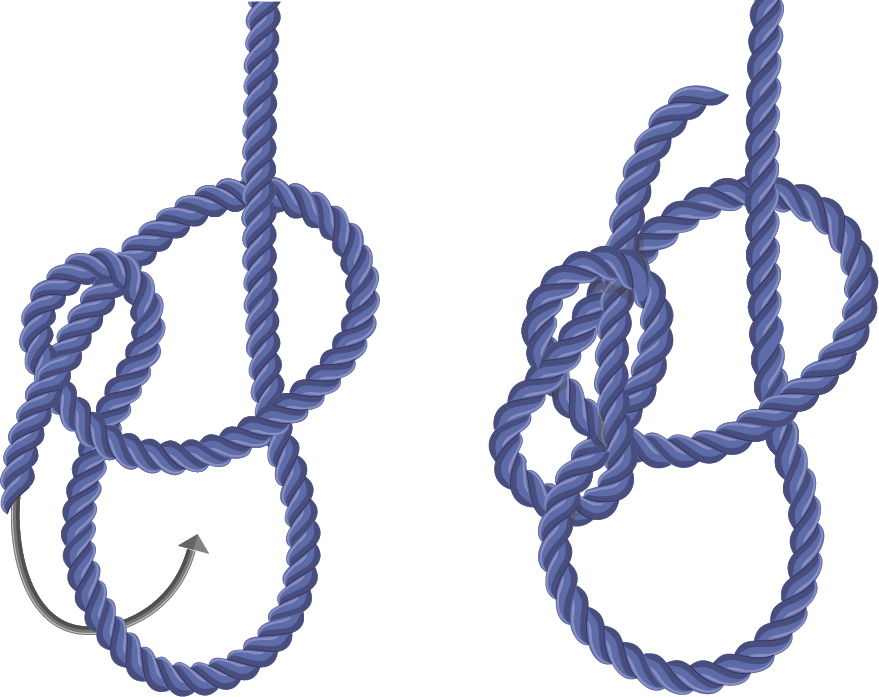 STEP 3 The knot is finished.
 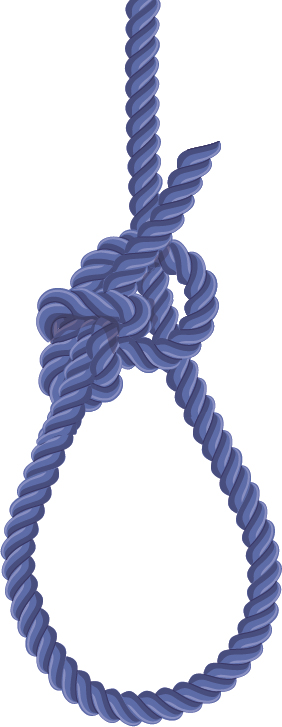 FIGURE EIGHT KNOT This very simple stopper knot, among other things, prevents a rope from escaping a pulley.
In general, its advisable to tie this knot well above the end of the rope (at least 8 inches [20 cm] up). STEP 1 Make a loop. 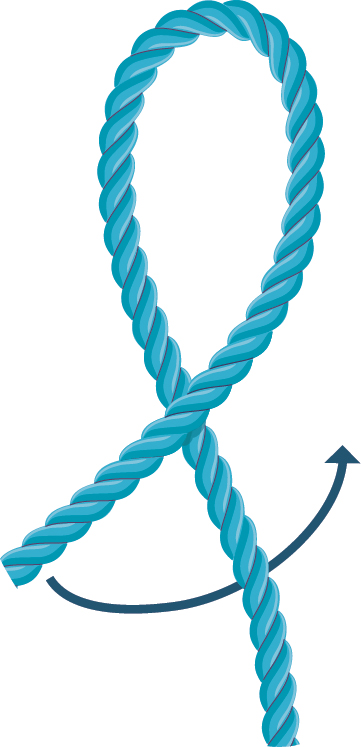 STEP 2 Pass the running end under the standing end, then through the loop. When going through the loop, first go through the top part and then through the bottom.
 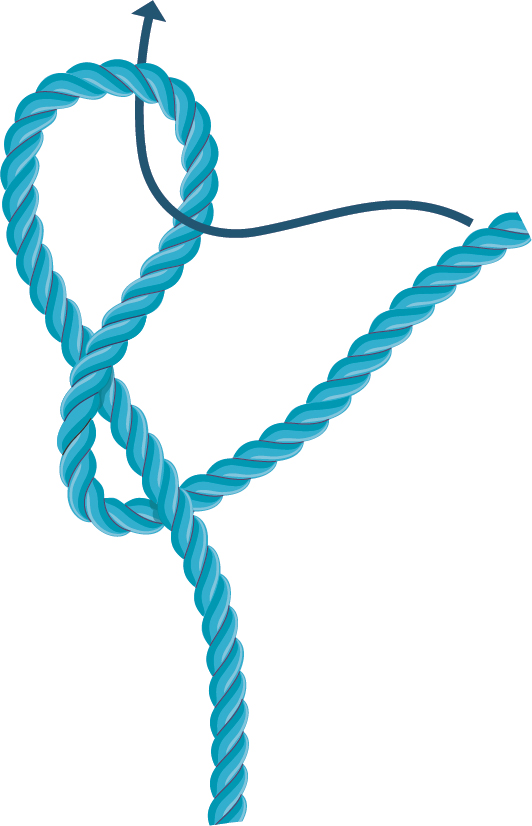 STEP 3 Pull the ends to tighten.
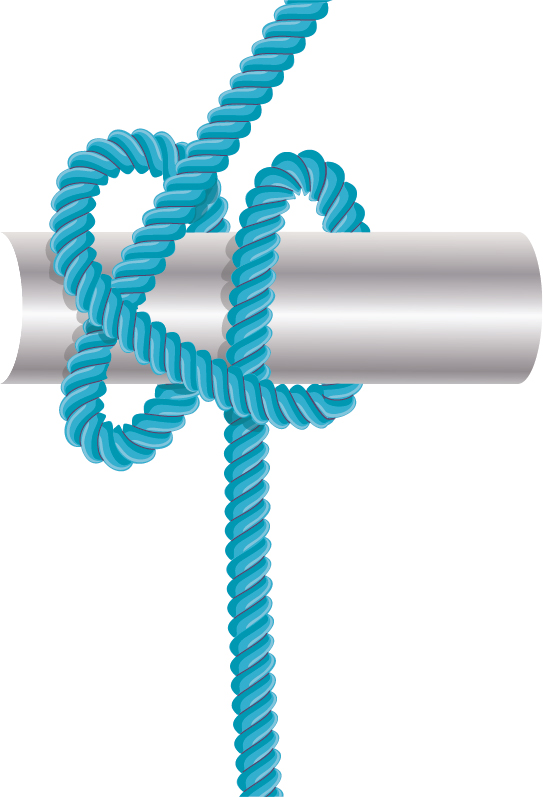
  CLOVE HITCH The clove hitch, a classic of the mooring hitches, is particularly simple to tie.
Its very useful for keeping a fender in place. STEP 1 Wrap once around a support. 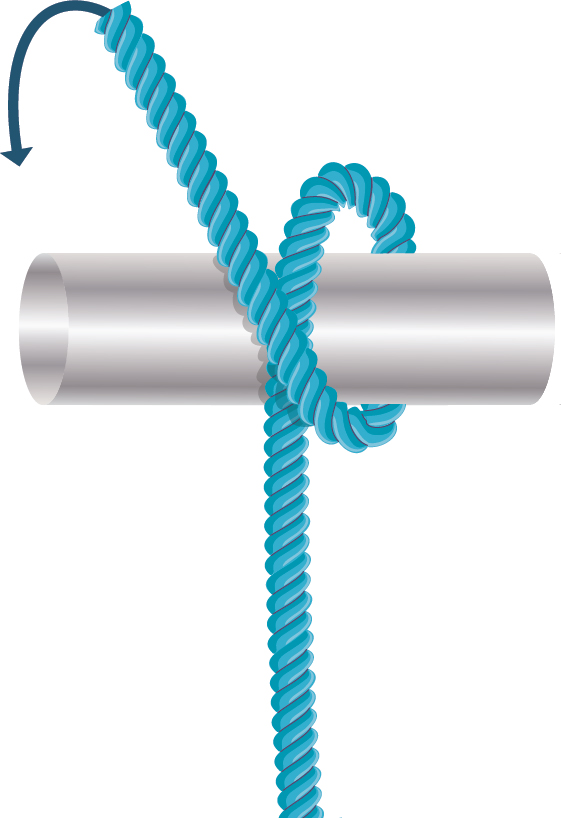 STEP 2 Take the running end and wrap the rope a second time around the support next to the first wrap, going back to front, and slide the running end beneath.
 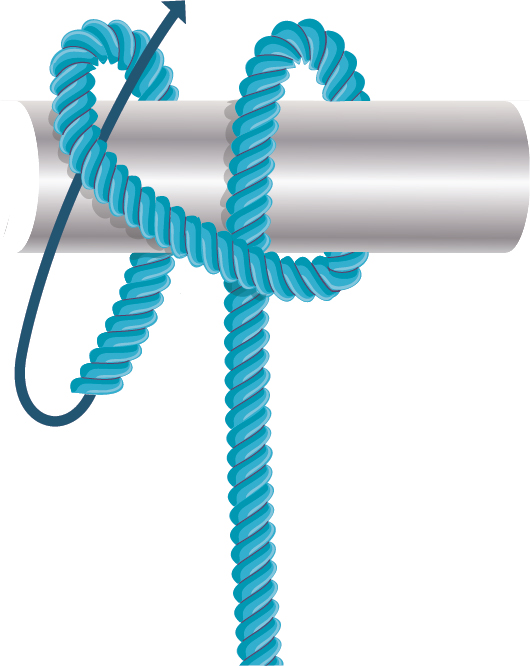 STEP 3 Tighten firmly.
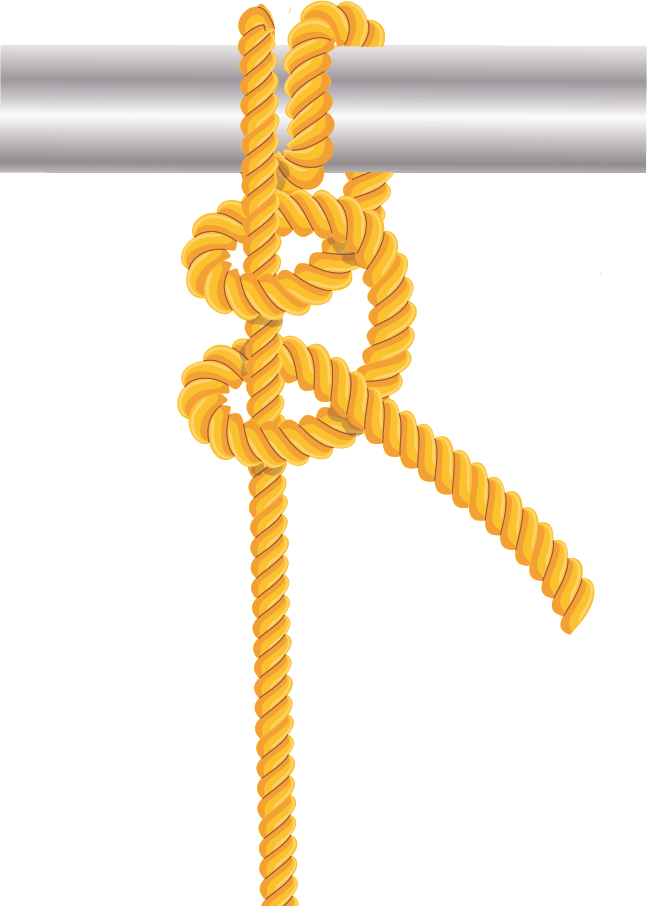
  ROUND TURN AND TWO HALF HITCHES This is the ultimate mooring hitch. Its a straightforward hitch, quick to tie and untie, and also has multiple uses.
STEP 1 Make two round turns around a support.  STEP 2 With the running end, make a loop that passes first in front of, then in back of, the standing end.
 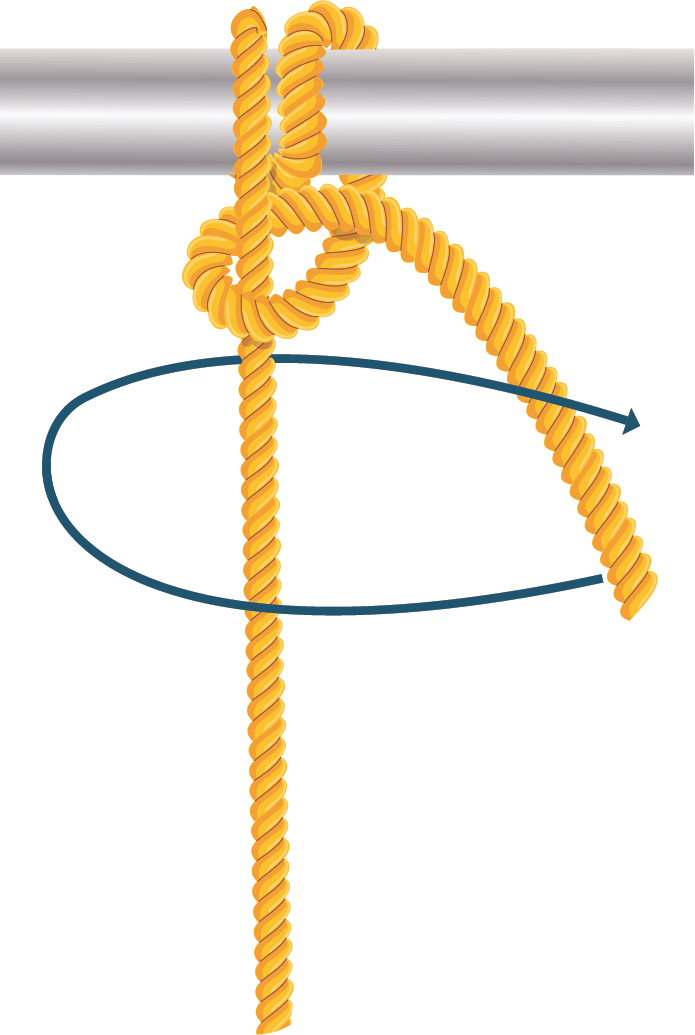 STEP 3 Make a second loop with the running end, turning it in the same direction as the first. Finish the hitch by pulling the running end to raise the loops.
  CLEAT HITCH No great mystery as to its use: this knot securely attaches a line to a cleat. To practice tying this knot, you can use a doorknob or a piece of furniture.
STEP 1 Wrap the rope around the cleat from bottom to top, bring the line back in front of the cleat, and start wrapping it again.  STEP 2 Make a loop along the running end.
  STEP 3 Thread the loop onto the cleat without turning it over.
  ROLLING HITCH The rolling hitch is generally used to connect a finer tether to a thicker, very taut rope. Therefore, by pulling on a taut rope, you can offset its tension by allowing it to recover some slack, even releasing when stuck. By the way, you can also use the rolling hitch to hang a hammock! STEP 1 Make a hitch.
Next page



 TABLE OF CONTENTS VOCABULARY T he word rope is the generic term for any line on a boat. Yet the words rope and line are almost never used. Each rope has its own name, according to its place and purpose on board. A mooring or a hawser serve to moor the boat, and a halyard is for raising a sail. A sheet adjusts the sail angle. On the boom youll find the topping lifts and the boom vang.
 If the strands cross, it becomes a loop . Below are the basic forms:
  Simple knot.
  Half hitch, which refers to wrapping the line around a support with its strands crossing.
  KNOTS BOWLINE This is a classic nautical knot with multiple uses.
  STEP 2 Pass the running end (or running part) through the loop.
  STEP 3 The running end goes around the standing end (or standing part) and then back through the loop. To tighten the knot, pull the standing end and the running end at the same time.
  VARIATION BOWLINE BEND Using two bowlines, you can make a bowline benda handy way of connecting two ropes, especially if they have different diameters!
  RUNNING BOWLINE The running bowline is very useful for making a sliding loop, which is often used to tie a vessel to a mooring buoy.
 STEP 2 Take the running end, pass it behind the standing end, and then through the loop you made in the beginning. Finish by going back though the large loop from behind, then through the small one.
  STEP 3 The knot is finished.
  FIGURE EIGHT KNOT This very simple stopper knot, among other things, prevents a rope from escaping a pulley.
 STEP 2 Pass the running end under the standing end, then through the loop. When going through the loop, first go through the top part and then through the bottom.
  STEP 3 Pull the ends to tighten.
  CLOVE HITCH The clove hitch, a classic of the mooring hitches, is particularly simple to tie.
 STEP 2 Take the running end and wrap the rope a second time around the support next to the first wrap, going back to front, and slide the running end beneath.
  STEP 3 Tighten firmly.
  ROUND TURN AND TWO HALF HITCHES This is the ultimate mooring hitch. Its a straightforward hitch, quick to tie and untie, and also has multiple uses.
 STEP 2 With the running end, make a loop that passes first in front of, then in back of, the standing end.
  STEP 3 Make a second loop with the running end, turning it in the same direction as the first. Finish the hitch by pulling the running end to raise the loops.
  CLEAT HITCH No great mystery as to its use: this knot securely attaches a line to a cleat. To practice tying this knot, you can use a doorknob or a piece of furniture.
 STEP 2 Make a loop along the running end.
  STEP 3 Thread the loop onto the cleat without turning it over.
  ROLLING HITCH The rolling hitch is generally used to connect a finer tether to a thicker, very taut rope. Therefore, by pulling on a taut rope, you can offset its tension by allowing it to recover some slack, even releasing when stuck. By the way, you can also use the rolling hitch to hang a hammock! STEP 1 Make a hitch.