Charl Coetzee - Essential Fingerpicking Patterns: A Beginners Guide To Fingerstyle Guitar
Here you can read online Charl Coetzee - Essential Fingerpicking Patterns: A Beginners Guide To Fingerstyle Guitar full text of the book (entire story) in english for free. Download pdf and epub, get meaning, cover and reviews about this ebook. year: 2012, genre: Children. Description of the work, (preface) as well as reviews are available. Best literature library LitArk.com created for fans of good reading and offers a wide selection of genres:
Romance novel
Science fiction
Adventure
Detective
Science
History
Home and family
Prose
Art
Politics
Computer
Non-fiction
Religion
Business
Children
Humor
Choose a favorite category and find really read worthwhile books. Enjoy immersion in the world of imagination, feel the emotions of the characters or learn something new for yourself, make an fascinating discovery.
- Book:Essential Fingerpicking Patterns: A Beginners Guide To Fingerstyle Guitar
- Author:
- Genre:
- Year:2012
- Rating:4 / 5
- Favourites:Add to favourites
- Your mark:
Essential Fingerpicking Patterns: A Beginners Guide To Fingerstyle Guitar: summary, description and annotation
We offer to read an annotation, description, summary or preface (depends on what the author of the book "Essential Fingerpicking Patterns: A Beginners Guide To Fingerstyle Guitar" wrote himself). If you haven't found the necessary information about the book — write in the comments, we will try to find it.
Charl Coetzee: author's other books
Who wrote Essential Fingerpicking Patterns: A Beginners Guide To Fingerstyle Guitar? Find out the surname, the name of the author of the book and a list of all author's works by series.


Essential Fingerpicking Patterns: A Beginners Guide To Fingerstyle Guitar — read online for free the complete book (whole text) full work
Below is the text of the book, divided by pages. System saving the place of the last page read, allows you to conveniently read the book "Essential Fingerpicking Patterns: A Beginners Guide To Fingerstyle Guitar" online for free, without having to search again every time where you left off. Put a bookmark, and you can go to the page where you finished reading at any time.
Font size:
Interval:
Bookmark:
Table of Contents
Introduction Welcome To The Crash Course Acoustic Guitar Chord Guide Fingerpicking is a really cool technique and well worth exploring and developing. When using fingerstyle techniques youre able to play the guitar from a pianists perspective. When we strum the guitar we play all the notes in a chord simultaneously which is cool but sometimes you want to arpeggiate the chords to get a piano or harp type sound. Arpeggio simply means broken chord. In this eBook I have written down a number of different fingerpicking patterns which you can then go and apply to different chords and progressions. At first I would suggest getting familiar with a particular pattern using the chords shown in the example and then once you have it under your fingers then you can use it on other chords as well.
Youll probably have to adapt things slightly when moving these patterns around to different chords as the root notes will be on different strings. This is normal and to be expected. The basic rule of thumb would be to only change the root note in the pattern and then leave the rest of the higher notes the same. I have filmed a video that explains in more detail how you can put these patterns to use. Welcome To The Crash Course Fingerpicking Guide Before we get into the patterns let me show you what the right hand fingers are called. P = Thumb I =Index M=Middle A=Ring The thumb normally covers the 6th, 5th and 4th strings while the Index, Middle and Ring fingers play the high strings.
High E=Ring B string=Middle G String=Index Sometimes the I, M and A fingers can shift strings and then theyll be assigned as follows: B string=Ring G string=Middle D String=Index Just look at the tab and the accompanying fingers and youll be good to go. Now allow me for a second to bring your attention to the one thing that has the power to either accelerate your progress or bring it to a complete halt! Im talking about muscle memory... Muscle memory will either work with you or against you and trust me, you want it to be on your side! Muscle memory simply means that your fingers will remember what you practice. So if you make the same mistake repeatedly it will remember that, which is not good. More often than not, trying to play things too fast too soon is the reason for making unnecessary mistakes. So remember to go slowly and to learn the patterns thoroughly before speeding things up.
If you speed things up before you have the basic pattern nailed, youll inevitably make the same mistakes repeatedly which means youre rehearsing bad technique. So rather take your time and do things properly right from the start. This way you will be creating a positive record in your muscle memory and then it becomes instinctive and effortless, which is the zone youre aiming to be in. If you have any questions feel free to and Ill help you out where possible. Lets get going then! Example 01 P I M A or R 3 2 1... This is a very basic exercise that will get your fingers used to this new technique.
Your thumb is normally assigned to the 3 bass strings, E, A and D while the index finger plays the G string, middle finger plays the B string and the ring finger plays the E string. Fig. 1  Using my special formula we call this pattern Root 3 2 1. Basically this means that if I have a chord progression of D C and G then fingers i, m and a will stay the same throughout while the thumb will move between the 3 bass strings so that it plays the Root for every chord. D Major = Thumb plays the D String. C Major = Thumb plays the A String.
G Major = Thumb plays the E String. Fig. 1.1  So the basic pattern P I M A or Root 3 2 1 can be used on any chord as long as you move the thumb to play the Root. Now there are exceptions to the rule sometimes especially when used with inversions but Ill cover that later in the ebook. Example 02 P A M I or R 1 2 3... This is almost a reverse of the previous pattern.
The root stays the same but the i, m & a fingers are now playing in the opposite direction. Youll hear how a tiny tweak like this can totally transform the sound of this pattern. Fig. 2  Lets apply that pattern to the D, C and G chord progression. Fig. 2.1
  Example 03 P I M A P A M I or R 3 2 1 R 1 2 3 ...
The previous two patterns are pretty cool but it could get a little bit repetitive, not that theres anything wrong with that, but you might want something with more variation? Thats exactly what youll get when you add those two patterns together. The first part of the bar ascends while the second part descends. Fig. 3  Lets apply that pattern to the D, C and G chord progression. Fig. 3.1
  Example 04 P A M I P I M A or R 1 2 3 R 3 2 1...
By now youre probably getting the hang of how this all works together? This time we start the first part of the bar with the descending pattern and the second part of the bar with the ascending pattern. Fig. 4  Lets apply that pattern to the D, C and G chord progression. Fig. 4.1
  Example 05 P I M A or R 4 3 2... Ok so now youve had a chance to use the PAMI/R321 and PIMA/R123 patterns.
Lets look at another variation that uses the same fingering but different strings. Well call this pattern R 4 3 2. Its still a PIMA pattern but the string grouping has changed. Fig. 5  Obviously this pattern doesnt fit a standard open D Major chord but it doesnt mean we cant use it for D. Have a look at the example in Fig 5.1 and youll see how I can incorporate inversions when using fingerpicking.
In Bar 5 Im playing a D/F# pronounced D over F Sharp. Inversions = Anytime you play a chord where the lowest note of the chord is not the root, its called an inversion a.k.a Slash Chords. Fig 5.1 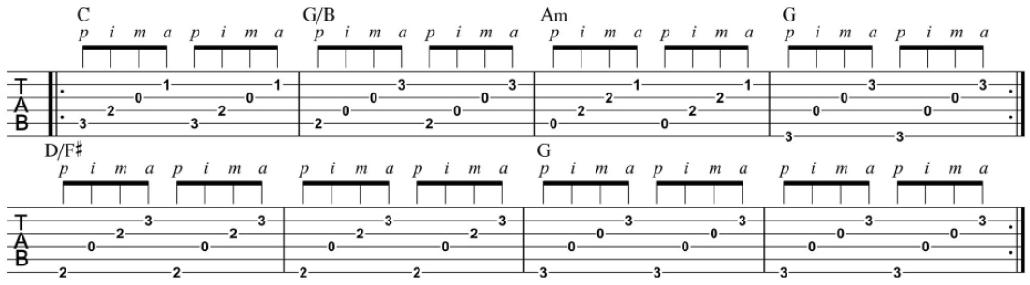 As you know by now weve been giving these patterns names like R 4 3 2 (Root Four Three Two) etc but as you can see in Fig 5.1 R (Root) can be replaced with another note, as long as it remains the lowest note. So the term root in my formula is used loosely and just refers to the lowest note of the chord which most of the time happens to be the root anyway. Example 06 P A M I or R 2 3 4... Fig. 6
  Heres the same example with the progression G Am G/B C. Fig. 6.1
Font size:
Interval:
Bookmark:
Similar books «Essential Fingerpicking Patterns: A Beginners Guide To Fingerstyle Guitar»
Look at similar books to Essential Fingerpicking Patterns: A Beginners Guide To Fingerstyle Guitar. We have selected literature similar in name and meaning in the hope of providing readers with more options to find new, interesting, not yet read works.
Discussion, reviews of the book Essential Fingerpicking Patterns: A Beginners Guide To Fingerstyle Guitar and just readers' own opinions. Leave your comments, write what you think about the work, its meaning or the main characters. Specify what exactly you liked and what you didn't like, and why you think so.