Dear Reader,
Beaded what? Rings? You may have said those words to yourself when you picked up this book. Would they fall apart? you wondered. Do I have to spend a lot of time and money on a single piece of jewelry? you pondered.
Im here to set the record straight, because beaded rings are not only the hottest new fashion craze, they are also inexpensive and quick to make. And, by using some of the new fishing lines, elastics, and wire on the market, most are quite durable, even with hand-washing.
Beadwork Creates Beaded Rings is a compilation of thirty of the most exciting ring designs Ive encountered. Youll find cocktail rings and everyday rings, sparkling crystal ones as well as sedate seed-beaded ones, rings you make to fit tightly on your finger and those that stretch easily over a knuckle. There are rings you knit, rings you work with a needle and thread, rings you bend with wire, and others you hold together with elastic. And you know what? All of them are gorgeous!
As with all of our Beadwork Creates books, its a good idea to check our Techniques section on before you begin. Its full of great tips to start you on your way, and it contains all the stitch information youll need for making each ring.
So sit down, find a favorite ring, and get to work. Before you know it, youll need more than ten fingers to show off your new obsession.
Jean Campbell
Editor-in-Chief
Beadwork magazine
Contents
by Jamie Hogsett
by Jeannette Cook
by Susan J. Manchester
by SuZ Garcia
by Sharon Bateman
by Sandy Amazeen
by Anna Tollin
by Nancy Graver
by Barbara L. Grainger
by Donna Zaidenberg
by Susan Manchester
by Leslie Venturoso
by Dustin Wedekind
by Linda Leibsker
by Betcey Ventrella
by Lisa Gettings
by Cindy Reiland
by Jean Campbell
by Diane Fitzgerald
by S. Raven Willey
by Leslie Granbeck
by Betcey Ventrella
by Sue Swanson
by Mary Libby Neiman
by Laura Funk
by Diane Fitzgerald
by Lynn Krestel
by Jamie Hogsett
by Sara Beth Cullinan
by Lea Zinke

Jamie Hogsett
This ten-minute project will get you hooked on making rings! It is flashy and stylish, but also easily glides over any finger making it very comfortable.
Materials
44 sterling silver heishi spacer 4mm beads
2 Swarovski crystal 6mm rondelle beads
1 Swarovski crystal 8mm round bead
1 sterling silver 1mm crimp tube
6" of clear .05mm stretch elastic
Notions
Chain-nose pliers or crimping pliers
Step 1: Use the elastic to string 22 heishi spacers, 1 rondelle, 1 crystal, 1 rondelle, and the remaining spacers.
Step 2: String the crimp tube and pass through the first several spacers you strung in Step 1. Gently pull both ends of the elastic to snug all the beads. Crimp the tube using the chain-nose or crimping pliers. Trim both ends close to the crimp tube.
Jamie Hogsett is projects editor for Beadwork magazine.


Jeannette Cook
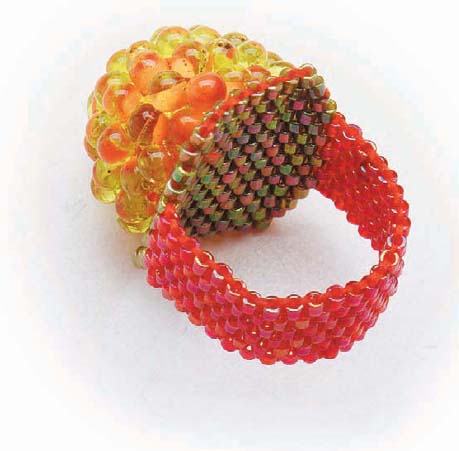
Inspired by those wonderful Miyuki color-lined teardrop beads, this gorgeous ring is designed to wow your admirers. Show off your inner power with pride!
Materials
Orange color-lined drop beads
Red and olive Delica beads
of a cotton ball
1" 1" piece of white grosgrain ribbon
Orange size B Nymo or A Silamide beading thread
Beeswax or Thread Heaven
Notions
Size 12 beading needles
Scissors
Pen
Lighter
Step 1: Draw a circle about the size of a quarter on the ribbon. Thread the needle with 3' of doubled and conditioned thread. Use running stitch to sew on the line you just made on the ribbon. Cut around the circle about " from the stitching. Use the lighter to carefully singe the fraying edges.
Step 2: Pull the ends of the thread to slightly draw in the sides of the circle. The ribbon will cup. Roll the cotton ball in your fingers to tighten it. Stuff it into the cup of ribbon and continue pulling the thread to tighten it around the cotton ball. Use your scissors end to tuck any loose cotton back into the ribbon as you tighten it. Gather the seam outside the stitching and tack them all down neatly. Rub this end on a flat surface to make it as flat as possible.
Step 3: Use your needle to pass up to the top center of the ribbon (the smooth end). String 1 drop and pass back through the fabric and out as close to where you exited as possible. Pull tight to seat the drop close to the fabric. Continue adding drops in concentric circles as tightly together as possible until you have covered all but the flattened end of the ribbon ball. Set aside.
Step 4: Using 3' of single conditioned thread, weave a piece of peyote stitch (see Techniques, ) 14 beads wide and 8 beads tall. Work 4 more rows, decreasing on each side of the beadwork. Weave through the beads to the first row created in this step and make identical decreases. This piece will be the mount for your ring top.
Step 5: Making sure your thread is always hidden within the beads, continue working peyote stitch off of the mount. Do so by working with red beads 6-wide. This will create the band of your ring. Work the band until the entire ring fits comfortably around your finger.
Step 5: Connect the end of the band to the other side of the ring mount so they lock like a zipper and weave the beads together. Weave through all the beads on the band to reinforce, finishing near the center of the ring mount.
Step 6: Center the beaded ribbon ball on the mount and securely stitch it to the peyote stitch. Secure the thread and trim close to the work.
Jeannette Cook has been working with beads as a wearable and fine art form for thirty-five years and teaching beading workshops for eighteen years. She is owner of Beady Eyed Women and can be reached at www.beadyeyedwomen.com.
Susan J. Manchester
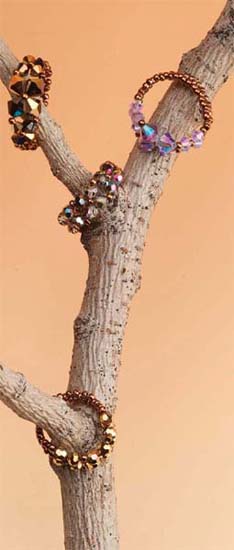
This sparkly crystal band is a great off-loom project for first-timers. Put it on and no one will know how easy it was to make!
Materials
12 Swarovski crystal 4mm bicone beads
Size 11 metallic-finish seed beads
Monofilament fishing line, 4lb test
Notions
Size 10 beading needle
Scissors
Step 1: Using 1 yd of line, string 5 size 11s. *String 1 crystal and 1 seed bead. Repeat from * five times. String 1 crystal.


