BEADWORK
Creates
Earrings
Edited by
Jean Campbell

Dear Reader,
Its easy to get in a rut by wearing the same pair of earrings day in and day out. Dont do it! A great pair of earrings helps draw attention to the most expressive part of the bodyyour face. Earrings can also be wonderful conversation starters. And once youve got someone looking at your face and talking with you, who knows what can happen?
To avoid the earring rut, Dr. Campbell offers a prescription for 30 fabulous earring projects from top designers. Ranging in technique from simple stringing to challenging off-loom stitching, theres a pair here for every day of the month. And because earrings work up so quickly, theres no excuse for not taking your medicine.
Once youve completed the projects in this book, youll have a fabulous collection of jewels that include drop, stiletto, stud, chandelier, and hoop shapes. Some earrings are lighthearted for those days when youre feeling that way, others are wild and funky, some are posh and elegant, and still others are downright serious. Whatever mood youre in, youll have earrings to wear. Most likely theyll complement the necklaces and bracelets already in your jewelry box, or they may inspire you to design pieces that match your new earrings.
As with all the books in our Beadwork Creates series, youll find a useful Techniques section on . Its full of great tips to get you going. It also contains information for those who need to learn new stitches or those whose skills are a little rusty.
So sit down, take some time to relax, and whip up a pair of earrings. Youll feel so much better that you wont need to call me in the morning.
Happy beading!
Jean Campbell, founding editor, Beadwork magazine
Contents
by Nikia Angel
by Joanie Jenniges
by Nancy Zellers
by SaraBeth Cullinan
by Nikki Blanchard
by Anna Tollin
by Jamie Hogsett
by Jennifer Sevlie Diederich
by Joanie Jenniges
by Dustin Wedekind
by Melody MacDuffee
by Joanie Jenniges
by Melody MacDuffee
by Jean Campbell
by Doris Coghill
by Barb Lippert
by Heidi Presteen
by Sharon Bateman
by Jean Campbell
by Melody MacDuffee
by Anna Tollin
by Kat Reaney
by Linda Richmond
by Betcey Ventrella
by Dawn Tomlinson
by Betcey Ventrella
by Dulcey Heller
by Chris Prussing
by Ann Cox
by Barb Grainger

Nikia Angel
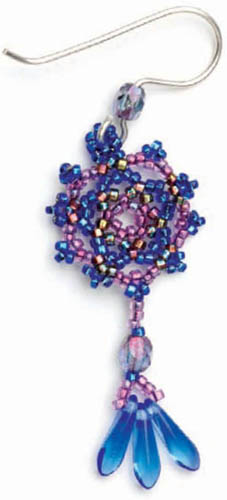
As youll see when you start making these colorful earrings, you just cant stop making them! Experiment with different colorways in another pair, and, if desired, complete a set at Step 4 for free-standing star shapes. The design is nothing short of magic.
Materials
Size 15 seed beads
4 faceted 3mm fire-polished glass beads
2 dagger-shaped 10mm glass beads
2 earring wires
Nymo size B beading thread in color to complement beads
Beeswax or synthetic beeswax
Notions
Size 12 beading needle
Scissors
Step 1: Using 3' (91.5 cm) of waxed thread and leaving a 4" (10 cm) tail, string 10 seed beads. Pass through all the beads again to make a foundation circle and exit from the last bead strung. Snug the beads and tie a square knot to secure them. Pass through 2 beads on the circle and pull tight to hide the knot.
Step 2: *String 3 seed beads, skip 1 bead on the foundation circle, and pass through the next bead (). Repeat from * around the circle to make five points. Exit from the second bead added in this round.
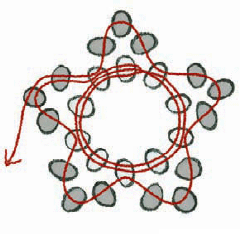
Figure 1
). Pass through the first and second bead added in this round.
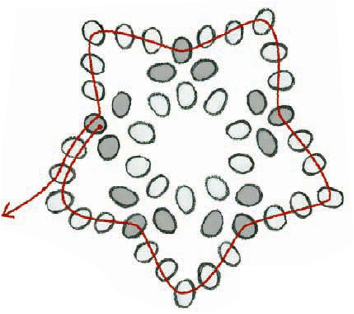
Figure 2
Step 4: String 3 seed beads and pass through the fourth and fifth beads of the first point made in Step 3. Follow the existing thread path so you exit from the second bead of the next point. Continue around the circle, adding three seed beads to each point created in Step 3 (). Pass through the first three beads added in this round.
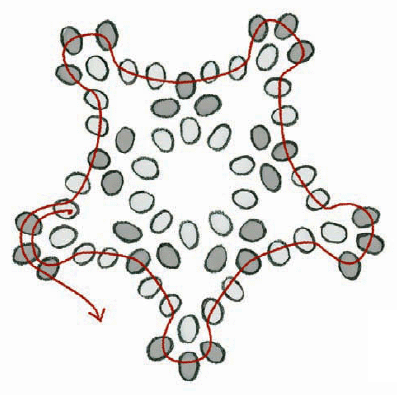
Figure 3
Step 5: *String 5 seed beads and pass through the next three beads added in Step 4. Repeat from * around until youve connected the five points. Pass through the first and second bead added in this round.
Step 6: *String 3 seed beads and pass through the fourth and fifth beads added in Step 5 and the first bead of the next point created in Step 4. String 3 beads and pass through the third bead of the same point created in Step 4 and the first and second beads added in the next point from Step 5 (). Repeat from * around the circle to make ten picots. Exit from the second bead added in this round.
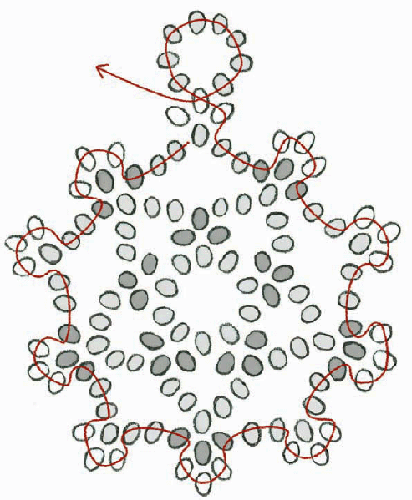
Figure 4
Step 7: String 8 seed beads and pass through the bead you just exited (). Pass through all the beads again to reinforce the loop.
Step 8: Weave through the beadwork and exit from the picot opposite the loop made in Step 7. String 3 seed beads, 1 fire-polished bead, 5 seed beads, 1 dagger, and 2 seed beads. Pass back through the third seed bead of the 5-seed bead segment and up through the other beads on the fringe leg.
Step 9: Weave through all the beads in the earring to secure and trim close to the work. Add an earring wire to the top loop.
Step 10: Repeat Steps 19 to make the second earring.
Nikia Angel spends her days in Albuquerque surrounded by beads as she makes kits to lure unsuspecting folks into the beading world. She is co-owner of www.BuytheKit.com.
Joanie Jenniges
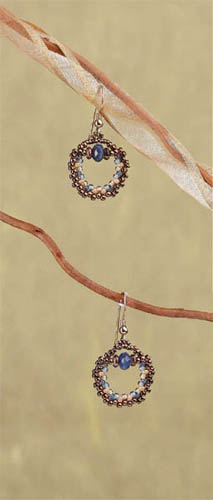
Weave tiny bits of color into a hoop to celebrate your favorite focal bead then let the compliments begin when you put them on!
Materials
Size 11 Japanese seed beads
Size 14 Japanese seed beads
2 round or faceted 5mm Swarovski pearls, semiprecious stone or Czech fire-polished beads
4 silver, gold, or glass 4mm heishe beads
2 sterling silver or gold-filled earring wires
Size D Nymo in color to complement beads
Beeswax or synthetic beeswax
Notions
Size 12 beading needle
Scissors
Chain-nose pliers
Step 1: Using 1 yd (91.5 cm) of thread and leaving a 6" (15 cm) tail, string 4 size 11s, 1 heishe, one 5mm, 1 heishe, and 21 size 11s. Note: Be sure that the size 11s on either side of the heishe beads have large enough holes to accommodate numerous thread passes. Use a square or surgeons knot to tie all the beads in a circle. Pass through the first 8 beads.


