Macram Bracelet
JEWELLERY PROJECT
Heidi Boyd
Love Macram Project
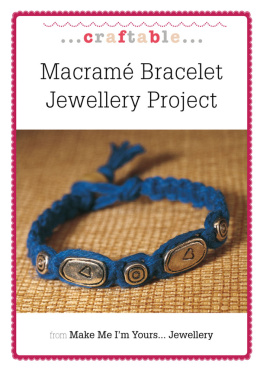
Macram is a versatile knotting technique very much of the moment in the seventies think macram hanging plant holders! Thankfully you can just as easily use it to create stunning knotted necklaces and bracelets from hemp cord, which is available in a rainbow of colours. If you are a macram virgin, this project is perfect for you as it requires just one simple knot.
You will need
Five flat metal beads
One round glass bead
4.6m (5yd) of 1mm blue hemp cord
Jewellery glue
Make sure that the beads you choose have holes that are large enough to accommodate multiple strands of the hemp cord. The finished length of this bracelet is 19cm (7in).
1. Cut one strand of 92cm (1yd) and two strands of 1.83m (2yd) from the hemp cord. Fold each strand in half and tie the centres of all three together in an overhand knot to make a loop (see Techniques: ).
2. Organize the strands, positioning the two shorter lengths in the centre with two long strands on either side. Make a square knot. The first part of this is to fold the two left strands over the centre strands. Bring the two right strands over the left stands, thread them under the centre strands and up through the loop in the left strands. Pull evenly on both ends to tighten the first half of the square knot and slide it up under the overhand knot.
3. To complete the square knot, fold the right strands over the centre strands. Bring the left strands over the right strands, thread them under the centre strands and up through the loop in the right strands. Pull evenly on the ends to tighten the second half of the knot and position it under the first half. Make another seven square knots.
4. Put glue on the ends of the two centre strands of hemp to prevent fraying. Thread both centre strands through a flat metal bead; slide the bead up under the last square knot. Follow the bead with another square knot.
5. Thread another flat metal bead onto the two centre strands and push it up under the last square knot. Repeat the process to string three more beads separated by single square knots.
6. Follow the last bead with eight more square knots. Tie all six strands into an overhand knot (see Techniques: ), then thread all the ends through a round glass bead. Tie all the strands in a second overhand knot to secure the bead and then trim the ends. To fasten the bracelet, thread the knotted-bead end through the starting loop made in step 1.
Macram marvels
By simply changing colours and beads, each macram design takes on a different look. For example, for great summertime jewellery use natural-coloured hemp and drilled shell beads. To make a choker, extend the length of the piece to 34cm (13in).
Techniques
Beaders knots
There are several simple knots that you will need to be able to tie when jewellery making, to ensure your pieces remain intact and fastenings firmly attached. For extra security, add a drop of jewellery glue on the knots and leave to dry before trimming the tails.
HALF-HITCH KNOT
Take the needle behind a thread between beads and pull through leaving a loop. Pass the needle back through the loop and pull up to make the half-hitch. Work a second half-hitch a few beads along for extra security, applying a drop of jewellery glue before trimming the tail.
A useful addition to your tool kit is a pair of fine pointed tweezers, which can come in very useful when you need to untie a knot.
REEF (SQUARE) KNOT
Pass the left thread over the right and tuck under. Then pass the right thread over the left and tuck under the left thread and through the gap in the middle of the knot.
OVERHAND KNOT
Cross the tail over the main thread to make a small loop, then pass the tail under the thread and back through the loop. Pull on each end of the thread to tighten the knot. You can manoeuvre the knot into position with a tapestry needle
TYING AN OVERHAND KNOT WITH A LOOP
This is a useful variation of the overhand knot. Instead of pulling the entire length of the strand through the knot, pull out a folded end to form a tight loop. The loop often functions as part of the clasp.
1. Fold the cord end down against itself. The length will depend on the size of the loop you want to make.
2. Wrap both cord thicknesses into a circle loop under the fold.
3. Bring the fold around and through the loop, then pull to tighten. If necessary, trim the cord end where it comes out from under the finished knot.

