EASY CARPENTRY PROJECTS FOR CHILDREN
by Jerome E. Leavitt
Illustrated by Margrete Cunningham
DOVER PUBLICATIONS, INC., New York

Copyright 1959 by Sterling Publishing Co., Inc.
All rights reserved.
This Dover edition, first published in 1986, is an unabridged and slightly corrected republication of the work originally published by Sterling Publishing Co., Inc., New York, in 1959, under the title Carpentry for Children. The present edition is published by special arrangement with Sterling Publishing Co., Inc., Two Park Avenue, New York, N.Y. 10016.
Library of Congress Cataloging-in-Publication Data
Leavitt, Jerome Edward, 1916
Easy carpentry projects for children.
Reprint. Originally published: Carpentry for children. New York : Sterling Pub. Co., 1959.
Summary: Instructions for making fifteen different articles from wood, with information on materials and tools and general directions for any woodworking project.
1. WoodworkJuvenile literature. 2. CarpentryJuvenile literature. [1. Woodwork. 2. Carpentry] I. Title.
TT185.L4 1986 684'.08 85-20645
ISBN-13: 978-0-486-25057-1 (pbk.)
ISBN-10: 0-486-25057-1 (pbk.)
Manufactured in the United States by Courier Corporation
25057116
www.doverpublications.com
This book, written especially for boys and girls, gives directions for making fifteen different articles out of wood. It tells you about the materials to use and the best way to use tools to make the articles. The last two sections, Steps in Squaring a Block of Wood, and Steps in Wood Finishing give general directions that apply to all woodworking projects. Therefore, it is a good idea to read these chapters before you start to work on any of the projects. It is assumed that the young carpenter has access to a home or school shop with a workbench and a vise.
Before you start to build any of the projects read the complete directions carefully and study the illustrations. If you collect all the necessary materials and tools before you start, it will be much easier for you to follow the directions step by step.
The author wishes to thank the editor and publishers of Junior Arts and Activities for permission to use some of these ideas that formerly appeared in that publication.
JEROME E. LEAVITT
CONTENTS
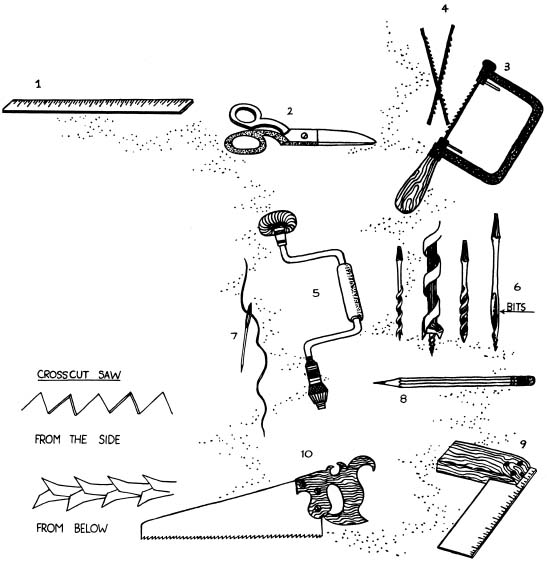
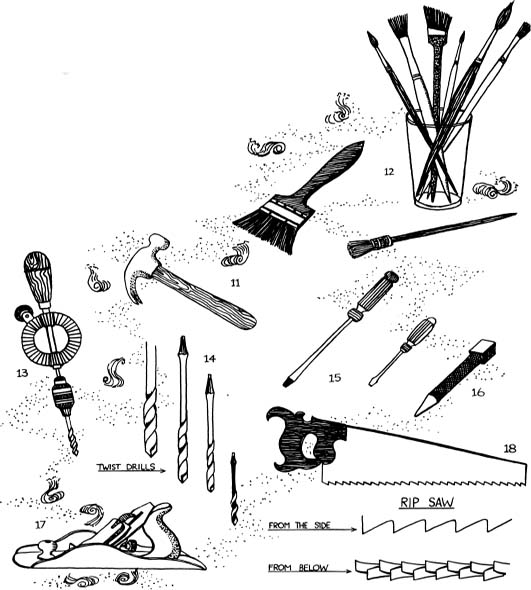
Different articles require different tools in their construction. This is a list of tools that you will need for many but not all of the projects in this book.
1. Ruler
2. Scissors
3. Coping saw
4. Coping saw blades
5. Brace
6. Bits
7. Needle
8. Pencil
9. Try square
10. Crosscut saw
11. Claw hammer
12. Paintbrushes
13. Hand drill
14. Twist drills
15. Screw drivers
16. Nail set
17. Smooth plane
18. Rip saw

Materials Needed
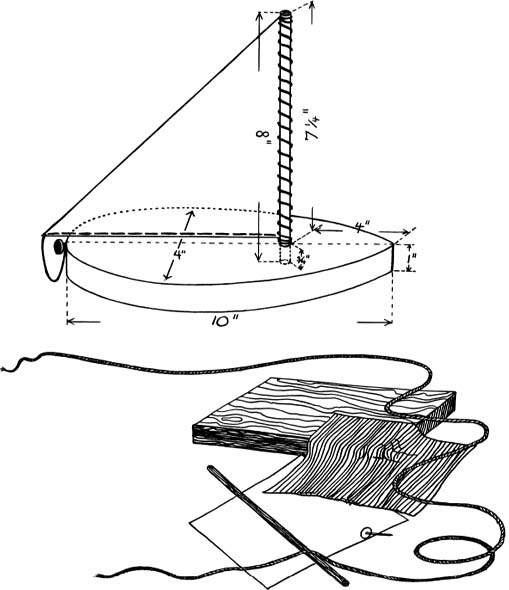
1 piece soft wood 1 x 4 x 10
1 dowel rod x 8
1 piece of paper 4 x 10
1 piece of cloth 7 x 7
1 piece of string 20 long
1 small carpet tack
Tools Needed
1 ruler
1 pair of scissors
1 coping saw
3 coping saw blades
1 brace
1 auger bit
1 bit
1 needle with large eye
1 pencil

You can make a simple sailboat from a piece of soft wood, such as pine, fir, or cypress. Make the mast from a dowel rod (a round stick) of birch or maple.
Before you begin to work, prepare all the necessary tools and materials listed above.
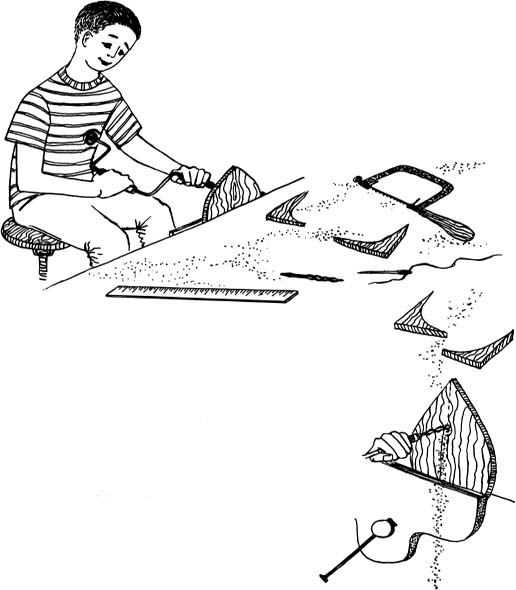
The first step is to make a pattern of the deck. Cut a piece of paper 4 inches wide and 10 inches long. Then draw the deck shape (as shown) on the paper and cut it out. After this, fold the pattern the long way down the middle and trim it to make it even.
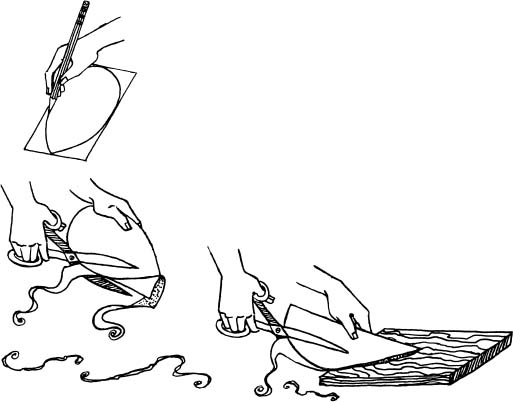
Now place the pattern on your piece of 1-inch-thick, soft wood and draw the outline of the deck. Next, cut it out with a coping saw. (A coping saw is made of a frame, handle, and blade. Because the blades are thin they can be used to cut circles and curved lines.) When you cut out the boat deck, fasten the board in the vise on your workbench and have the teeth of the coping saw point away from the frame. To make a turn when sawing, saw back and forth at one spot until you cut a fairly wide groove for the blade to turn in.
When you have the deck outline completely sawed you also have the whole bottom of the boat. To finish it off, you might like to whittle the bottom edge with a pocketknife until it is rounded the way a real boat is.
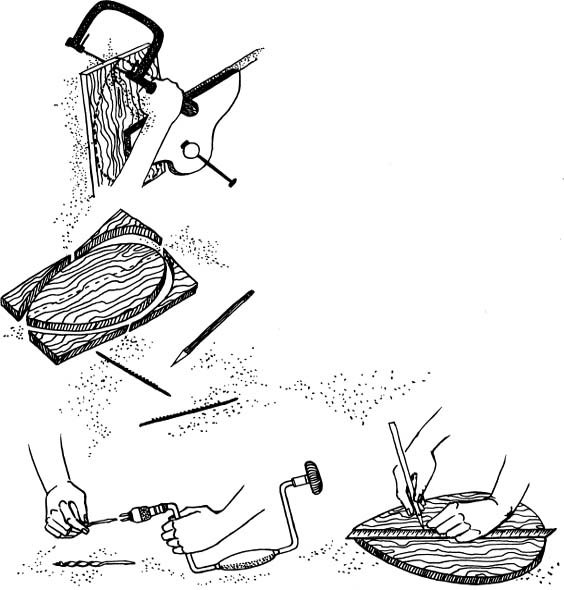
For the mast, drill a -inch round hole in the deck, 4 inches from the point (bow) and on the center line of the boat. Use a brace to hold this drill, which is called an auger bit. Auger bits are only used on wood because they are not strong enough to cut metal. To put the bit into the brace, open the jaws, slide in the bit, and tighten it. To use it, hold the brace near the bit with your left hand, place the knob against your body, and grasp the handle with your right hand. Then push the screw of the bit into the wood and turn the handle clockwise. Drill the hole only -inch deep. Dont go through the 1-inch deck wood.
Make your mast 8 inches long, cutting it from a -inch-thick dowel rod. Push the mast into the hole you have prepared.
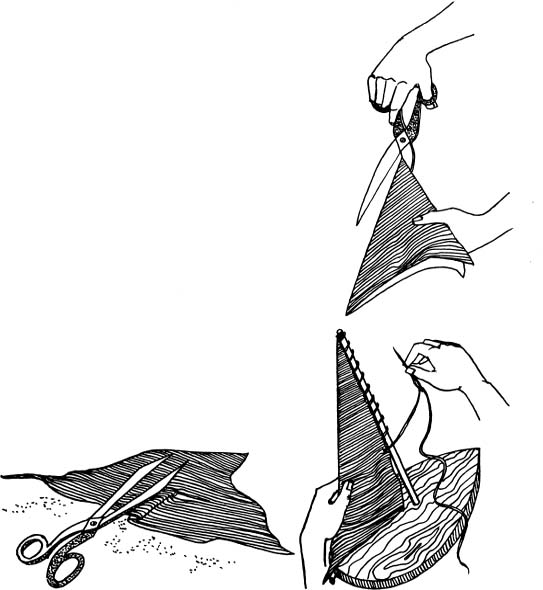
Make your sail by folding a 7-inch-square piece of cloth in half diagonally, so it forms a triangle. Then cut on the fold. Only one of these triangles is needed for the sail. Tie one end of your string to the top of the mast and thread the large-eyed needle with the string. Sew the sail on the mast by drawing the needle through the sail and around the mast from top to bottom. Then tie the string around the bottom of the mast and sew it through the bottom of the sail, allowing about 6 inches to extend beyond the sail. (See illustration on page 14.) Now tie the loose end of the string to a tack placed in the center of the back (stern) edge of the boat.
Your boat is now ready to be tried out in the water.
Next page


