

GARDEN PROJECTS
25 EASY-TO-BUILD WOOD STRUCTURES & ORNAMENTSROGER MARSHALL Copyright 2015 by Roger MarshallAll rights reserved. No part of this book may be reproduced in any form or by any electronic or mechanical means including information storage and retrieval systems without permission in writing from the publisher, except by a reviewer, who may quote brief passages.Illustrations by the author unless otherwise specified
Book design and composition by Charles ForsmanPublished by The Countryman Press, P.O. Box 748, Woodstock, VT 05091
Distributed by W. W. Norton & Company, Inc., 500 Fifth Avenue, New York, NY 10110CIP Data is available from the Library of CongressGarden Projects
ISBN: 978-1-58157-211-7
ISBN: 978-1-58157-685-6 (e-book) CONTENTS

Back in 1980, I worked with a crew to build my own home. Since that time I have built a garage with my studio above it, two 300-square-foot greenhouses, cold frames, raised beds, and numerous other projects around the property.
I also design boats for a living, and I have used that skill and the work on our property to develop this book. The majority of these projects are fairly easy for a handy person, and they can be completed in a few hours with materials purchased from almost any hardware store. Others are more difficult and may take several days. A list of recommended tools accompanies each project description. Common woodworking tools such as sandpaper, paint, and paintbrushes may not be included in the lists, but it should be assumed that they will be needed for most, if not all, projects. While most of these projects can be accomplished by one person, it should be said that no man is an island.
I was not alone in the development of these projects. My son David and his friends made the gravestones in the Halloween project. Check them out, Im sure youll laugh long and loud. Also, over the years, I have found that any project, no matter how large or small, should not be started when the hardware store is closed. Scott and his crew at Jamestown Hardware were particularly helpful when it came to finding the right piece of material or particular screw for the job. All of the drawings were modeled using Rhino software and rendered with Flamingo; both programs were developed by Robert McNeel and Associates.
With these programs it is possible to develop the design and superimpose it on a digital photograph to better visualize the design. Steve Baker, another boat designer and Jamestown resident is the guru when it comes to using Rhino. When I got stuck, Steve spent an hour or three and bailed me out. Roger MarshallJamestown, Rhode Island
One of the more efficient methods of gardening is to grow vegetables or flowers in a raised bed. Raised beds are easy to set up and easy to use, and best of all, you can build them without ever having to dig over the soil, if you so choose.

These raised beds took about 4 hours to build and are perfect for separating growing plants from walkways.

These raised beds took about 4 hours to build and are perfect for separating growing plants from walkways.
To create deep soil, fill the beds with a mixture of manure, soil, sand, and compost.  TIME About 4 hours
 TOOLS Hand saw or circular saw Light hammer for nailing Heavier sledgehammer for setting corner posts Square-ended spade or wide hoe to dig the trench for the bed walls 25 tape measure Garden twine OPTIONAL TOOLS Portable drill and screwdriver bit
 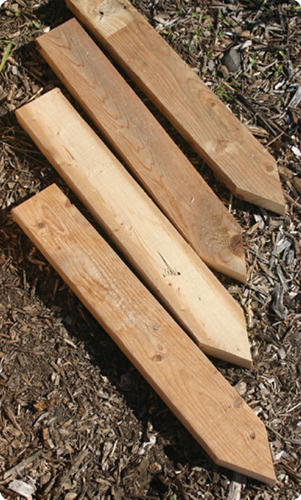 Figure 1-1
 MATERIALS FOR A 4 12 BED Four 2 2 18 to 24 wooden posts with one end sharpened Two 2 10 12 wooden boards (You can also use 2 8 12 boards) Two 2 10 4 boards (You can also use 2 8 4 boards) Fasteners: 2 1/2 or 3 exterior-grade galvanized or ceramic-coated screws, or 16d nails
  METHOD STEP
 Determine the size of your growing bed. The width of your growing bed is critical to ease of use. A 4-wide bed is the maximum recommended size, as you will have easy access from both sides. If you can only reach in from one side, make it a 3-wide or even a 2-wide bed. If you build it wider than this, you will have to walk on the bed, which will compact the soil and make it more difficult for plant roots to spread and gain necessary moisture and nutrients.
As for length, you can make your growing bed as long as you want. The longest lengths of lumber commonly available are 16. If you want to build a longer bed than this, you can buy longer pieces at some lumber yards, or you can butt the ends of smaller pieces together. For example, some of my growing beds are 44 long, but none are wider than 4. For this example, we will assume the bed is to be 12 long 4 wide.  Figure 1-2STEP
 Find the right location.
It is best to site your growing beds in an east-west orientation. This way, if you put a tall tomato plant on the north side of the bed, it will not shade any plants behind it. Ideally, the ground should be flat to make it easy to set up and tend your growing beds. If your ground is sloped, site the beds on the most southerly facing side possible, as long as the slope is not too steep. You can step your beds along the slope to get the maximum amount of sunlight to each bed.
Next page




 Copyright 2015 by Roger MarshallAll rights reserved. No part of this book may be reproduced in any form or by any electronic or mechanical means including information storage and retrieval systems without permission in writing from the publisher, except by a reviewer, who may quote brief passages.Illustrations by the author unless otherwise specified
 Back in 1980, I worked with a crew to build my own home. Since that time I have built a garage with my studio above it, two 300-square-foot greenhouses, cold frames, raised beds, and numerous other projects around the property.
 These raised beds took about 4 hours to build and are perfect for separating growing plants from walkways.
  TIME About 4 hours
 TOOLS Hand saw or circular saw Light hammer for nailing Heavier sledgehammer for setting corner posts Square-ended spade or wide hoe to dig the trench for the bed walls 25 tape measure Garden twine OPTIONAL TOOLS Portable drill and screwdriver bit
  Figure 1-1
 MATERIALS FOR A 4 12 BED Four 2 2 18 to 24 wooden posts with one end sharpened Two 2 10 12 wooden boards (You can also use 2 8 12 boards) Two 2 10 4 boards (You can also use 2 8 4 boards) Fasteners: 2 1/2 or 3 exterior-grade galvanized or ceramic-coated screws, or 16d nails
  METHOD STEP
 Determine the size of your growing bed. The width of your growing bed is critical to ease of use. A 4-wide bed is the maximum recommended size, as you will have easy access from both sides. If you can only reach in from one side, make it a 3-wide or even a 2-wide bed. If you build it wider than this, you will have to walk on the bed, which will compact the soil and make it more difficult for plant roots to spread and gain necessary moisture and nutrients.
 Figure 1-2STEP