Linux Web Server Development
A Step-by-Step Guide for Ubuntu, Fedora and other Linux Distributions
Christos Karayiannis
Editor:
Andrew Swartzbaugh
CreateSpace
Copyright 2015 Christos Karayiannis
All rights reserved. No part of this publication or the information in it may be quoted from or reproduced in any form by means such as printing, scanning, photocopying or otherwise without prior written permission of the copyright holder.
Disclaimer and Terms of Use: Effort has been made to ensure that the information in this book is accurate and complete, however, the author and the publisher do not warrant the accuracy of the information, text and graphics contained within the book due to the rapidly change of science, research, known and unknown facts and internet. The Author and the publisher do not hold any responsibility for errors, omissions or contrary implementation of the subject matter herein. This book is presented solely for motivational and informational purposes only.
ISBN-13: 978-1511993135
ISBN-10: 1511993138
Printed by CreateSpace
Table of Contents
Introduction
A Professional Homebrew Web Server
This book guides you through some simple steps to deploying a professional Web server for your home or your office. You may ask yourself, Do I really need a full-fledged Web server for my home or office? Why should I set one up? Possible answers are:
You wish to set up and maintain a Web site for your job or personal interests in order to avoid the expense of hiring someone else to do the work.
You wish to do something a little more sophisticated than a free Web hosting site will allow. While there are many free Web hosting sites, these sites typically do not offer advanced features. For example, your Web site may need to perform database queries or you may wish to show the input from a Web camera on your Web site.
You wish to learn more about the Internet-related technology by following a hands-on approach.
Whatever the case, by reading this book you will be able to do the following:
Turn (even) a painfully old computer into a Web server using free Open Source programs.
Configure your Operating System (OS) to support the Web Server service, by providing the appropriate IP address and TCP port numbers.
Configure your router to make your Web server available for the entire Internet.
Use a DDNS (Dynamic Domain Name Service) service to obtain a free Domain Name for your site (e.g., name.ddns_provider.com).
Utilize o nline network tools for checking the connectivity, performance, and status of the site. You will even create a network tool that returns the IP address of the visitor.
Learn about the underlying technologies of the Web and start building simple HTML or advanced PHP and MySQL Web sites.
What makes this book different is that it guides you from the beginning to the end of the process of setting up a Web server. The only requirement is a computer with an Internet connection.
Web Server Setup Overview
The following paragraphs are an overview of the steps you will follow in order to set up the Web server. Dont worry if you dont understand some of the terms/concepts found in the overview the terms/concepts in the overview will be explained in later chapters.
After you choose the Operating System for your server as well as the Web server program, you must configure the Operating System network layer. For example, you may need to open the TCP ports required by the server program and provide a static IP address for the server computer.
Using the Virtual Servers service provided by your router, you will redirect HTTP requests destined to the routers sole public IP address to the private IP address of your server.
By registering your domain name with a Dynamic DNS (DDNS) service, you will map your routers public IP address to a domain name, e.g., webserver.dynu.com , at no cost.
You will run the Web server and even start multiple Virtual Servers (this is unrelated to the routers Virtual Servers service) that will run in parallel, dispatching different content according to a set of rules that you configure.
You will learn how to do simple administrative tasks; read log files, view graphs that show the servers activities, etc.
You will use online network tools to ensure that the site behaves from outside your Local Area Network (LAN) as expected.
You will enhance the Web site with PHP dynamic content and query a database that you build using MySQL .
Chapter 1 Initial Planning
Gathering the Components
Your first step is to select your hardware and software for your Web server. One typically has restrictions for the hardware since its cheaper to use the hardware devices that she already owns typically a computer and a modem/router. Fortunately, there is a great deal of free Open Source software that you can use. The software we use in this book consists of Linux (the Operating System), the Cherokee server (the Web server), and the various online and Linux tools for testing the server.
Choosing the Operating System
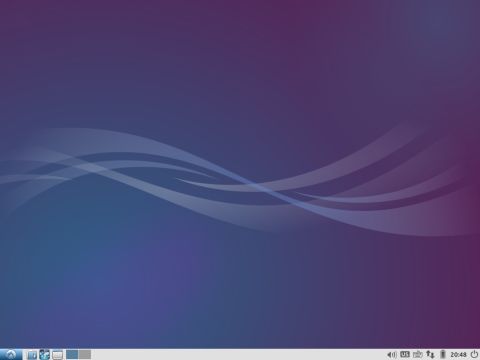
For this book, we have chosen Ubuntu Linux as the Operating System, because it is the most popular Linux distribution. More specifically, we have installed Ubuntu 12.04.5 LTS and Lubuntu 14.04.2 , which is a lightweight Ubuntu version based on the Lightweight X11 Desktop Environment ( LXDE) , a fast-performing and energy-saving desktop environment.
Another Linux flavor Fedora 20 is also covered in the appendix. The appendix highlights the main implementation differences for the Web server between Fedora and Ubuntu.
The following image shows the Lubuntu desktop:
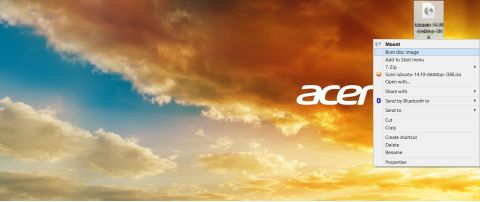
Download the Lubuntu installation ISO image from the Lubuntu download site ( http://lubuntu.net/) and burn it onto a blank DVD. To burn an ISO image in Windows 7, right-click on an ISO image and choose Burn disc image .
This launches the Windows Disc Image Burner program . At the programs window, simply click on the Burn button to start the process.
Start the computer with the .iso disk in the DVD drive to enter the Lubuntu installation process. Make sure that your BIOS is set to boot first from the device/media that you are using.
During this process, the computer will be checked for the required 4.4 GB disk space and will be checked for an Internet connection. You will also be asked to select a number of options:
the language for the installation process
whether you wish to install Lubuntu to the local hard drive
the language for the Lubuntu system
whether you wish for the installer to download updates while installing
whether you wish to install Lubuntu alongside with the current OS or to erase the current OS
the geographical location
the keyboard layout
the username, password, and the computer name
After the installation is complete, restart the computer and login to the system.

