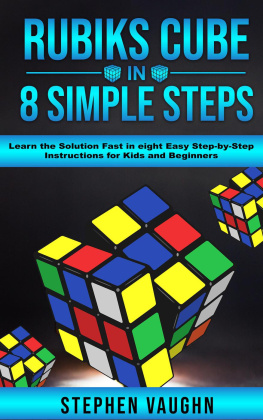
Stephen Vaughn - Rubiks Cube In 8 Simple Steps--Learn the Solution Fast In Eight Easy Step-By-Step Instructions For Kids and Beginners
Here you can read online Stephen Vaughn - Rubiks Cube In 8 Simple Steps--Learn the Solution Fast In Eight Easy Step-By-Step Instructions For Kids and Beginners full text of the book (entire story) in english for free. Download pdf and epub, get meaning, cover and reviews about this ebook. year: 2020, publisher: Stephen Vaughn, genre: Science fiction. Description of the work, (preface) as well as reviews are available. Best literature library LitArk.com created for fans of good reading and offers a wide selection of genres:
Romance novel
Science fiction
Adventure
Detective
Science
History
Home and family
Prose
Art
Politics
Computer
Non-fiction
Religion
Business
Children
Humor
Choose a favorite category and find really read worthwhile books. Enjoy immersion in the world of imagination, feel the emotions of the characters or learn something new for yourself, make an fascinating discovery.

- Book:Rubiks Cube In 8 Simple Steps--Learn the Solution Fast In Eight Easy Step-By-Step Instructions For Kids and Beginners
- Author:
- Publisher:Stephen Vaughn
- Genre:
- Year:2020
- Rating:4 / 5
- Favourites:Add to favourites
- Your mark:
Rubiks Cube In 8 Simple Steps--Learn the Solution Fast In Eight Easy Step-By-Step Instructions For Kids and Beginners: summary, description and annotation
We offer to read an annotation, description, summary or preface (depends on what the author of the book "Rubiks Cube In 8 Simple Steps--Learn the Solution Fast In Eight Easy Step-By-Step Instructions For Kids and Beginners" wrote himself). If you haven't found the necessary information about the book — write in the comments, we will try to find it.
Have you ever picked up this cube and been baffled by its complexity? Ever wondered how anyone can complete the whole thing? Did you come to the conclusion that youll never be able to complete it?
This little puzzle has fascinated and confused millions of people since its conception in 1974. It even took the inventor of the cube Ern Rubik a whole month to solve his own creation. Dont worry though, were going to do it in a fraction of that time. You might be holding the cube muddled up in front of you unsure what to do. In less than an hour this guides going to solve that problem for you with no frustrations!
Whats in this book
- History of the Rubiks Cube
- Terminology of the cube
- The 8 simple steps to solve it
- Colored images to help you follow along
- Cool facts since its creation
- How to make awesome patterns once its done
Whatre you waiting for!? Theres no need to take apart the cube or the stickers and put them back on. Scroll up and click add to cart button now so we can begin to solve that cube!
Stephen Vaughn: author's other books
Who wrote Rubiks Cube In 8 Simple Steps--Learn the Solution Fast In Eight Easy Step-By-Step Instructions For Kids and Beginners? Find out the surname, the name of the author of the book and a list of all author's works by series.


Rubiks Cube In 8 Simple Steps--Learn the Solution Fast In Eight Easy Step-By-Step Instructions For Kids and Beginners — read online for free the complete book (whole text) full work
Below is the text of the book, divided by pages. System saving the place of the last page read, allows you to conveniently read the book "Rubiks Cube In 8 Simple Steps--Learn the Solution Fast In Eight Easy Step-By-Step Instructions For Kids and Beginners" online for free, without having to search again every time where you left off. Put a bookmark, and you can go to the page where you finished reading at any time.
Font size:
Interval:
Bookmark:
Stephen Vaughn
Copyright 2019 - All rights reserved.
The content contained within this book may not be reproduced, duplicated or transmitted without direct written permission from the author or the publisher.
Under no circumstances will any blame or legal responsibility be held against the publisher, or author, for any damages, reparation, or monetary loss due to the information contained within this book. Either directly or indirectly. You are responsible for your own choices, actions, and results.
Legal Notice:
This book is copyright protected. This book is only for personal use. You cannot amend, distribute, sell, use, quote or paraphrase any part, or the content within this book, without the consent of the author or publisher.
Disclaimer Notice:
Please note the information contained within this document is for educational and entertainment purposes only. All effort has been executed to present accurate, up to date, and reliable, complete information. No warranties of any kind are declared or implied. Readers acknowledge that the author is not engaging in the rendering of legal, financial, medical or professional advice. The content within this book has been derived from various sources. Please consult a licensed professional before attempting any techniques outlined in this book.
By reading this document, the reader agrees that under no circumstances is the author responsible for any losses, direct or indirect, which are incurred as a result of the use of the information contained within this document, including, but not limited to, errors, omissions, or inaccuracies.
Step 2 - White Corners
Step 3 - Middle Layer
Step 5 - Yellow Corners
Introduction
W elcome to the wonderful world of the Rubiks Cube! This tiny little enigma has fascinated millions of people around the globe since its inception. At the same time it has baffled and perplexed everyone who has come across one. How can this seemingly tiny cube outsmart some of the most intelligent people in the world?
This guide book is going to unravel the mysteries of the cube and give you a simple methodical sequence in solving it. After going through this book youll have all the answers you are looking for and be rewarded for your efforts. Lets get stuck into it!
Rubiks Cube Language
Before we begin however were going to have to go through and learn some terminology so we can make the process of solving the cube a little more easy and efficient.
When looking at a cube well see a cube with six different sides either jumbled or unjumbled depending on whether you have just bought it or not. The standard Rubiks Cube measures at 2.2 square inches but there are a variety of different cubes on the market these days so yours may be bigger or smaller.
The goal as you already probably know is to get each side of the Rubiks Cube to have the same color. The original colors are white, yellow, blue, green, orange and red. Again with all the different Cubes in the market yours may have different colors. Generally these colors are paired together i.e. yellow and white should be on opposite sides of each other, orange and red should be opposites and the same with blue and green.
In the rest of the book we will assume that your Rubiks Cube follows this pattern. If it doesnt dont stress, the techniques will still work to solve your cube. Just simply match up your color with the ones listed above so were congruent and on the same page while were solving the puzzle.
Cubies
Pick up the cube and have a close look at it. You can see that each face has 9 smaller squares or cubes on it. These smaller cubes are called cubies. Can you guess how many individual cubies are within the whole cube? If we used a simple maths formula and did 3x3x3 we would get 27. This however would be incorrect since it doesnt take into account the cubie in the middle of the Rubiks cube which is actually empty. This leaves us with 26 separate cubies.
There are three different cubies on the cube. First we have the corner cubies which have three sides with three different colors. Then we have the edge cubies which are on the sides between the two corner cubies with two colors on each. Lastly we have the centre cubies which are the only ones with a single color.
Left, Right, Front & Back
Now were going to denote some terminology to the sides of the Rubiks cube so we can keep things neat, tidy and consistent. This terminology is called cube notation in the Rubiks Cube community. You will see how this works and comes together in the later chapters so dont worry if it doesnt make much sense now.
If you dont already have your Rubiks Cube near you go and grab it. Itll make more sense with it in your hand. Holding the cube up in front of you the notations for sides will be as the following:
- The side youre looking at thats facing you will be known as Front or F .
- The side that is facing the opposite direction from you is known as Back or B .
- The side facing the ceiling or roof will be known as Up or U .
- The side facing the ground will be known as Down or D .
- The side on the left will be known as L .
- The side on the right will be known as R .
Here are some images to solidify what weve just spoken about. This should aid in helping you remember the notations.
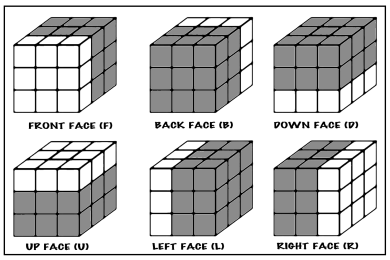
F rom now on we will be using these cube notations that represent the faces, so its important you make yourself familiar with them. This is also the standard in the Rubiks Cube community. People within this community who are avid Rubiks Cube fans call themselves Cubers in case you have dreams of going down this path.
Twists, Turns & Slides
Now weve got the notations down pat were going to go through the different possible cube movements there are. All six sides F , B , R , L , U , D can be rotated clockwise or anti-clockwise. With analog clocks not being as prevalent as they once were these terms may be a little foreign to you so there are some images below to visualise this.

C lockwise Notations
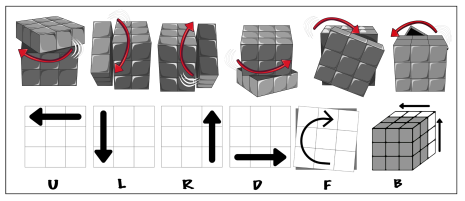
A nti-Clockwise Notations
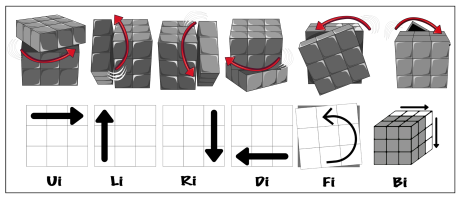
T wo sets of examples have been used to help you visualise the turns. We will be using the images on the bottom row for the rest of the guide. If you make a mistake in the future, make sure to come back to this image and make sure the turn you are doing is correct.
The notations given for clockwise turns are simply the letter thats been given to the side. Anti-clockwise notations have an i (which stands for inverted) after the letter that represents that side.
Each rotation, either clockwise or anti-clockwise, is known as a turn and when done only affects one layer.
Lets go through some quick examples to really drill this in so when we get to actually solving the cube you can do the turns without having to think too much.
If the cube notation is a L , while looking at one face of the cube, you would turn the cubes left side clockwise. This would move the three cubies on the left layer facing you go down while the three cubies on the U face on the left will now be on the face youre looking at.
Font size:
Interval:
Bookmark:
Similar books «Rubiks Cube In 8 Simple Steps--Learn the Solution Fast In Eight Easy Step-By-Step Instructions For Kids and Beginners»
Look at similar books to Rubiks Cube In 8 Simple Steps--Learn the Solution Fast In Eight Easy Step-By-Step Instructions For Kids and Beginners. We have selected literature similar in name and meaning in the hope of providing readers with more options to find new, interesting, not yet read works.
Discussion, reviews of the book Rubiks Cube In 8 Simple Steps--Learn the Solution Fast In Eight Easy Step-By-Step Instructions For Kids and Beginners and just readers' own opinions. Leave your comments, write what you think about the work, its meaning or the main characters. Specify what exactly you liked and what you didn't like, and why you think so.