Robert Davis - Arduino LED Cube Projects
Here you can read online Robert Davis - Arduino LED Cube Projects full text of the book (entire story) in english for free. Download pdf and epub, get meaning, cover and reviews about this ebook. year: 2015, genre: Children. Description of the work, (preface) as well as reviews are available. Best literature library LitArk.com created for fans of good reading and offers a wide selection of genres:
Romance novel
Science fiction
Adventure
Detective
Science
History
Home and family
Prose
Art
Politics
Computer
Non-fiction
Religion
Business
Children
Humor
Choose a favorite category and find really read worthwhile books. Enjoy immersion in the world of imagination, feel the emotions of the characters or learn something new for yourself, make an fascinating discovery.

- Book:Arduino LED Cube Projects
- Author:
- Genre:
- Year:2015
- Rating:3 / 5
- Favourites:Add to favourites
- Your mark:
Arduino LED Cube Projects: summary, description and annotation
We offer to read an annotation, description, summary or preface (depends on what the author of the book "Arduino LED Cube Projects" wrote himself). If you haven't found the necessary information about the book — write in the comments, we will try to find it.
Robert Davis: author's other books
Who wrote Arduino LED Cube Projects? Find out the surname, the name of the author of the book and a list of all author's works by series.


Arduino LED Cube Projects — read online for free the complete book (whole text) full work
Below is the text of the book, divided by pages. System saving the place of the last page read, allows you to conveniently read the book "Arduino LED Cube Projects" online for free, without having to search again every time where you left off. Put a bookmark, and you can go to the page where you finished reading at any time.
Font size:
Interval:
Bookmark:
Arduino LED Cube Projects 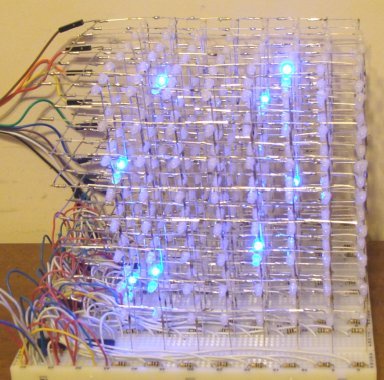 Robert J Davis
Arduino LED Projects 2 By Robert J Davis II Copyright 2015 by Robert J Davis II All rights reserved. The first book of LED projects started with individual LEDs and ended with LED signs. Since then I have discovered the fun of making LED cubes. There are so many variations of LED cubes that there almost could be a book written that is just dedicated to how to make the many varieties of LED cubes. As always the reader or builder takes all responsibility for the safe construction and operation of these devices. If you are not familiar with building complex projects it is highly recommended that you start off with the first book of Arduino LED Projects.
These projects are fairly complex. I have tried to make them look like they are easy to build. Every design in this book has an explanation, a schematic diagram, a picture of the assembled project, and the code to make it work. This is written to get you started, adding more layers, or customizing the code can make this a lot more fun. Most of the parts to build these projects will need to be ordered from China via eBay or one of the mail order parts vendors like MCM Electronics. Some of the parts are available at your local Radio Shack.
Some of the parts were just lying around because they were left over from previous projects.
Table of Contents 1. Comparing Arduino Versions4 Introducing the PCduino 2. Introduction to LED cubes.7 LED Spacing LED Cube Organization Common Cathode or Anode? Shift registers or Latches? 3. 4x4x4 Direct Drive Cube..12 Making the 4x4 arrays Demo Programs 4. 4x4x5 LED Cube with 74595s....26 Adding the Shift Registers Demo Programs 6. 8x8x8 LED Cube..33 Making the 8x8 arrays Modifying the breadboards Completing the kit Demo Programs 7. 8x8x8 Color LED Cube52 Making the 8x8 or 7x7 RGB arrays Adding the Current Limiting Resistors Demo Programs Chapter 1 Comparing Arduino Versions There are now many versions of the Arduino. 8x8x8 Color LED Cube52 Making the 8x8 or 7x7 RGB arrays Adding the Current Limiting Resistors Demo Programs Chapter 1 Comparing Arduino Versions There are now many versions of the Arduino.
Here are four of the more common versions. They are the Nana, the good old Arduino UNO, the Arduino Mega, and the PcDuino. The Mega added a lot of I/O pins that were needed to interface to some LCD screens and other things that required more than the normal 20 I/O pins. Here is a picture comparing these four processors. The Nano is on the left, then the Uno, the Mega is next and the PCDuino is on the right. 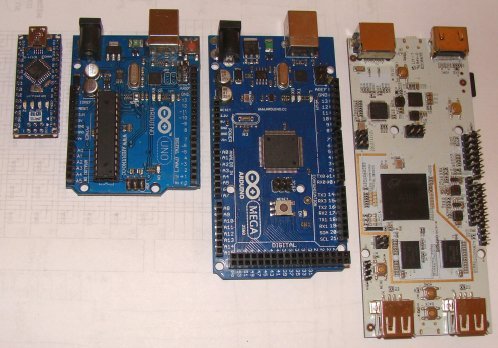 The PcDuino gives you the power of a PC that you can hold in your hand.
It eliminates the middle computer. You can now write the code on the same machine that you run the code. Here is a comparison chart showing some of the differences between these four versions of the Arduino. Nano Uno Mega PcDuino ------ ------ ------ ---------- Clock 16Mhz 16MHz 16MHz 1GHz Memory 32K 16K/32K 128K/256K 1Gig+2Gig I/O Pins 14 14 54 14 Analog Pins 8 6 16 8 Logic Volts 5V 5V 5V 3.3V Pin Current 40ma 40ma 40ma 4ma Supply Volts 7-12V 7-12V 7-12V 5V USB? No No No Yes Network? No No No Yes Video? No No No HDMI SD Mem? No No No Yes up to 32 Gig The PcDuino can replace the computer that the Arduino applications are normally written on. Within a few minutes needed to familiarize yourself with Linux you can be writing the code on the same computer that you run the code! Once you locate the Arduino icon you can then use the familiar Arduino development environment to run your applications. Not everything that runs on the Uno can be run on the PcDuino.
The most obvious difference is the logic voltage of 3.3 volts and the current limit of 4ma. That compares to a logic level of 5 volts and 40 ma of current for the other Arduino processors. Here is a picture of a PcDuino mounted on a piece of Plexiglas that is 3 inches by 6 inches in size. It is a good idea to mount it to something otherwise whenever I would handle the PcDuino the SD card was accidentally ejected. Later I added some rubber feet to keep it from sliding around on the desk. 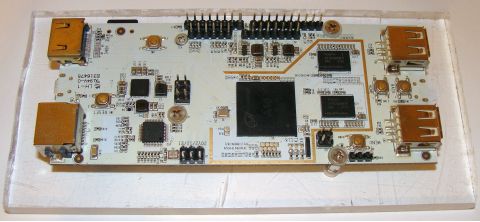 When I first powered up the PcDuino it required that I set the screen resolution.
I picked one and the screen went blank and never came back. I re-flashed the SD card and the results were the same. Eventually I found out that the problem was the AC adapter. When they say to use a 2 amp AC adapter they are serious. Apparently there is a power surge when it switches to graphics mode that will have issues with a 1 amp AC adapter. To use a PcDuino you will need the following accessories: 1.
HDMI cable and HDMI monitor. 2. USB Mouse and Keyboard. 3. 5V 2A AC adapter. 4.
Optional USB hub to add any USB devices. 5. Optional micro SD card for more room for programs This next picture shows where to connect things up to the PcDuino.  Chapter 2 Introduction to LED Cubes LED cubes give us the ability to display things in 3D. They can be looked at as complex mathematic displays, although they lack a lot of steps as far as showing a lot of detail. You can even display complex mathematical formulas on them.
There are many design considerations to consider. First of all consider the LED. It has leads that are about one inch long. That makes the maximum spacing that uses those leads about one inch. However I tried that and because one lead must go overtop of the other lead it has to be about 1.25 inches long and basically it usually comes up short. 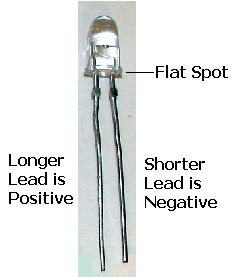 The easiest LED spacing is .8 inches or 20cm. The easiest LED spacing is .8 inches or 20cm.
The 8x8x8 LED cube uses 15cm or .6 inches because it had to be compatible with a circuit board that is part of a kit. However the .6 inch spacing almost forces you to cut one lead shorter as it is too long. Another design consideration is what you can fit on a breadboard. You need to add a shift register for every 8 LEDs as a minimum. You will also need to consider how LEDs usually come in packages of 100. Some venders packages are exactly 100 and some will throw in some extra LEDs.
Here are the mathematics of the common LED cube sizes. 3x3x3=27 LEDs 4x4x4=64 LEDs 5x5x5=125 LEDs 6x6x6=216 LEDs 7x7x7=343 LEDs 8x8x8=512 LEDs A typical 8x8 LED layer looks like this chart. However if you are using a shift register then the first data bit (left most) gets shifted down to the last shift position (64) so the numbers are reversed in the shifting process. 64 63 62 61 60 59 58 57 56 55 54 53 52 51 50 49 48 47 46 45 44 43 42 41 40 39 38 37 36 35 34 33 32 31 30 29 28 27 26 25 24 23 22 21 20 19 18 17 16 15 14 13 12 11 10 9 8 7 6 5 4 3 2 1 Mathematically then the X and Y axis would look like this. Y axis 7 o o o o o o o o 6 o o o o o o o o 5 o o o o o o o o 4 o o o o o o o o 3 o o o o o o o o 2 o o o o o o o o 1 o o o o o o o o 0 o o o o o o o o 7 6 5 4 3 2 1 0 X axis It is oriented this way so that the arrays in the software will line up with the actual LEDs. That is to say that the first 0 or 1 will end up in LED 64.
Next pageFont size:
Interval:
Bookmark:
Similar books «Arduino LED Cube Projects»
Look at similar books to Arduino LED Cube Projects. We have selected literature similar in name and meaning in the hope of providing readers with more options to find new, interesting, not yet read works.
Discussion, reviews of the book Arduino LED Cube Projects and just readers' own opinions. Leave your comments, write what you think about the work, its meaning or the main characters. Specify what exactly you liked and what you didn't like, and why you think so.