Rustige - Home Security Projects for Arduino
Here you can read online Rustige - Home Security Projects for Arduino full text of the book (entire story) in english for free. Download pdf and epub, get meaning, cover and reviews about this ebook. year: 2015, genre: Computer. Description of the work, (preface) as well as reviews are available. Best literature library LitArk.com created for fans of good reading and offers a wide selection of genres:
Romance novel
Science fiction
Adventure
Detective
Science
History
Home and family
Prose
Art
Politics
Computer
Non-fiction
Religion
Business
Children
Humor
Choose a favorite category and find really read worthwhile books. Enjoy immersion in the world of imagination, feel the emotions of the characters or learn something new for yourself, make an fascinating discovery.

Home Security Projects for Arduino: summary, description and annotation
We offer to read an annotation, description, summary or preface (depends on what the author of the book "Home Security Projects for Arduino" wrote himself). If you haven't found the necessary information about the book — write in the comments, we will try to find it.
Rustige: author's other books
Who wrote Home Security Projects for Arduino? Find out the surname, the name of the author of the book and a list of all author's works by series.


Home Security Projects for Arduino — read online for free the complete book (whole text) full work
Below is the text of the book, divided by pages. System saving the place of the last page read, allows you to conveniently read the book "Home Security Projects for Arduino" online for free, without having to search again every time where you left off. Put a bookmark, and you can go to the page where you finished reading at any time.
Font size:
Interval:
Bookmark:
Disclaimer: Whilst every effort has been made to ensure all the information contained in this book is accurate, the author & publisher can accept no liability for any consequential loss or damage, however caused, arising as a result of using the information contained.
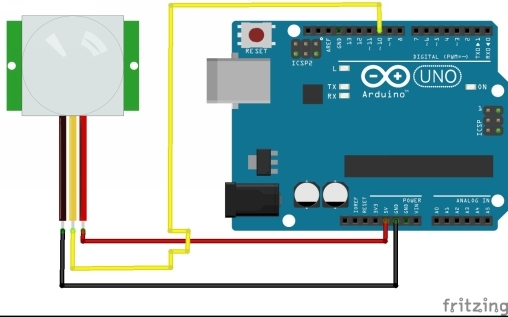
Table of ContentsThe uploaded program then runs on the Arduino board each time you power it up. If you want to use the board for a different project, you just reprogram it with a new Sketch via the USB port. The boards have digital and analogue input/outputs: there are 13 digital pins, which are like switches that can be on or off. So we can set one of the pins as an input & connect a PIR module to it, and also set another of the pins as an output and connect an LED to it (the LED we use is actually hard-wired onto the board). We can then write a Sketch (the Arduino name for a program) that senses the PIR motion sensor has been tripped and turns on the LED for 30 seconds. There are also six analogue pins which can detect an input value between 0-1023.
These are useful if you want to connect a sensor that might have a range of values, like a temperature, moisture or light sensor. Towards the end of this document we show you how to read a light sensor. The boards connect to the PC using the USB port. The USB port supplies the 5 volt power required by the Arduino, and also the interface for reprogramming the board with a new Sketch. The board can talk back to the PC over a USB serial interface, which allows us to send a motion detected message back to the PC when the PIR is triggered. On the PC we're going to use the programming language Python to read the motion detected message and then send an email alert to our phone, using a Gmail account.
We're using Python because it's available for Windows, Mac & Linux PCs. We've chosen Python 2.7.8, because some of the library functions we need aren't yet available for the newer version Python 3.4.1 USB Arduino models can be powered by a PC, a USB mains adapter or a USB battery pack.
 Here's how to connect the smaller Pro Nano board: GND to GND , OUT to D10 & VCC to 5V
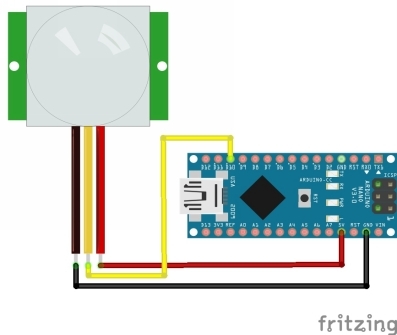
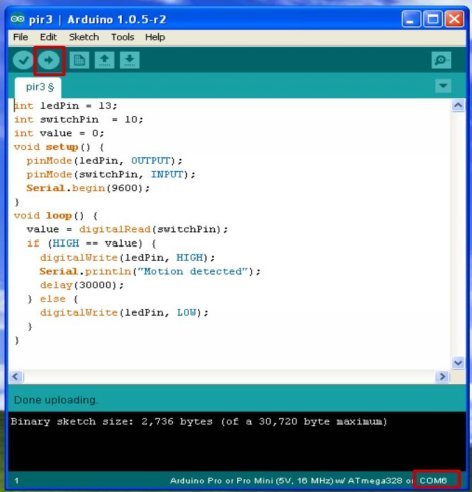 Go to File Open & select the sketch called pir.
 Insert USB lead into the Arduino & your PC. Go to Tools Serial Port & select the serial port that appeared when you attached the Arduino. (make a note of the port number, COM8 in the red box, you'll need it later for the Python scripts) Go to Tools Board & select either Arduino Uno ATmega328 (the larger board) or Arduino Nano w/ ATmega328 (the smaller board). You can now program the Arduino by clicking on the circle with a right-pointing arrow in it.
When we see that message we'll perform an action. There are various example scripts, each slightly more complex & useful. We're going to use Python version 2.7.8 which is available for Windows, Mac & Linux here: https://www.python.org/download/releases/2.7.8/ Please don't be tempted to download the 64 bit or the newer 3.4.1 version, as the libraries we're using won't work with it. Python 2.7.8 32 bit for Windows XP, Vista 7 & 8.1 is also on the DVD. Here's what the Python IDLE (GUI) looks like: 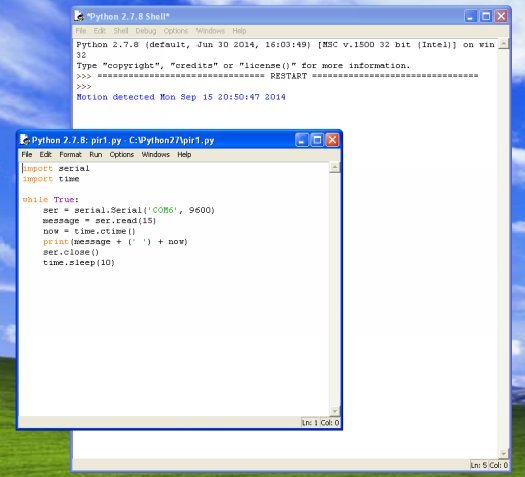 We also need to install the PySerial library pyserial-2.7.win32.exe (md5) for Python 2.x (2.4...2.7) from https://pypi.python.org/pypi/pyserial for Windows installs.
File Open pir1.py New window opens select Run Run Module If you get an error, then you'll need to change the serial COM port number in the pir1.py script to match the configuration on your PC. You can determine which USB serial COM port number has been allocated to your Arduino in the bottom right of the Arduino programming software screen. Move in front of the PIR module & you should see the Motion Detected message in the Python Shell screen. Here's what the contents of Python script Pir1.py look like in case you want to type it yourself: import serial import time while True: ser = serial.Serial(' COM6 ', 9600) message = ser.read(15) now = time.ctime() print(message + (' ') + now) ser.close() time.sleep(10) The first two lines of the program setup the time & USB serial port functions. Then we have the main loop of the program, which continues forever, or until you close the Idle Python GUI window. The first line of the main loop sets up the serial port, which you will almost certainly have to change from COM6 to something else, like COM8 or COM10, depending what you found when you ran the Arduino software.
You can also see which COM port has been allocated to your Arduino board in Windows XP under Control Panel System Hardware Device Manager Ports (COM & LPT). Try inserting the USB device into a different port on your PC if you don't see it listed. The next line reads 15 characters from the serial port into the variabl e messag e . The next line reads the current time & date into the variabl e no w . Then the variables get printed to the screen, the serial port gets closed & we wait ten seconds while the PIR module resets.
Font size:
Interval:
Bookmark:
Similar books «Home Security Projects for Arduino»
Look at similar books to Home Security Projects for Arduino. We have selected literature similar in name and meaning in the hope of providing readers with more options to find new, interesting, not yet read works.
Discussion, reviews of the book Home Security Projects for Arduino and just readers' own opinions. Leave your comments, write what you think about the work, its meaning or the main characters. Specify what exactly you liked and what you didn't like, and why you think so.