ELEMENTARY
SEWING
SKILLS

ELEMENTARY
SEWING
SKILLS
CAROLYN N.K.DENHAM
words and pictures by
RODERICK FIELD
MERCHANT & MILLS

CONTENTS

INTRODUCTION
Elementary skills are at the beginning of our endeavours. They are not comprehensive or complete, but are the foundations of learning and the first steps towards building a dependable, useful knowledge base that informs our efforts and allows us to progress. We have been ruthless in paring down the vast library of sewing information that exists and presenting you with fundamental, basic and indispensable nuggets of wisdom for you to digest and master.
Merchant & Mills believe in sewing seriously. Yet we also believe that sewing should be fun and rewarding, not filled with fear and dread of failure, like dieting or parallel parking under pressure. This book aims to draw out ability, encourage creativity and bring you, the reader, something marvellous to show for your efforts beyond pin-pricked fingers and a carpet covered in lint.
We will guide you through the key elements of using the sewing machine, understanding garment construction, in theory and in practice, and using sewing patterns to make the clothes you want to wear. This books hopes to be your ever-ready tutor, to elaborate on troublesome methods or to offer a simple solution to a challenging task. With due application, it will enable you to grow in ability and confidence while all the time preparing you to face a more complex and thorough book on sewing.

ORDER OF MAKING
The structure of this book roughly follows the order in which you would make a garment. First of all we consider the essential dressmaking tools and materials: the sewing machine, other useful tools and the fabric. We then move on to explaining pattern pieces and garment construction.
All markings are transferred from the pattern pieces to the fabric.
All fusible interfacing is cut and carefully ironed on the wrong side of the fabric.
You should work on the flat where possible.
The most important lesson is that any steps that can be completed before the fabric is constructed into a three-dimensional garment should be done first as it is much easier to work on a flat body piece. Darts and patch pockets should be tackled first so that you are working on the flat. Back seams can be joined; if the back has no waist seams and there is a zip to be inserted this can be done now. Shoulder seams come next. Depending on the design, any neck facings or collars can be made at this point so again you are working on the flat.
Then we move on to side seams and in-seam pockets. Armholes can be finished or sleeves inserted. Waist seams are joined, zips or facings that cross the waist seams are completed, and necklines and collars may need to be done now.
Buttonholes and buttons are tackled last before hemming the finished garment.

THE SEWING MACHINE
A beginner needs a sewing machine with a good straight stitch, zigzag and buttonhole. Your machine does not need computer programs, embroidery features, smartphone apps or anything else.
A removable sewing machine arm is useful as it allows you to sew armholes and cuffs more easily. A sewing machine set into a table allows you much more control and is generally considered better.
THREADING AND THREAD TYPES
Cotton or sew-all (polyester) will serve most purposes. Avoid cheap threads, as they may unravel and shed fluff around the needle eye as you sew, before snapping. Thread is not a place where you should try to make savings!
THREADING THE MACHINE
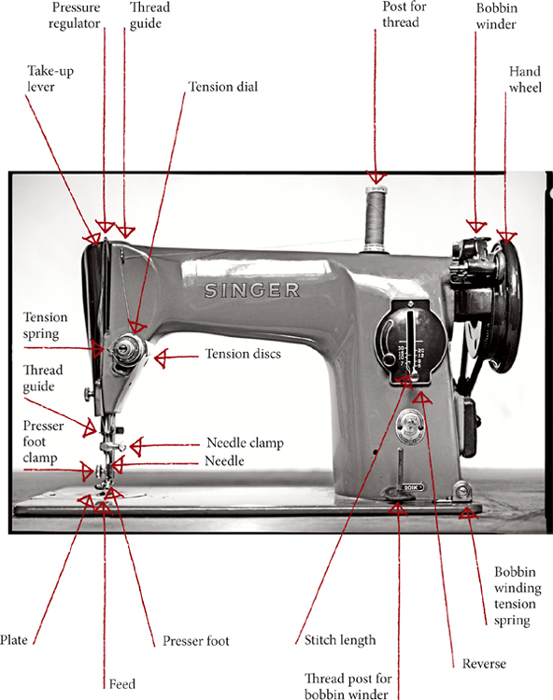
Although sewing machines can look very complicated at first sight, they all follow the same basic principles and you will find that all models share certain common features.
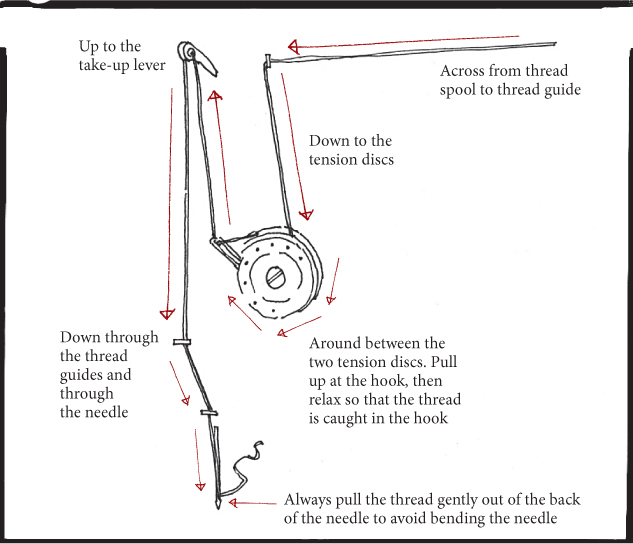
To thread the machine, lift up the presser foot. The thread will only pull through the tension discs if the presser foot is raised.
The basic principle for threading is across, down, around and hooked, up, down and through the needle. This is always the same, no matter what model of sewing machine you have.
SEWING MACHINE NEEDLES
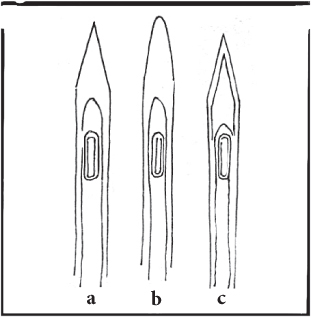
There are three basic types of sewing machine needles:
a: sharp all-standard fabrics
b: ball-point knits
c: chiselled leather and vinyls.
Needles are available in sizes from 70 to 110. Choose the size based on the weight of the fabric and change the needle regularly:
lightweight fabrics: 7080
medium-weight fabrics: 8090
heavy-weight fabrics: 90100
heavy denims, canvas: 110.
The top of the needle has one flat side that slots into the post. The flat side normally goes to the back; however, with some older machines it will go to one side. The machine will not sew if the needle is inserted incorrectly.
INSERTING A NEEDLE INTO THE NEEDLE CLAMP
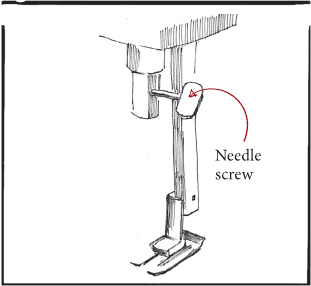
To insert the needle, you will first need to loosen the needle clamp.
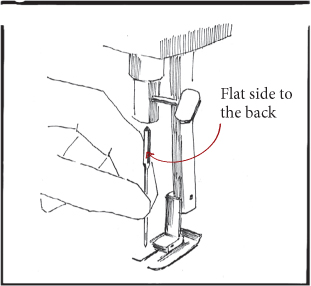
With the flat side of the needle towards the back, push the needle as far as it will go into the clamp.
FEED AND FOOT PRESSURE
The feed is under the plate directly under the presser foot. The feed moves the fabric along with each stitch. How much it moves is controlled by the stitch length. The foot pressure is controlled on the top or with a dial on the side. The tighter the screw or higher the number, the greater the pressure applied.
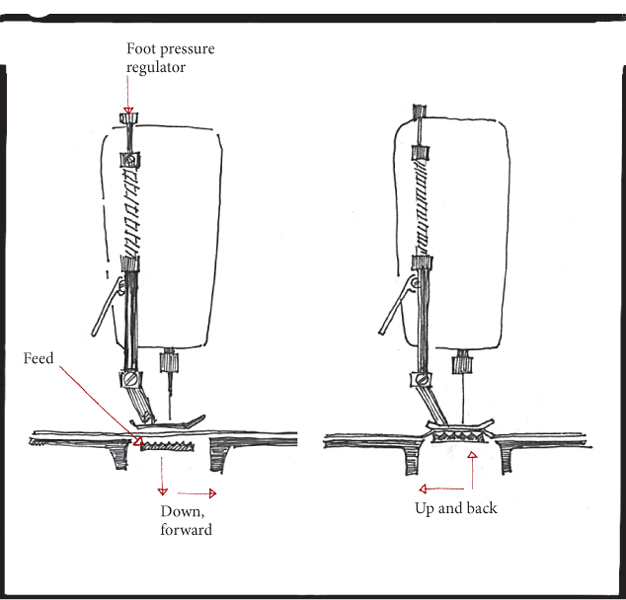
THE CORRECT FOOT PRESSURE
Applying not enough foot pressure will result in wobbly stitching or sometimes skipped stitches as the fabric is not controlled enough. Conversely, applying too much foot pressure can be one of the causes of uneven seams.
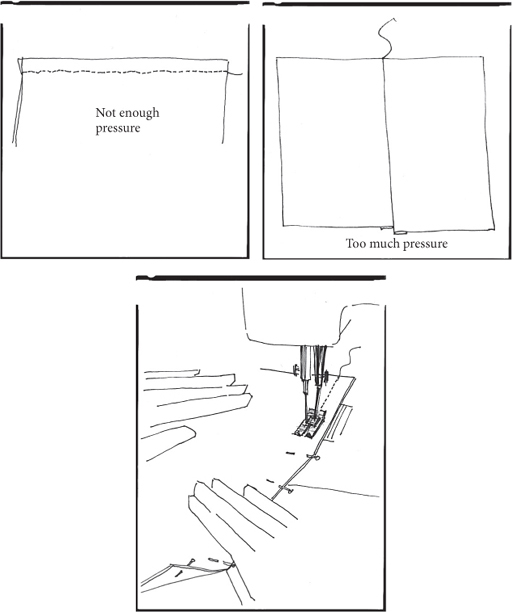
UNEVEN SEAMS
The feed dogs pull the bottom layer of fabric more than the top layer, so it is not uncommon to end the seam unevenly. To overcome this effect, hold the fabric in your right hand with thumb under and fingers over, and then rotate your hand slightly upwards. This helps to retard the movement of the lower layer just a little, and helps to keep the edges aligned.
Next page
