Publisher: Amy Marson Creative Director: Gailen Runge Art Director/Cover Designer: Kristy Zacharias Editor: Lynn Koolish Technical Editors: Debbie Rodgers and Mary E. Flynn Book Designer: Casey Dukes Production Coordinator/Illustrator: Jenny Davis Production Editor: Katie Van Amburg Photo Assistant: Mary Peyton Peppo Styled photos by Nissa Brehmer, unless otherwise noted; Instructional photos by Diane Pedersen, unless otherwise noted Published by Stash Books, an imprint of C&T Publishing, Inc., P.O. Box 1456, Lafayette, CA 94549 DEDICATION We dedicate this book to our mothers, fathers, grandmothers, and grandfathers, whose creativity, resourcefulness, and love of all things handmade inspired us to learn to sew. ACKNOWLEDGMENTS AND THANKS First of all, we want to thank all of the talented sewists, designers, and bloggers who make up the amazing online sewing community. Without them, neither this book nor SewCanShe (sewcanshe.com) would be possible. Second, we really must thank S.
Truett Cathy, the founder of Chick-fil-A restaurants, for providing the perfect location for our weekly mommy-blogger business meetings. The ideas for this book first took shape while we sat in a Chick-fil-A booth drinking endless diet sodas as our preschoolers romped in the play area. Third, we owe a debt of gratitude to our agent, Linda; to the tireless editors at C&T for answering our many questions and guiding us through our first book-writing experience; and to the very generous shops and manufacturers that provided the fabric and supplies needed for the projects and photographs in the book (see ). Thank you all. We are honored to call you our friends! Caroline and Sarah Introducing: A SewCanShe Book Hello sewing fans! We are very excited to bring to you this collection of sewing projects written by many of our very favorite bloggers, with a few of our own designs as well. Most of us spend our time sewing for our children, grandchildren, friends, and neighbors but hardly ever take the time to sew for ourselves.
We want to make it easy for you to take occasional breaks from all of your selfless sewing and do some selfish sewing instead. We are giving you a challenge (and an excuse) to sew something for yourself every month of the year. The projects in this book are organized into twelve chapters for the twelve months of the year to keep you sewing sweet little projects all year long. Youll find clothing pieces, tote bags, purses, and accessoriesall to make you feel spoiled. Enjoy the beautiful pictures, reminiscent of a blog tutorial. We are sure you will find that in many cases a picture really does explain better than a thousand words.
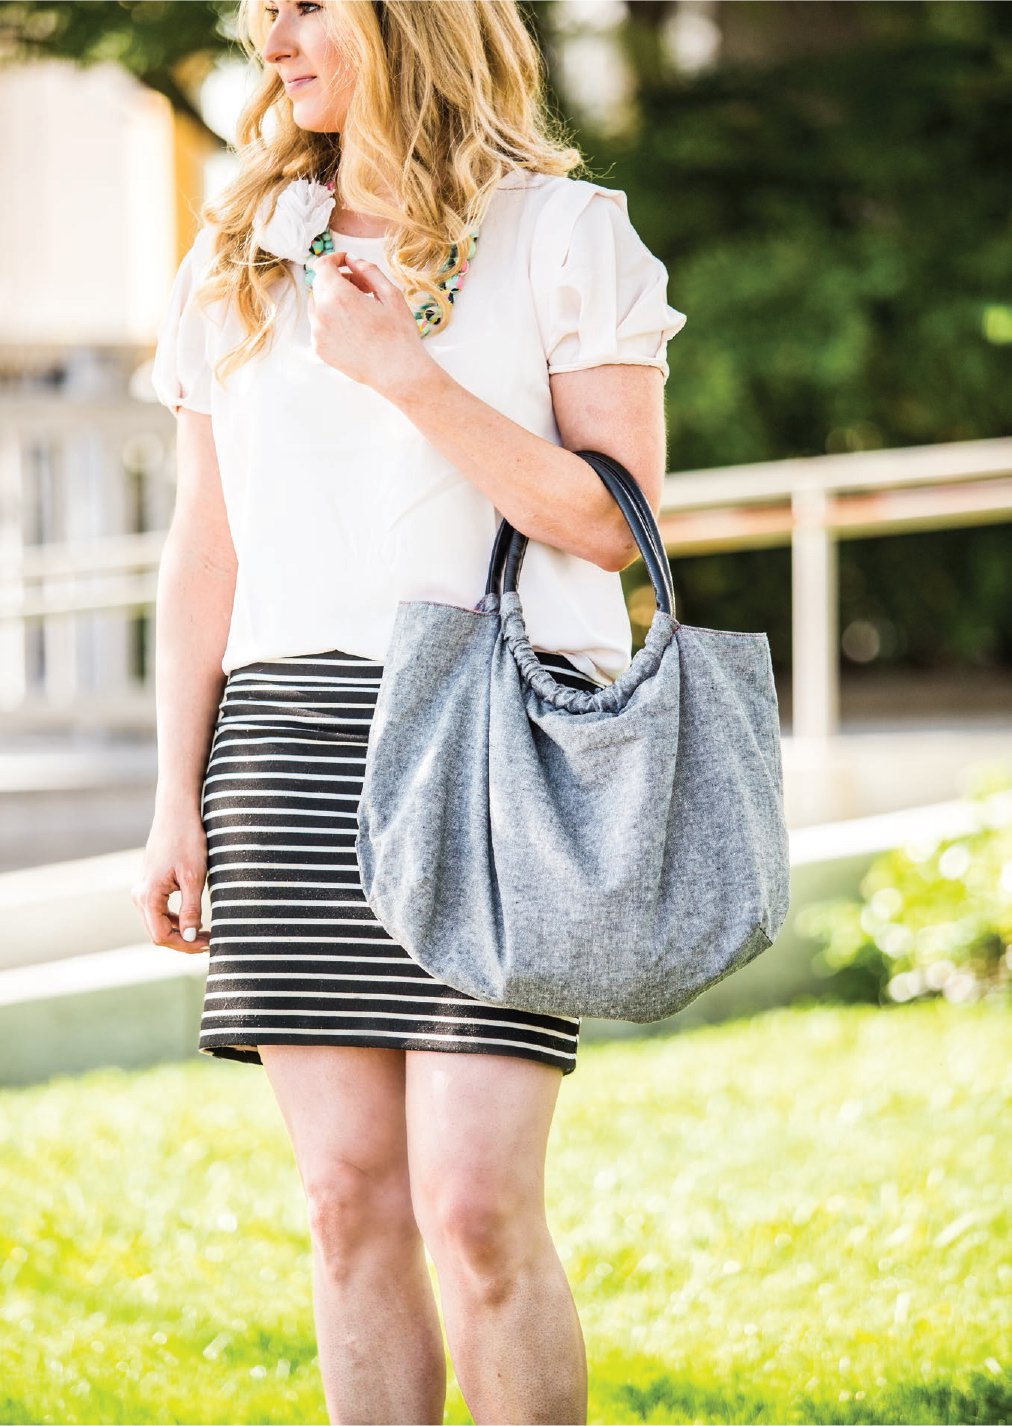
The projects in this book are written for sewists who have had some sewing experience but may still consider themselves beginners. Be sure to check out Techniques Youll Use for lots of tips (including how to make continuous bias trim) and a refresher of the things youll need to know. Let the Selfish Sewing begin! JANUARY SWEETLY GATHERED ROUND HANDBAG by Delia Randall  This chic, lightweight handbag features handmade faux leather handles and lots of pocket options. The advantage of making your own handles is that they are more flexible to sew and more comfortable to wear. You may also use 8 premade hoop handles.
  MEET THE DESIGNER Delia Randall is a 30-year-old mother to three beautiful children, a wife to a very patient husband, and an avid sewist who mostly enjoys sewing clothing for her children.
She also likes to craft, crochet, and capture it all through her love of photography. She has a weakness for milkshakes, gardening, stripes, pretty fabric (especially striped pretty fabric), and kids who ask to be read to. You can read more about what Delia is currently sewing on her blog, Delia Creates (deliacreates.com).  Finished size: 16 wide 13 tall (without handles) 6 deep Fabrics: Yarn-Dyed Essex from Robert Kaufman and Waterfront Park by Violet Craft from Michael Miller Fabrics FABRIC REQUIREMENTS For the outer bag: yard of light- to midweight apparel fabric (at least 40 wide) For the lining: 1 yards of quilters cotton or silky polyester (at least 40 wide) For the handles: yard of faux leather or vinyl (5560 wide) Omit if using store-bought hoop handles. Additional supplies -wide upholstery cording: 50 (usually sold by the yard) Leather and universal sewing machine needlesNylon zipper: 7 or longer Hot-glue gun or masking tapeDelias Tip If you are using store-bought hoop handles, you can omit the faux leather or vinyl. I found my vinyl in the home decor fabric clearance section of my fabric store. CUTTING
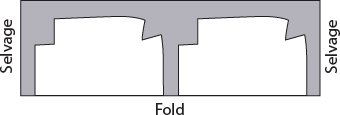
 Pattern is on .From the vinyl, cut: 2 strips 2 26 Fold the outer fabric crosswise to a 13 40 rectangle and cut: 2 pieces using the Sweetly Gathered Handbag pattern, with the pattern placed on the fold
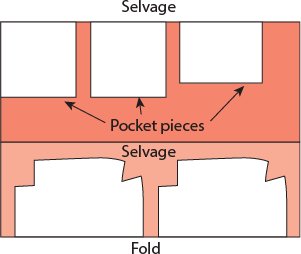
  Fold the lining fabric lengthwise 12 from a selvage and cut: 2 pieces using the Sweetly Gathered Handbag pattern, with the pattern placed on the fold From the single layer above the fold, cut: 2 squares 10 10 for the welt zipper pocket 1 rectangle 11 8 for the divided pocket
  Sewing Seam allowances are unless otherwise noted. Sew the Zipper Welt Pocket Center 1 of the welt zipper pocket pieces in the middle of 1 of the lining pieces, right sides facing. CUTTING
 Pattern is on .From the vinyl, cut: 2 strips 2 26 Fold the outer fabric crosswise to a 13 40 rectangle and cut: 2 pieces using the Sweetly Gathered Handbag pattern, with the pattern placed on the fold
  Fold the lining fabric lengthwise 12 from a selvage and cut: 2 pieces using the Sweetly Gathered Handbag pattern, with the pattern placed on the fold From the single layer above the fold, cut: 2 squares 10 10 for the welt zipper pocket 1 rectangle 11 8 for the divided pocket
  Sewing Seam allowances are unless otherwise noted. Sew the Zipper Welt Pocket Center 1 of the welt zipper pocket pieces in the middle of 1 of the lining pieces, right sides facing.
Position it 4 below the top of the notched side. Pin it at each corner. A 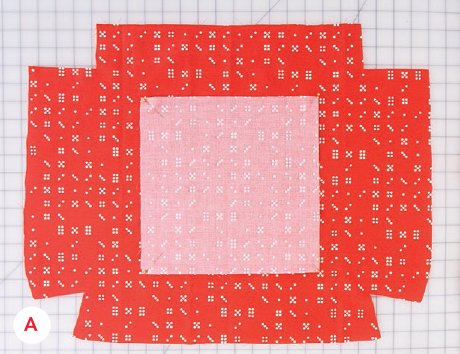 Measure down 2 from the top of the welt pocket piece. Using a ruler and a fabric-marking pen, draw a rectangle that is tall and 6 wide. Draw a line down the middle vertically and horizontally. Draw two 45 lines from each corner.
Next page


 This chic, lightweight handbag features handmade faux leather handles and lots of pocket options. The advantage of making your own handles is that they are more flexible to sew and more comfortable to wear. You may also use 8 premade hoop handles.
  MEET THE DESIGNER Delia Randall is a 30-year-old mother to three beautiful children, a wife to a very patient husband, and an avid sewist who mostly enjoys sewing clothing for her children.
 Finished size: 16 wide 13 tall (without handles) 6 deep Fabrics: Yarn-Dyed Essex from Robert Kaufman and Waterfront Park by Violet Craft from Michael Miller Fabrics FABRIC REQUIREMENTS For the outer bag: yard of light- to midweight apparel fabric (at least 40 wide) For the lining: 1 yards of quilters cotton or silky polyester (at least 40 wide) For the handles: yard of faux leather or vinyl (5560 wide) Omit if using store-bought hoop handles. Additional supplies -wide upholstery cording: 50 (usually sold by the yard) Leather and universal sewing machine needlesNylon zipper: 7 or longer Hot-glue gun or masking tapeDelias Tip If you are using store-bought hoop handles, you can omit the faux leather or vinyl. I found my vinyl in the home decor fabric clearance section of my fabric store. CUTTING
 Pattern is on .From the vinyl, cut: 2 strips 2 26 Fold the outer fabric crosswise to a 13 40 rectangle and cut: 2 pieces using the Sweetly Gathered Handbag pattern, with the pattern placed on the fold
  Fold the lining fabric lengthwise 12 from a selvage and cut: 2 pieces using the Sweetly Gathered Handbag pattern, with the pattern placed on the fold From the single layer above the fold, cut: 2 squares 10 10 for the welt zipper pocket 1 rectangle 11 8 for the divided pocket
  Sewing Seam allowances are unless otherwise noted. Sew the Zipper Welt Pocket Center 1 of the welt zipper pocket pieces in the middle of 1 of the lining pieces, right sides facing. CUTTING
 Measure down 2 from the top of the welt pocket piece. Using a ruler and a fabric-marking pen, draw a rectangle that is tall and 6 wide. Draw a line down the middle vertically and horizontally. Draw two 45 lines from each corner.