FAT QUARTER MAKES
FIFTY SEWING PROJECTS MADE USING FAT QUARTERS
Edited by Ame Verso

www.stitchcraftcreate.co.uk
----CONTENTS----
1 FAT QUARTER
2 FAT QUARTERS
3 FAT QUARTERS
4 FAT QUARTERS
56 FAT QUARTERS
79 FAT QUARTERS
10 FAT QUARTERS
----INTRODUCTION----
Every crafter just loves to stash fabric especially fat quarters and is always on the lookout for new ideas to quilt, stitch and appliqu. 50 Fat Quarter Makes, brought to you by eleven talented designers, is overflowing with exciting and inspirational projects for all those lovely fabric bundles: the ones you already have stored away and those you are yet to buy!
So what exactly is a fat quarter? Taken from one yard of fabric, fat quarters are cut in half lengthways and then in half widthways to form a quarter cut, (usually) measuring 18 22in (46 56cm). Widely available pre-cut in an array of patterns and colours; their squarer shape makes them highly versatile for patchwork, appliqu, strip piecing and more, which is why crafters adore them so much.
This unique collection begins with single fat quarter patterns for everyday items, such as pincushions and purses, that can be completed in less than a day. You can then move onto more complex projects requiring a small handful of fat quarters: from a fun girly twirly skirt to a lovely sewing machine cover, and even a decorative family of fabric hedgehogs to brighten up your home. If you are feeling ambitious, why not savour the stunning projects that use up to ten fat quarters? They will bust your much-loved fabric stash and give you family heirlooms to treasure, including beautiful quilts, striking pillows and a delightful reversible table runner that will take you from winter through to summer. The handy side bar on every page will tell you at a glance how many fat quarters you will need for each project just look for the shaded diamonds.
So be inspired, release that fabric stash and get creative with these easy-to-follow patterns, complete with a handy stitch library to get you started. Everything you need in one beautiful package to make a wealth of useful and stylish projects for your home, garden, family and friends, and even your pets.
----LITTLE MOUSE PINCUSHION----
Jessie Fincham
This cute and charming mouse is the perfect home for all your pins. Surprisingly simple to create using a fat quarter of your favourite fabric and the templates provided, it will certainly add character to your sewing supplies.
MATERIALS
- 1 fat quarter of fabric
- Scrap of cardboard
- Scrap of white felt
- Black embroidery cotton (floss)
Using the templates provided (see ), cut one of the following from the fat quarter: sides A and B, head and base. Now cut another base from cardboard and two ears from white felt.
Fold the ears slightly to bunch in the middle and tack (baste) them in position between the marks on the head.
Sew the sides together along the long, unnotched edge. Then sew the short edge of the side section to the head (see ).

Using black embroidery cotton (floss), sew two French knots for the eyes. To make the tail, knot the end of the cotton and sew from the inside of the back of the mouse to the outside. Secure with a knot at the base of the fabric and trim. Repeat with a couple of lengths of embroidery cotton to form the whiskers.
Stitch the body to the fabric base, matching the notches and leaving an opening for the stuffing. Turn right side out.
Trim the cardboard template by 14in (6mm) and insert it through the opening. Fill the mouse tightly with toy stuffing and whipstitch the gap to close.

----FUNKY MUG RUG----
Cynthia Shaffer
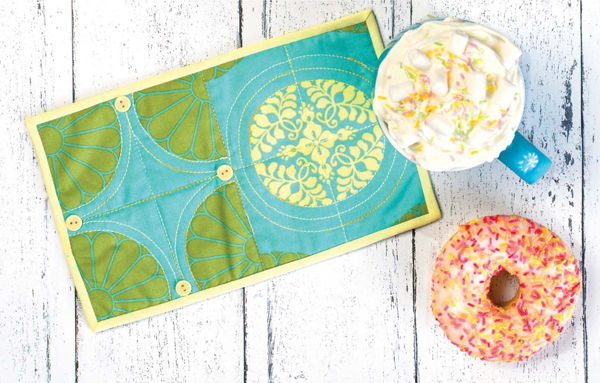
This vibrant coaster panel, formed from a single fat quarter, is guaranteed to brighten up your coffee table. Make the most of your print by fussy cutting the panels, quilting in contrasting thread and adding cute button details.
MATERIALS
- 1 fat quarter of large print fabric
- 1 sheet of vellum
- 10 7in (25 18cm) thin wadding (batting)
- 36in (91.5cm) double fold binding
- 4 small buttons
PATTERN NOTES
Seam allowance is 14in (6mm)
Cut a 434 512in (12 14cm) rectangle from the fat quarter. Fussy cut to centre the yellow medallion.
Draw a 314 234in (8 7cm) rectangle. Using a pair of compasses, add a quarter circle with a 212in (6.5cm) radius at the bottom left corner of the rectangle. Trace this template onto the vellum and transfer the quarter circle.
Cut the template four times from the fat quarter, following the quarter circle shape to fussy cut these panels. Cut two panels with the template facing up and two facing down.
Stitch the four panels together, then stitch to the panel from Step 1.
Cut a 10 7in (25 18cm) panel from the fat quarter. Position face down, then place the wadding and the pieced panel on top. Pin and machine quilt the layers together using contrasting thread. Stitch circles around the yellow medallion, then stitch around the pieced panel, following the semi circles and sewing in the ditch.
Stitch the binding to the outer edge and attach the buttons, as shown.
----CHIC SUNGLASSES CASE----
Ali Burdon
This stylish case, sewn from a single fat quarter, is perfect for protecting your summer shades. The button and loop fastening gives you easy access to your eyewear and you can mix and match your styles by experimenting with different fabrics and trims.
MATERIALS
- 1 fat quarter of fabric
- 10in (25cm) medium loft fusible fleece
- 10in (25cm) medium weight iron-on interfacing
- 2in (5cm) length of ribbon, lace or trim
- 3in (7.5cm) length of elastic cord
- 34in (2cm) diameter button
PATTERN NOTES
Seam allowance is 14in (6mm)
Cut four pieces from the fat quarter (two for the outer and two for the lining), two pieces from the fusible fleece and two pieces from the interfacing, each measuring 6 8in (15 20cm). Iron the fusible fleece to the outer fabric and the interfacing to the lining fabric, following the manufacturers instructions.
Fold or trim the ribbon in half and pin, right sides together, 234in (7cm) from the top right- hand edge of the outer front. The raw edges of the ribbon should just overlap the right-hand raw edge of the fabric.
Place the second piece of outer fabric right sides together with the first, sandwiching the folded ribbon in-between. Pin and stitch the sides and bottom seam. Pin the lining fabrics, right sides together, then stitch the side and bottom seams, leaving a 3in (7.5cm) opening in the centre of the bottom seam for turning.
To create the flat base, draw a 1in (2.5cm) square at each bottom corner of the lining section. Open out the pouch and pinch one of the corners, bringing the side and bottom seams together. Match the markings and then stitch along the line created, reverse stitching at both ends. Repeat for the other corner. Trim the excess fabric at the corners, leaving a 14in (6mm) seam allowance, then turn right sides out and iron. Repeat for the outer section pieces.


