Youll find that in each project Ive presented Rachels Tips: Little techniques I share that will help your project go more smoothly.
Youll find that in each project Ive presented Rachels Tips: Little techniques I share that will help your project go more smoothly.
Ive also included Whats the Storytales about the kernels of creativity that inspired each project. Just about all the projects feature clear color illustrations, and Im really excited to share the multiple step-by-step photos. While many steps for each project are covered within the directions, information on bead stitches, wireworking, and general jewelry making is included in the Basics section. Some of my favorite materials are noted here, too. Finally, please note that Ive made just about each project in multiple colorways. Take my lead and create projects that are uniquely your own.
So, I encourage you to think about beaded and wire-jewelry-making techniques a little differently. Add a little bit of something unusual, perhaps causing a happy accident. Trust me, even Ootheca Cuff () was born out of a series of trying something new and being unafraid to make a mistake. I also encourage you to widen your beading abilities and learn more techniques. The more techniques you learn, the more creative possibilities there are. I hope you enjoy these pieces designed to dazzle you.
Think big and have a great time. I look forward to seeing what you come up with! Rachel

Combine right-angle weave, tubular peyote stitch, and a little basic wireworking to create this stunning cratered double-sided cuff.
 WHATS THE STORY?
 This cuff design arrived one night while I was watching a DVD with my husband. Out of the blue, he wanted to work on a beading project, too. After setting him up with a peyote bracelet project, I wondered what my own project would be. The memory of a mans bracelet Id seen years earlier popped into my mindan image that haunted me since Id first seen it.
In my endeavor to watch the movie, help with Colins project, and create my own, my cuff design came out considerably different than planned! Having worked several rows, I realized the cuff had amazing dimension, much like an egg crate. Thus Ootheca (Latin for an insects egg case) was born. 
TECHNIQUES
Attaching jump rings Head pin Right-angle weave Tubular peyote stitch Basic loop
See for helpful technique information.MATERIALS
80 g opaque lavender size 11 Japanese seed beads (A) 15 g sapphire luster size 11 Japanese seed beads (B) 320 amethyst AB 3mm crystal bicones 3 silver 6mm round magnetic clasps 16 sterling silver 4mm jump rings Gray or smoke beading thread 14 (4.3m) of sterling silver 22-gauge round wire
TOOLS
Size 12 beading needle Thread snips or small scissors Fine-point permanent marker Flush wire cutters Wire straighteners 2 pairs of chain-nose pliers Round-nose pliers
SIZING
You can size this bracelet to fit your wrist by adding length to the base:
SMALL 27 units long
MEDIUM 29 units long
LARGE 31 units long
Note The base length should always be an odd number of units. If youre unsure of the length, make each base band two rows shorter than you think you need. More units can be added later.
1 BASES. Use 6' (1.8m) of single thread to right-angle weave a band:
Row 1, Unit 1 String 16A, leaving a 6" (15.2cm) tail.
Tie a knot to form a tight circle. Pass through the first 4A ().  FIGURE 1Row 1, Unit 2 String 12A and pass through the 4A you last exited from the previous unit and the first 8A just added ().
 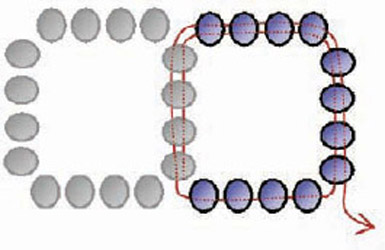 FIGURE 2Row 1, Units 3-6 Repeat Row 1, Unit 2 four times (). Pass through the top 4A of the final unit to step up to the next row.
  FIGURE 3Row 2 String 12A and pass through the 4A last exited and the first 4A just added ().
Repeat, working right-angle weave across the row to complete a total of 6 units. 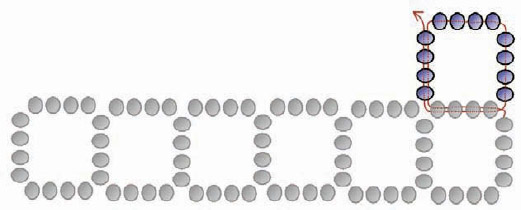 FIGURE 4
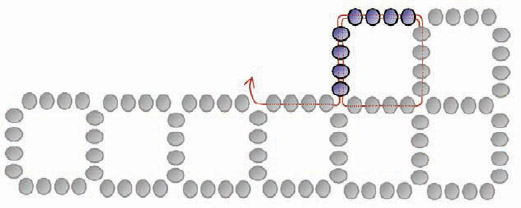 FIGURE 5
RACHELS TIPS- Even though its tempting to jump ahead in the instructions, youll find its considerably easier to stitch the bracelet together if you complete both sides of the embellished base first.
- Coat your thread with beeswax to help maintain thread tension.
- Use a fair amount of thread tension as you work. It will help clarify where the next bead should be added. Dont overdo the tension, though, as the overall stiffness of the cuff will increase when the wirework binding is added.
- When beading the bumps it may help you keep track of your place if you pile the number of beads required for each round in an ice cube tray or other separator.
- This cuff is reversible, so consider making the sides different in contrasting or complementing colors. There are many wonderful variations to choose from.






 Welcome to Seed Bead Fusion, where you have a chance to mix and match beadweaving, wireworking, and stringing techniques for your beading pleasure. I encourage you to try these projects on for size one by one and enjoy the exploration of merging stitches and changing techniques. Whether youre new to jewelry making or been at it a while, there is a design here for you. Why mix and match techniques? Having worked in several bead stores, I answered a lot of questions about beading and, honestly, Ive seen more funky jewelry that one ought to see. From answering questions that cover everything from stringing to beadweaving to wireworking, a desire grew in me to approach the same techniques a little differently by adding seed beads to wire or merging one beadweaving stitch into another.

 WHATS THE STORY? This cuff design arrived one night while I was watching a DVD with my husband. Out of the blue, he wanted to work on a beading project, too. After setting him up with a peyote bracelet project, I wondered what my own project would be. The memory of a mans bracelet Id seen years earlier popped into my mindan image that haunted me since Id first seen it.
 FIGURE 1Row 1, Unit 2 String 12A and pass through the 4A you last exited from the previous unit and the first 8A just added ().
  FIGURE 2Row 1, Units 3-6 Repeat Row 1, Unit 2 four times (). Pass through the top 4A of the final unit to step up to the next row.
  FIGURE 3Row 2 String 12A and pass through the 4A last exited and the first 4A just added ().
 FIGURE 4
 FIGURE 5