Karl F. Lutzen - Building Homebrew Equipment
Here you can read online Karl F. Lutzen - Building Homebrew Equipment full text of the book (entire story) in english for free. Download pdf and epub, get meaning, cover and reviews about this ebook. year: 1998, publisher: Storey Publishing, LLC, genre: Home and family. Description of the work, (preface) as well as reviews are available. Best literature library LitArk.com created for fans of good reading and offers a wide selection of genres:
Romance novel
Science fiction
Adventure
Detective
Science
History
Home and family
Prose
Art
Politics
Computer
Non-fiction
Religion
Business
Children
Humor
Choose a favorite category and find really read worthwhile books. Enjoy immersion in the world of imagination, feel the emotions of the characters or learn something new for yourself, make an fascinating discovery.

- Book:Building Homebrew Equipment
- Author:
- Publisher:Storey Publishing, LLC
- Genre:
- Year:1998
- Rating:5 / 5
- Favourites:Add to favourites
- Your mark:
Building Homebrew Equipment: summary, description and annotation
We offer to read an annotation, description, summary or preface (depends on what the author of the book "Building Homebrew Equipment" wrote himself). If you haven't found the necessary information about the book — write in the comments, we will try to find it.
Karl F. Lutzen: author's other books
Who wrote Building Homebrew Equipment? Find out the surname, the name of the author of the book and a list of all author's works by series.


Building Homebrew Equipment — read online for free the complete book (whole text) full work
Below is the text of the book, divided by pages. System saving the place of the last page read, allows you to conveniently read the book "Building Homebrew Equipment" online for free, without having to search again every time where you left off. Put a bookmark, and you can go to the page where you finished reading at any time.
Font size:
Interval:
Bookmark:
The best way to move carboys is with rolling carboy carriers. They can be made at a minimum cost (we were able to make the rolling carboy carrier with only scrap wood from our work shed), they can be assembled quickly, and they provide a much safer and easier way to handle glass carboys. You basically construct a platform with a lip to keep the carboy in place and then put caster wheels on the bottom so that it can be rolled from the brewery area to the fermenter area. This doesnt solve the problem of moving carboys up and down stairs, but if you brew and ferment on the same level, its a real back-saver.
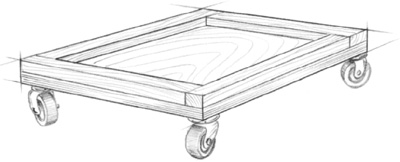
The best way to move a carboy is with a rolling carboy carrier like this.
1 13 13 platform of plywood
4 1-wide 12-long strips of plywood
4 swivel coasters
16 #10 -long wood screws
1. Cut out the platform and strips from a plywood sheet.
2. Glue and clamp the strips to the platform in the pattern illustrated.
3. Attach the swivel casters with the wood screws 1 in from the edges (be sure to drill pilot holes first).
4. Set the carboy on the platform, fill, attach airlock, and roll into the fermenter closet or corner.
Milk crates provide an easy way to build an inverted carboy stand for the BrewCap system. A carboy stand is a necessity if you want to effectively drain your carboys after sanitizing them, or if you are interested in using the BrewCap (made by BrewCo in Boone, North Carolina). The BrewCap was developed to allow brewers a more effective way to remove the expended yeast and trub that settle at the bottom of the carboy. With your carboy in an inverted position, the BrewCap holds two tubes in place: The short one extends into the neck and removes the expended yeast and trub, and the long one extends to the top of the inverted carboy and is a pressure-relief mechanism. Using a BrewCap, you will no longer need to siphon the wort into a secondary fermenter, and it is a completely closed system.
2 (identical) milk crates
4 bolts, washers, and nuts (size will depend on the size and design of your milk crates)
1. Saw a hole in the bottom of one of the milk crates (the top crate) large enough that the neck of the inverted carboy extends through the hole.
2. Set the second crate (the bottom crate) on its side and face the open side toward you; cut a large square hole in the top of the crate to accommodate the neck of the carboy and the hoses.
3. Fasten the two crates together using bolts, washers, and nuts.
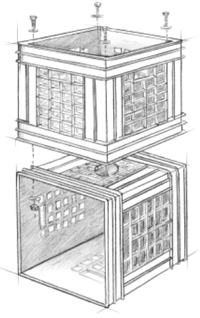
Milk crates provide an easy way to build an inverted carboy stand for the BrewCap system.
One of the longest steps of the extract brewers brewing process (other than the wort boil) can be the cooling of the wort. Especially if you still are using the ice bath and diffusion method of cooling your wort, you know how long it takes to get the 200 wort down to a temperature appropriate for pitching the yeast. The immersion chiller can reduce your cooling time to 15 minutes.
Immersion chillers are usually built from a coil of copper tubing with connectors on each end to which hoses are attached (garden hoses are often used). One connector is run to a source of cold water; the other is run to a drain for expelling the hot water. The immersion chiller offers a simple, effective way to quickly cool hot wort. Cooling wort quickly is important for two reasons. One: You can achieve a more effective cold break, which is the point when suspended proteins drop out of suspension as the wort is cooled. And two: You reduce the amount of time the wort is exposed to possible airborne pathogens.
Chillers are readily available from many homebrewing supply stores for $30 to $35; however, they can also be built at home for a bit less than that. One advantage to building the chiller yourself is that you can adapt the plans to suit your own needs. Well describe a few ways that chillers can be adapted to work more effectively.
When you build a wort chiller, the most critical aspect is the tubing you choose. Copper works well because it efficiently transmits heat energy and is readily available at fairly low cost. Stainless-steel tubing would work, but it costs more. Aluminum also works fine, but some brewers feel that it tends to give the beer a metallic taste. There is, however, no real evidence of such flavor problems. Your tubing should be in diameter. If you use a thinner tube, you will achieve potentially greater efficiency because the thinner tube will give you more surface area per volume. However, chillers made from -diameter tubing tend to take much longer to cool wort and are prone to clogging. Using a -diameter tubing gives you good efficiency and acceptable cooling times, and it avoids clogging.
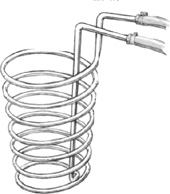
You can buy an immersion chiller like this one for about $30, or you can make one yourself.
25 of -diameter copper tubing
2 hose clamps
1 inexpensive garden hose (25 is all you need)
Note:Lengths of copper tubing greater than 20 usually come in a large coil. Most hardware stores will want to sell you a full box containing 50 to 60 of tubing. Shop with a friend and build two wort chillers if your hardware store will not sell you a cut length (or maybe find a new hardware store!). You could also build two chillers and use the double-coil chiller method that we describe on page 8.
Note:Before you begin, you should know that you can easily crimp your copper tubing and ruin that section of it. Once its crimped, cut out the crimped section and attach a coupler by soldering (lead-free, please). If you dont have a spring tubing bender, buy one when you buy your copper tubing. It will help make the 90-degree bends without crimping the tubing.
One other point: You should plan to leave enough copper tubing on the ends so that they stick out over the sides of the pot (see illustration on page 7). Once in a while you may get leaks from loose hose clamps; if the tubinghose connection is outside the pot and it does leak, the water will not drip into the wort.
1. Turn the copper tubing into a coil. If the copper tubing came in a coil, you can wind it into a tighter coil by hand. This is done by holding one end and turning the coils into ever-smaller coils. You can coil the copper tubing for your immersion chiller by wrapping it carefully around a soda keg if you have a soda keg handy. The final diameter must be small enough that there is at least 2 between the interior sides of the brewpot and the coil. Leave about 18 to 24 on one end.
2. Bend the short end of the tube at the top of the coil 90 degrees out from the coil.
Font size:
Interval:
Bookmark:
Similar books «Building Homebrew Equipment»
Look at similar books to Building Homebrew Equipment. We have selected literature similar in name and meaning in the hope of providing readers with more options to find new, interesting, not yet read works.
Discussion, reviews of the book Building Homebrew Equipment and just readers' own opinions. Leave your comments, write what you think about the work, its meaning or the main characters. Specify what exactly you liked and what you didn't like, and why you think so.