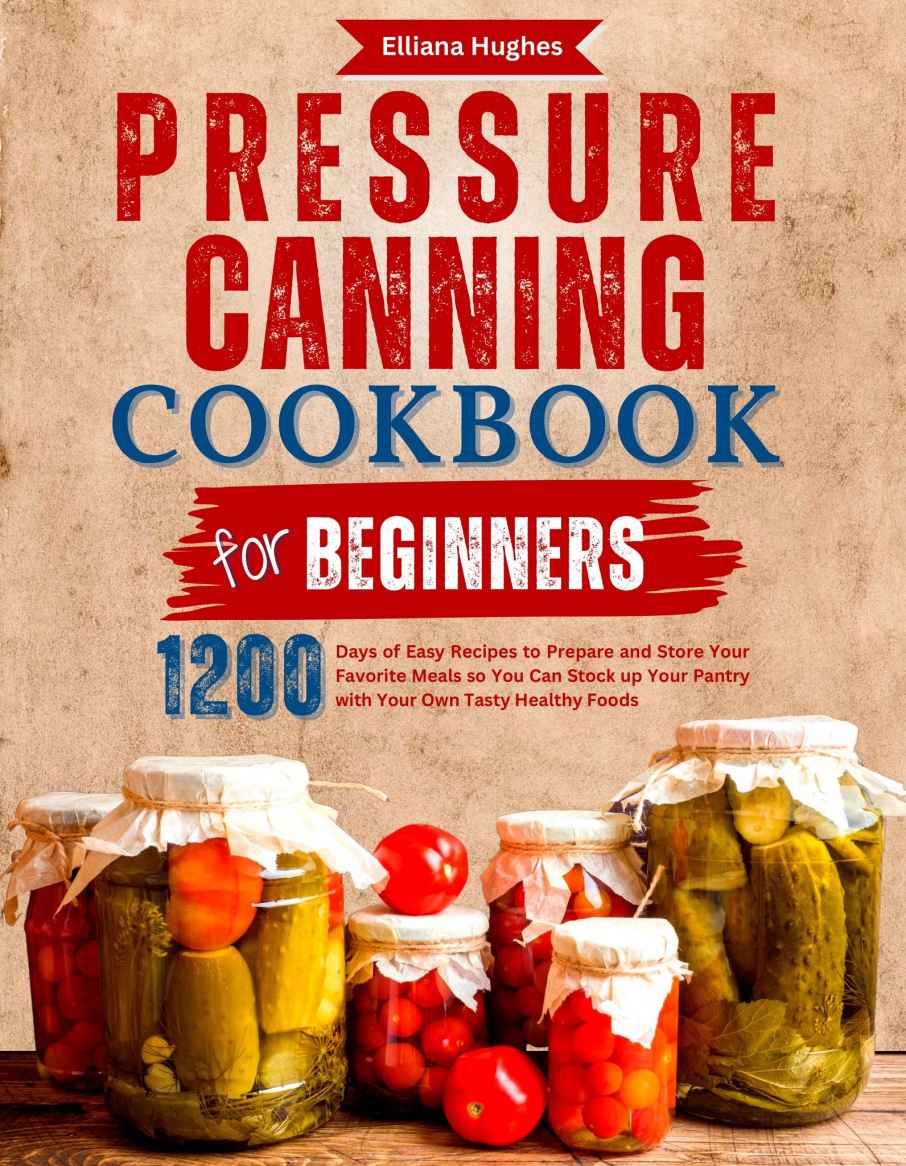
Hughes - Pressure Canning Cookbook for Beginners: 1200 Days of Easy Recipes to Prepare
Here you can read online Hughes - Pressure Canning Cookbook for Beginners: 1200 Days of Easy Recipes to Prepare full text of the book (entire story) in english for free. Download pdf and epub, get meaning, cover and reviews about this ebook. year: 2022, genre: Home and family. Description of the work, (preface) as well as reviews are available. Best literature library LitArk.com created for fans of good reading and offers a wide selection of genres:
Romance novel
Science fiction
Adventure
Detective
Science
History
Home and family
Prose
Art
Politics
Computer
Non-fiction
Religion
Business
Children
Humor
Choose a favorite category and find really read worthwhile books. Enjoy immersion in the world of imagination, feel the emotions of the characters or learn something new for yourself, make an fascinating discovery.
- Book:Pressure Canning Cookbook for Beginners: 1200 Days of Easy Recipes to Prepare
- Author:
- Genre:
- Year:2022
- Rating:5 / 5
- Favourites:Add to favourites
- Your mark:
Pressure Canning Cookbook for Beginners: 1200 Days of Easy Recipes to Prepare: summary, description and annotation
We offer to read an annotation, description, summary or preface (depends on what the author of the book "Pressure Canning Cookbook for Beginners: 1200 Days of Easy Recipes to Prepare" wrote himself). If you haven't found the necessary information about the book — write in the comments, we will try to find it.
Hughes: author's other books
Who wrote Pressure Canning Cookbook for Beginners: 1200 Days of Easy Recipes to Prepare? Find out the surname, the name of the author of the book and a list of all author's works by series.


Pressure Canning Cookbook for Beginners: 1200 Days of Easy Recipes to Prepare — read online for free the complete book (whole text) full work
Below is the text of the book, divided by pages. System saving the place of the last page read, allows you to conveniently read the book "Pressure Canning Cookbook for Beginners: 1200 Days of Easy Recipes to Prepare" online for free, without having to search again every time where you left off. Put a bookmark, and you can go to the page where you finished reading at any time.
Font size:
Interval:
Bookmark:
PRESSURE CANNING COOKBOOK FOR BEGINNERS
1200 Days of Easy Recipes to Prepare and Store Your Favorite Meals so You Can Stock up Your Pantry with Your Own Tasty Healthy Foods
Elliana Hughes
Table of Contents
If done correctly, canning is a powerful, secure food preservation technique. Foods are put in jars during the canning process and heated to a temperature that kills bacteria that could ruin the food or risk a person's health. Enzymes that could destroy the food are also made inactive by canning. During heating, the jar's air is expelled, and a vacuum seal is created when it cools. The vacuum seal prevents air from returning to the product and decontaminates the food with bacteria.
Using specialized equipment, food is processed at a higher temperature during pressure canning (which should not be confused with pressure cooking!) to prevent spoiling. Pressure canning is required to preserve "low acid" vegetables and commodities. Pressure canning is necessary to keep "low acid" vegetables and foods. (Foods with many acids, including pickled cucumbers, tomatoes, berries, and fruit, can easily be preserved using water-bath canning.) We'll get into this further shortly.
A pressure canner successfully heats and processes low acid items, including meat, vegetables, beans, and soups, by applying pressure to produce temperatures considerably above boiling. Jams, pickles, and other foods with acidity (pH 4.6) can be preserved with a boiling water bath canner, although low acid foods may contain more deadly microorganisms.
Although a canner is required (several cost around $100), the same pot can also be used for water-bath preservation. Despite its intimidating appearance, it's like most things, and after a few attempts, it becomes no more challenging than standard canning. We often advise trying water-bath canning to create jam, pickles, or tomato sauce if you've never tried canning.
- Pressure canning is a "project," but it's rewarding if you have a lot of fruit and vegetables from your garden. Why do you want to can?
- Do you have three shelves of glass canning jars and your mother's pressure canner? Or perhaps you acquired some canning supplies through inheritance or a garage sale?
- Maybe this year, you doubled the size of your vegetable garden. Or did you expand the scope of your CSA membership to include larger purchases?
- Or you're prepared to go beyond simple jams and pickles for the refrigerator to preserve the harvest for a full year!
Comprehensive, simple-to-follow recipes based on the most recent academic research and updated when new information becomes available are essential for safe, successful canning.
Preparation time: 20 minutes
Cooking time: 20 minutes
Servings:
Ingredients:
- 2 teaspoons salt
- 1/4 teaspoon ground nutmeg
- 1 tablespoon ground cinnamon
- 3 tbsp lemon juice
- 6 pounds apples, peeled
- 4 1/2 cups white sugar
- 10 cups water
- 1 cup cornstarch
- 1 pinch ground cloves, optional
Directions:
- Mix sugar, salt, cinnamon, cloves, and nutmeg in a big pan over medium heat. Mix thoroughly after adding 5 cups of water. Until the sugar dissolves, cook and whisk constantly.
- In another pot, whisk the other 5 cups of water with the cornstarch until well combined while the initial mixture is heating.
- Stirring and heating the sugar and spice mixture while adding the cornstarch mixture will result in boiling, thick, and bubbling mixture. Add the lemon juice after turning the heat away.
- With sliced apples to halfway fill your jars. Pour the syrup over the apples, then top off the jar with more apples by almost one inch. As you keep adding syrup, make sure to leave at least 1/2 inch of space between the filling and the jar top to allow for expansion.
- After removing air bubbles from the jar's sides with a thin plastic, silicone, or wooden knife, put the jars' lids and rings.
- To get the water in the boiling water bath to the same temperature as the filled jars, add a few cups of cold water. Place the jars in the water, making sure there is at least a 1/2 inch of water covering each jar.
- Bring canning water to a rolling boil. Let the jars to sit for 25 minutes after the water reaches boiling.
- Remove the jars and dry them on a thick towel. The lids will begin to make "popping" sounds as they seal up as they cool.
- Once they have cooled, firmly press on the top center of each jar to prevent the lid from rising and falling. If so, the jar wasn't sealed properly.
Per serving: Calories: Kcal; Fat: 0g; Carbs: 29g; Fiber:1g: Protein: 0g
Preparation time: 35 minutes
Cooking time: 25 minutes
Servings:
Ingredients:
- 1 3/4 cup honey
- 1 lemon
- 15 pounds ripe peaches
- 1/2 teaspoon salt
- 2/3 cup sweet white wine
- 4 cups water
- 1 tablespoon dried lavender buds
Directions:
- Boil a large pot of water before preparing and skinning your peaches. On each peach's bottom end, cut a small x. A few peaches at a time dropped into hot water and let to boil for 30 to 60 seconds.
- Move peaches to a big bowl of ice water using a slotted spoon. Remove the peaches from the ice water when they are cool enough to handle. Peel the peach's skin back by finding the small x. You can aid in peeling the peach by using a small sharp knife. If you like peaches in smaller sizes, you may also cut them into quarters.
- Mix the water, honey, wine, lavender, and salt in a Dutch oven to make the syrup. Until the honey is dissolved, cook, and stir over medium heat.
- Cut 2 to 3-inch strips of lemon peel using a vegetable peeler, and then scrape off any white portion. For future usage, save the peels and place the lemon in the refrigerator.
- Place lemon peel and your peaches, cut side down, in hot sterilized canning jars, leaving 1/2-inch headspace. Pour heated syrup over the peaches, then evenly distribute the lavender among the jars while keeping a headspace of 1/2 inch.
- Wipe the jar rims, adjust the lids, and screw bands onto the jars. For 25 minutes, process your filled jars in a large, deep soup pot filled with boiling water canner (start timing when water returns to boil).
- Make sure the jars are completely submerged in water. Take the jars out of the soup pot or canner and let them cool on wire racks. Store until use in the cabinet. Makes 12 pints or 8 quarts.
Per serving: Calories: 77Kcal; Fat: 0g; Carbs: 1g; Fiber:2.5g Protein: 1g
Preparation time: 20 minutes
Cooking time: 30 minutes
Servings:
Ingredients:
- 1 tablespoon orange zest
- cup white sugar
- 2 soda crackers, finely crushed
- 4 Granny Smith apples
- teaspoon ground cloves
- cup apple cider
- 1 cups seedless raisins
- teaspoon ground cinnamon
- 1 pastry for 9-inch double crust pie
- cup orange juice
Directions:
- Preheat the oven to 425 degrees F and 220 degrees C.
- Combine the raisins, apples, orange zest, orange juice, and apple cider in a pan. Apples simmered for about 20 minutes over medium heat, stirring periodically, until very soft. The soda crackers, sugar, cinnamon, and cloves are thoroughly mixed in. Place in the refrigerator or fill the pie crust with the apple mixture. Add the second crust on top. To seal the crusts, pinch and crimp the edges. With a fork, pierce the top crust in multiple places.
- Bake for 30 minutes at 350 degrees F (175 degrees C) oven temperature, or until the top is golden brown. Before serving, cool.
Font size:
Interval:
Bookmark:
Similar books «Pressure Canning Cookbook for Beginners: 1200 Days of Easy Recipes to Prepare»
Look at similar books to Pressure Canning Cookbook for Beginners: 1200 Days of Easy Recipes to Prepare. We have selected literature similar in name and meaning in the hope of providing readers with more options to find new, interesting, not yet read works.
Discussion, reviews of the book Pressure Canning Cookbook for Beginners: 1200 Days of Easy Recipes to Prepare and just readers' own opinions. Leave your comments, write what you think about the work, its meaning or the main characters. Specify what exactly you liked and what you didn't like, and why you think so.