At the beginning of each project the approximate quantities of yarn required are given. If different yarns are used (that is, a different yarn composition or weight), these quantities may alter. This is because the length of a ball of yarn depends on its weight and fibre content. If you are substituting yarns, check the tension of your preferred yarn against the tension of the pattern (the tension of the yarn can be found on the ball band; the tension of the pattern can be found at the beginning of the instructions). These must be the same if the substitution is to be successful. You will also need to knit a tension (gauge) square to check that you can achieve the tension as given in the pattern instructions.
If more than one ball of a particular colour is needed (for the basic bears, for example), ensure that you buy them from the same dye lot. The colour of a specific shade of yarn can vary between dye lots and the change will show in the finished project.
Tension (what knitters in the US know as gauge) can differ quite dramatically between knitters. This is because of the way that the needles and yarn are held. If your tension does not match that stated in the pattern, you should change your needle size and try again following this simple rule: If your knitting is too loose (fewer stitches and rows than the tension stated), you must use a smaller needle to make your knitting tighter. If your knitting is too tight (more stitches and rows than the tension stated), you must use a bigger needle to make your knitting looser.
It is important that your tension is correct to ensure that the outfits fit your bear well.
Common abbreviations
The following abbreviations are used throughout the pattern instructions in this book:
cm centimetre(s)
cont continue
g gram(s)
in inch(es)
inc increase
k knit
k2tog knit two stitches together
k2togtbl knit two stitches together through back of loop
k3tog knit three stitches together
M1 make one stitch
mm millimetre(s)
p purl
p2sso pass two slipped stitches over
p2tog purl two stitches together
p2togtbl purl two stitches together through back of loop
p3tog purl three stitches together
patt pattern
rem remain(ing)
rep repeat
RS right side
sl1 slip one stitch
sl2 slip two stitches
st(s) stitch(es)
st st stocking (stockinette) stitch
WS wrong side
ybk yarn back
yfwd yarn forward
yo yarn over
Special abbreviations
A number of special abbreviations appear when particular techniques are required for a project:
C6B Cable six back: Slip the next three stitches onto cable needle and hold at back of work, k3 from left needle and then knit the three stitches from the cable needle.
ML Place sequin on a loop: knit into the next stitch and, before slipping the stitch off the left needle, slide a sequin up to the needle and bring the yarn to the front of the work between the needle points. Wrap the yarn around your left thumb and take it back between the needle points. Now, knit into the stitch again and then slip the stitch off the needle. You will now have two stitches on the right-hand needle.
Cast one off by lifting one stitch over the other. PB Place bead: bring the yarn forward, slip bead to front of work, slip one stitch purlwise, take yarn to back of work. Bead will now be sitting in front of the slipped stitch. P2B Place two beads: bring the yarn forward, slip two beads to front of work, slip 1 st purlwise, take yarn to back of work. Beads will now be sitting in front of the slipped stitch. PS Place sequin: bring the yarn forward, slip sequin to front of work, slip one stitch purlwise, take yarn to back of work.
Sequin will now be sitting in front of the slipped stitch.
Techniques
Intarsia
Intarsia knitting produces a single-thickness fabric that uses different balls of yarn for different areas of colour. There should be very little, if any, carrying across of yarns at the back of the work. There are several ways to keep the separate colours of yarn organized when working in intarsia. My preferred method is to use yarn bobbins.
Three needle cast-off (bind-off)
This technique allows you to join two pieces of knitting by casting them off together instead of sewing them together.
Three needle cast-off (bind-off)
This technique allows you to join two pieces of knitting by casting them off together instead of sewing them together.
The method is worked by placing the two pieces of knitting (each piece on a needle) together in the left hand with right sides facing each other. With a third needle, you cast (bind) off the two rows of stitches together. Insert the right needle through the stitch on the front needle and through the stitch on the back needle and work them together. Repeat and cast (bind) off in the usual way.
Making I-cord
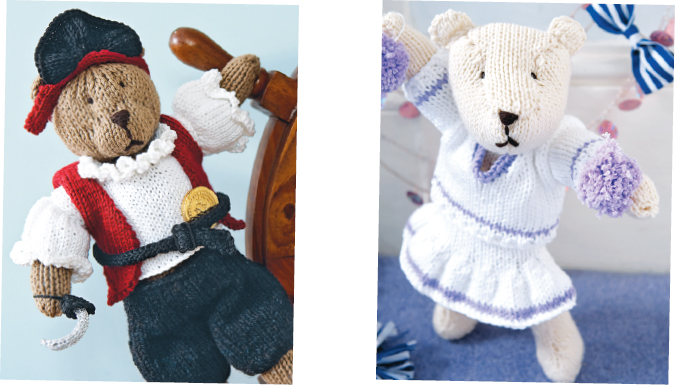
I-cord makes a sturdy piece of knitted cord. In this book we use it for the Pirates sword handle.
Once you have cast on your stitches, you must knit one row. You would now usually turn your needles, but to make the cord, do not turn. Instead, slide the stitches to the other end of the double-pointed needle ready to be knitted again. The yarn will now be at the left edge of the knitting; therefore, to knit, you must pull it tightly across the back of your work and then knit one row. Continue in this way, never turning, and always sliding the work to the other end of the double-pointed needle.
Pompoms
The Cheerleader bear features two pompoms to complete her outfit.
Pompoms
The Cheerleader bear features two pompoms to complete her outfit.
Cut two circles of card approx. 2cm (in) in diameter with a 1cm (in)-diameter hole in the middle. Wind the yarn around the outside of the two circles of card until the hole in the centre is almost filled in. Next, cut slowly and carefully around the edges of the two pieces of card until all the yarn has been cut. Gently ease the pieces of card apart, but before taking them off completely, tie a piece of yarn in a secure knot around the centre of the pom-pom to hold it together. Now remove the card.

