Becky Thomas - Loom Magic Charms!: 25 Cool Designs That Will Rock Your Rainbow
Here you can read online Becky Thomas - Loom Magic Charms!: 25 Cool Designs That Will Rock Your Rainbow full text of the book (entire story) in english for free. Download pdf and epub, get meaning, cover and reviews about this ebook. year: 2014, publisher: Skyhorse Publishing, genre: Home and family. Description of the work, (preface) as well as reviews are available. Best literature library LitArk.com created for fans of good reading and offers a wide selection of genres:
Romance novel
Science fiction
Adventure
Detective
Science
History
Home and family
Prose
Art
Politics
Computer
Non-fiction
Religion
Business
Children
Humor
Choose a favorite category and find really read worthwhile books. Enjoy immersion in the world of imagination, feel the emotions of the characters or learn something new for yourself, make an fascinating discovery.

- Book:Loom Magic Charms!: 25 Cool Designs That Will Rock Your Rainbow
- Author:
- Publisher:Skyhorse Publishing
- Genre:
- Year:2014
- Rating:3 / 5
- Favourites:Add to favourites
- Your mark:
Loom Magic Charms!: 25 Cool Designs That Will Rock Your Rainbow: summary, description and annotation
We offer to read an annotation, description, summary or preface (depends on what the author of the book "Loom Magic Charms!: 25 Cool Designs That Will Rock Your Rainbow" wrote himself). If you haven't found the necessary information about the book — write in the comments, we will try to find it.
Learn to loom your own ornaments and charms that can be added to bracelets, necklaces, or even shoelaces and zippers. This fully illustrated, step-by-step guide features projects of every variety, from dinosaurs, giraffes and dolphins to sunglasses, flipflops, and more. Plus, each project only requires one loom!
With twenty-five projects in all, Loom Magic Charms! will help you add that extra something to your Rainbow Loom designs!
Becky Thomas: author's other books
Who wrote Loom Magic Charms!: 25 Cool Designs That Will Rock Your Rainbow? Find out the surname, the name of the author of the book and a list of all author's works by series.


Loom Magic Charms!: 25 Cool Designs That Will Rock Your Rainbow — read online for free the complete book (whole text) full work
Below is the text of the book, divided by pages. System saving the place of the last page read, allows you to conveniently read the book "Loom Magic Charms!: 25 Cool Designs That Will Rock Your Rainbow" online for free, without having to search again every time where you left off. Put a bookmark, and you can go to the page where you finished reading at any time.
Font size:
Interval:
Bookmark:


Copyright 2014 by Hollan Publishing, Inc.
Rainbow Loom is a registered trademark and does not sponsor, authorize, or endorse this book.
All rights reserved. No part of this book may be reproduced in any manner without the express written consent of the publisher, except in the case of brief excerpts in critical reviews or articles. All inquiries should be addressed to Sky Pony Press, 307 West 36th Street, 11th Floor, New York, NY 10018.
Sky Pony Press books may be purchased in bulk at special discounts for sales promotion, corporate gifts, fund-raising, or educational purposes. Special editions can also be created to specifications. For details, contact the Special Sales Department, Sky Pony Press, 307 West 36th Street, 11th Floor, New York, NY 10018 or .
Sky Pony is a registered trademark of Skyhorse Publishing, Inc., a Delaware corporation.
Visit our website at www.skyponypress.com.
10 9 8 7 6 5 4 3 2 1
Library of Congress Cataloguing-in-Publication Data is available on file.
Cover design by Owen Corrigan
Cover photo credit Hollan Publishing, Inc.
ISBN: 978-1-63220-259-8
Ebook ISBN: 978-1-63220-260-4
Printed in the United States of Ameica
Contents
Acknowledgments
W ed like to thank our wonderful editor Kelsie Besaw and Sara Kitchen, who again helped us to get this book out in record speed! We would also like to thank everyone at Skyhorse for continuing to do a fantastic job with this series. Thank you to Bill Wolfsthal, Tony Lyons, and Linda Biagi for putting it all together and giving us this opportunity. Wed also like to thank Holly Schmidt for her unending support and Allan Penn for his excellent photography.
Finally, wed like to thank all of our models, Alden Glovsky, Nathaniel Stanwood, Owen Schmidt, Christa Coffey, Leah Coffey, and Lucy Bartlett, who lent their smiling faces to our book.
Glossary
H ere is a list of some of the terms we use when explaining how to do each project. Getting to know them will help you speed through all these great designs!
hook: The hook is the off-white, hook-shaped utensil that is provided in the packaging of your loom. This is used to move rubber bands from their pegs instead of your fingers.
c-clip: A c-clip, as its name suggests, is a small, clear clip shaped like a c that we use to hold rubber bands together. C-clips are often the last step in a project. Some rubber band kits come with s-clips instead; you can use those the same way you use c-clips.
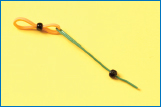
threading: To thread beads onto your project, wrap a thin piece of wiresuch as a stripped twist-tiearound a single band. Add the beads onto the wire from the other end, and then slide them onto the band.
Set up your loom square: When all the columns are evenly set on the loom; no column of pegs is set forward or backward.
offset: When columns in the loom are not square. For example, when the outside columns are set evenly and the middle column is set one peg closer to you.
Making a chain or knitting: To make a chain for arms or feet, wrap a single band around your hook three or four times so it looks like a knot. Attach a double band to the end of the hook, and slide the knot onto this double band. Move everything back onto the shaft of the hook. Continue this process of adding double bands to the chain until you have the desired length.

Holding bands: Holding bands are placed across the rows of your charms before you loop the project. They help to keep all the bands in your designs in the right shape. Do not loop holding bands: when you loop your other bands, pull them through the holding bands as you would with any cap bands.
Doubling: To double a rubber band, fold it onto itself before placing it onto the loom or hook. This makes the band extra tight. When a project calls for doubled bands, the instructions will often say to wrap the band around your hook twice before placing it on the loom; this is an easy way to attach a tight doubled band to multiple pegs. Do not confuse this with a double band: two single bands placed on the loom together.
Double band: Two single rubber bands placed onto the loom together.
How to Loop your project back: When you have finished putting down all your rubber bands on the loom, there is one more step before you can remove your project from the loom. This step connects your bands to each other instead of just to the loom.
To Loop Your Project:
Start at the peg indicated in the instructions; usually it is the last or second-to-last peg in your project or the peg where you have put a cap band.
Use your plastic hook tool and slide it into the hollow space in the middle of the peg to grab the top un-looped band on the peg.

Then pull the band up and off the peg, pulling it through any cap bands or any looped bands stacked above it.
Attach the band on your hook to the peg where the other end of the same band is still attached. If there is more than one band, loop all the bands on a peg before you move on to loop the next peg.

Pegs are typically looped in the opposite order from how you laid them out on the loom, but be sure to follow any specific instructions for the project you are working on.
When you have finished looping your project, you should have a few loose loops remaining on the last peg on the loom. You need to secure those loops by tying a band around them or using a c-clip or your project will unravel!

T-Rex
F or the fiercest of loom projects, meet the T-Rex! This Tyrannosaurus looks just like the real thing, but luckily for you, we are not in the Cretaceous Period and he is not made of sharp claws and teeth. This project has a lot of steps for his many different body parts, so just be careful to follow all of the steps in order.
Difficulty level: Hard
You need:
1 loom 2 hooks dark green bands red bands white bands black bands
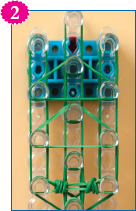
Set up your loom offset so that the center column is one peg farther from you.
First you will make the T-Rexs mouth. For the top jaw, lay out the figure shown using green double bands. Attach a cap band at the bottom center peg.

Using single bands that have been doubled, or wrapped once on themselves, lay out two triangular holding bands. To make his nostrils, wrap two separate single bands around your hook several times. Slide both of them onto another single green band and attach this to your loom at the fourth outside pegs.
Font size:
Interval:
Bookmark:
Similar books «Loom Magic Charms!: 25 Cool Designs That Will Rock Your Rainbow»
Look at similar books to Loom Magic Charms!: 25 Cool Designs That Will Rock Your Rainbow. We have selected literature similar in name and meaning in the hope of providing readers with more options to find new, interesting, not yet read works.
Discussion, reviews of the book Loom Magic Charms!: 25 Cool Designs That Will Rock Your Rainbow and just readers' own opinions. Leave your comments, write what you think about the work, its meaning or the main characters. Specify what exactly you liked and what you didn't like, and why you think so.