Dedication
I want to dedicate this book to Wanda, Cindy, Lisa, and Brenda. They took my pieced tops and quilted them into beautiful quilts. Outstanding job, ladies!
Acknowledgments
In one way or another, quilts are made by committee. Quilters reach out to others for inspiration and instruction. In earlier times, contact was through quilting bees; today, there are guilds, bees, retreats, and conferences. This book is possible because of the encouraging efforts of many people.
Liz Aneloski at C&T Publishing guided and pointed me in the right direction every step of the way. Jody Lamb and Leslie Graham pieced tops and bound quilts. Wanda Jones, Cindy Thompson, Lisa DeSpain, and Brenda Shreve provided longarm quilting. Fabrics were courtesy of Robert Kaufman Fabrics, P&B Textiles, Andover Fabrics, and Timeless Treasures; batting was courtesy of Hobbs Bonded Fibers and Pellon. Quilting friends encouraged me and provided support.
The idea was mine, but the above helped nurture and develop the theme. I am grateful for all their help.

Thumb through a stack of the latest quilt magazines and quilt books and you will see an interesting trend developing. The featured quilts are more dark than light. But these quilts arent dark and drab; rather, they are dark and bright. Quilters are discovering that bright colors pop better against dark fabrics than they do against light fabrics.

The same 1930s reproduction fabrics are used for both of these quilts. The difference?
The design on the left has a white and light-colored background, and the one on the right has a black background.
See how much more vibrant and bright the 1930s fabrics look against black than against the pale background in the examples at right. That this is not really something new is evident when one looks back at yesterdays quilts. We have wonderful examples made by Amish quilters in the nineteenth and early twentieth centuries. These quilts were made primarily with bright and deeply saturated colors and black; a light-colored background was extremely rare. At the turn of the twentieth century many quilters made crazy quilts, another style with an emphasis on black to make the other colors shine. Lets not forget the primitive wool penny rugs of the 1800s; once again, black was the color of choice to frame the pennies. Many of the Log C abin quilts from the nineteenth century combine black with bright colors for contrast. One of the first quilts I made in the 1980s was a Double Wedding Ringwith a black background.
Black backgrounds with up-to-date fabrics give all these quilts a contemporary flair. They are dramatic. They are bright. They are fun!
This book presents patterns for eleven quilts, plus a gallery of a bakers dozen more to show the dramatic effects you can achieve by using dark backgrounds to create remarkable quilts. It includes patterns for every skill level, from beginner to advanced; make these quilts to advance your skill level or simply to have funor both.
So expand your horizons! Take a break from the everyday, and see how black can add extra sparkle to your quilts.

The basic techniques used for the quilts throughout this book are presented here. Its important to take the time to read through these instructions before you begin any of the projects.
Materials and Cutting
The quilts included in the book illustrate the wide range of fabrics that can be enhanced and intensified by combining them with black: batiks, hand-dyes, 30s prints, Japanese designs, contemporary patterns, tone-on-tones, the Fossil Fern line by Benartex, and prints by Kaffe Fassett, to name a few.
Yardage requirements given for all the quilts are based on a usable fabric width of 40. All cutting includes seam allowances.
Piecing
All block sizes and measurements for the projects are based on using an accurate seam allowance. Press all seams after sewing, in the direction indicated by the arrows in the how-to illustrations.
SEW-AND-FLIP TECHNIQUE
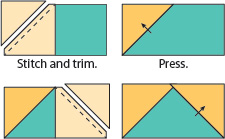
Using this technique, you do not need to actually cut any triangles. Triangular patches are created from squares and rectangles.
Place the 2 pieces, usually a square and a rectangle, right sides together, aligning the raw edges as indicated for the individual project. Draw a diagonal line from corner to corner on the wrong side of the small square.
Sew along the marked line. Trim away the fabric outside the stitching to leave a seam allowance and flip open the top piece; press.
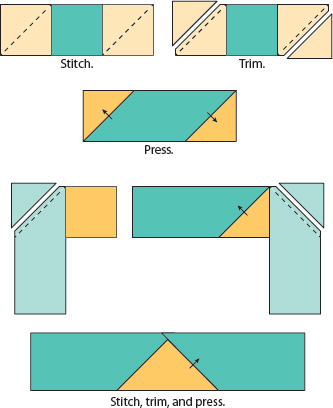
The first fabric layers must be trimmed before you add a second square on top, as some designs require. Refer to the specific project diagrams for other piecing variations that use this basic technique.
tip
When sewing the diagonal seam from corner to corner, start from the inside corner of the square rather than from the outside corner. The fabric will feed more easily this way and will be less likely to be pulled down into the throat plate of the sewing machine.
HALF-SQUARE TRIANGLES
These units are made from pairs of squares. In the cutting charts for the projects, these are the squares with measurements ending in  .
.
Place 2 squares right sides together with the lighter color on top, carefully aligning all raw edges. Draw a diagonal line from corner to corner.
Stitch from the drawn line on both sides, creating a double seam. Cut apart on the line. Open the squares and press the seams toward the darker triangles.

tip
Half-square triangles also can be made by using products such as Triangles on a Roll or Half Square Triangulations (see Resources, ). Press the units open before you remove the papers. The papers stabilize the bias seam and help keep the fabric from stretching out of shape.
Setting Triangles
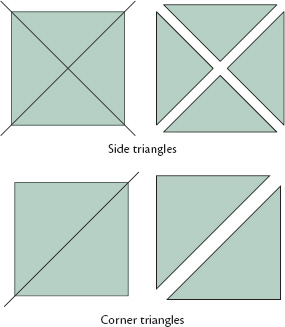
Quilts that call for on-point settings need triangles to fill in the sides and corners when the blocks are set diagonally into rows. To make these, cut squares and then cut them diagonally in quarters (for side triangles) or halves (for corner triangles). The triangles are cut slightly larger than needed, to allow for piecing variances and to ensure a good fit. When the quilt top is completely assembled, trim and square up the outside edges of your quilt, leaving an accurate seam allowance.




 .
.
