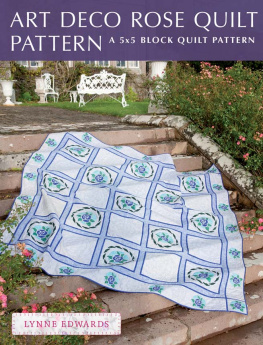
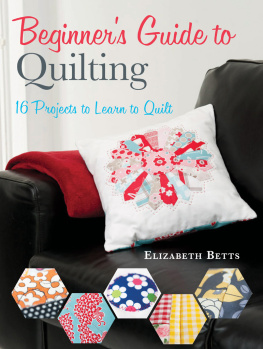
Lynne Edwards - Art Deco Rose Quilt Pattern: A Quick & Easy Quilting Project
Here you can read online Lynne Edwards - Art Deco Rose Quilt Pattern: A Quick & Easy Quilting Project full text of the book (entire story) in english for free. Download pdf and epub, get meaning, cover and reviews about this ebook. year: 2013, publisher: F+W Media, genre: Home and family. Description of the work, (preface) as well as reviews are available. Best literature library LitArk.com created for fans of good reading and offers a wide selection of genres:
Romance novel
Science fiction
Adventure
Detective
Science
History
Home and family
Prose
Art
Politics
Computer
Non-fiction
Religion
Business
Children
Humor
Choose a favorite category and find really read worthwhile books. Enjoy immersion in the world of imagination, feel the emotions of the characters or learn something new for yourself, make an fascinating discovery.

- Book:Art Deco Rose Quilt Pattern: A Quick & Easy Quilting Project
- Author:
- Publisher:F+W Media
- Genre:
- Year:2013
- Rating:4 / 5
- Favourites:Add to favourites
- Your mark:
Art Deco Rose Quilt Pattern: A Quick & Easy Quilting Project: summary, description and annotation
We offer to read an annotation, description, summary or preface (depends on what the author of the book "Art Deco Rose Quilt Pattern: A Quick & Easy Quilting Project" wrote himself). If you haven't found the necessary information about the book — write in the comments, we will try to find it.
Learn to sew beautiful handmade quilts with Lynne Edwards simple blanket stitch applique technique. Choose from 12 inspiring projects that include both machine sewing and hand stitching techniques for patchwork quilts youll be truly proud of.
Straightforward instructions allow even new quilters to create gorgeous quilts, and experienced quilters will love adopting the stick-and-stitch technique that gives such great results.
- Detailed step-by-step instructions
- Full-colour illustrations
- Beautiful photography
Lynne Edwards: author's other books
Who wrote Art Deco Rose Quilt Pattern: A Quick & Easy Quilting Project? Find out the surname, the name of the author of the book and a list of all author's works by series.


Art Deco Rose Quilt Pattern: A Quick & Easy Quilting Project — read online for free the complete book (whole text) full work
Below is the text of the book, divided by pages. System saving the place of the last page read, allows you to conveniently read the book "Art Deco Rose Quilt Pattern: A Quick & Easy Quilting Project" online for free, without having to search again every time where you left off. Put a bookmark, and you can go to the page where you finished reading at any time.
Font size:
Interval:
Bookmark:
![]()
This section describes the essential techniques you will need to create the blanket stitch appliqu for this project. More general techniques required for quilt making, such as adding borders, quilting and binding are described in General Techniques.
Most of the appliqu patterns are printed full size as they appear in the quilt, although some will need to be enlarged. These patterns are used as a reference when arranging the separate pieces of fabric to build up the final appliqu design.
When using the stick-and-stitch technique, the appliqu shapes must first be reversed. The design is then separated into the various shapes that make up the final image. Any shape that is overlapped by another will need an extra amount added, about in (3mm) wide to the edge that will be overlapped. This is shown as a dashed line on the separate shapes and should be included when the shapes are traced on to the paper side of the fusible web. For each of the designs in the book, all the reversed pieces are shown labelled and grouped ready for tracing.
With this technique most of the inner section of the fusible is removed before the outline is ironed on to the fabric. If this inner area is large enough, I have placed one or more smaller outlines within it to be traced as positioned. Once that area of web has been cut and removed from the large drawn outline, the smaller shapes marked on it can then be cut out as usual.
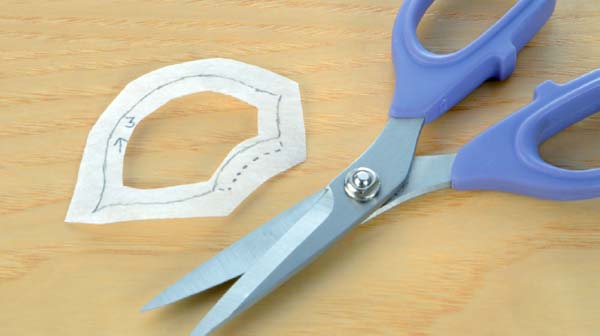
Place the fusible web smooth side uppermost over the reversed shapes of the design as given in each project. Trace each section including any dashed areas. Mark the grain line arrows and the numbers on the tracing, keeping these at the very edge of the shape rather than in the centre, as the centre area of fusible web will be removed later. The shapes can be traced closer together but leave about in (1.3cm) between each traced shape to make cutting out easier. Cut out each traced shape roughly in (6mm) beyond the outer drawn line (see Photo below).

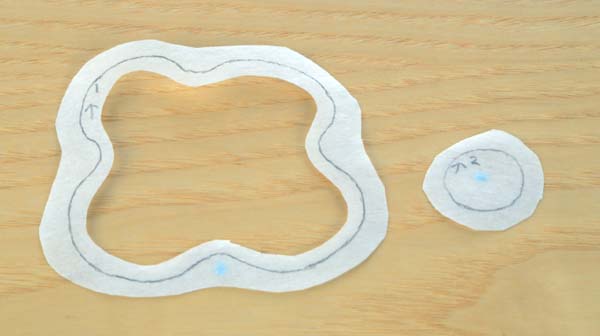
Carefully cut out the central area of fusible web and remove it, leaving only about in (3mm) inside the drawn line. The removed pieces of fusible can be kept for later projects. If the removed area has extra, smaller shapes traced on to it, these can now be cut out in the same way. Dont try to cut away the inner areas of any small or narrow pieces less than 1in (2.5cm) across as they are just too fiddly.
Place each cut piece of fusible web rough side downwards on the wrong side of the fabric, matching the grain line arrow with the grain or weave of the fabric. Press with a hot iron to stick the web to the fabric.
Now cut accurately along the drawn line through both the paper and the fabric. Include in the cut-out shape any dashed area.

The numbers on the reverse of each piece tell you the order in which to build up the design. If the design is very simple, it can be built up directly on the background fabric, using the drawing of the finished design as a guide for positioning each piece. Take the first piece, remove the paper backing and position the piece right side up, glue side down on the background. Add each fabric shape in turn until the design is complete. Dashed areas need to be overlapped by other pieces. When you are happy with the arrangement, press everything with a hot iron to fix the pieces in place.
For a more complex design where you need to be very accurate with the positioning of each fabric shape, use an appliqu pressing sheet or non-stick baking parchment paper to help. Lay the pressing sheet or paper over the drawn design you will be able to see the design through the plastic sheet. The non-stick baking parchment paper is less transparent, but should still allow the design to show through well enough for positioning the pieces on to it. The whole design is assembled piece by piece and ironed on to the pressing sheet or parchment paper (see Tip below). Once it is complete, only then will it be carefully peeled away from the background plastic or paper and re-positioned and ironed in place on the background fabric.
Fix the design and parchment paper or pressing sheet on to the ironing surface with pins or masking tape at the corners to keep everything in position as you stick.
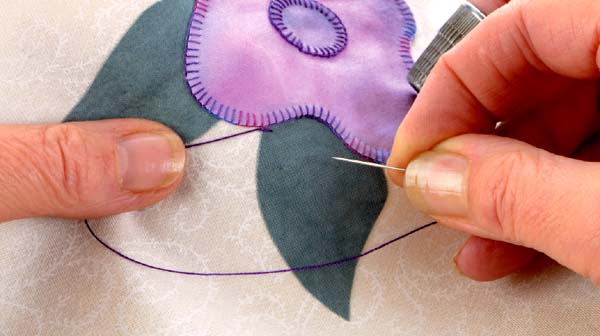
These guidelines for stitching the design by hand are for right-handed quilters. Left-handers need to study the photographs in a mirror to follow the step-by-step instructions. Start at the end of a piece of fabric, preferably where it is overlapped by another appliqu piece. Once you are more experienced, it can be your choice where you begin and finish, but this makes for an easier and less obvious starting point.
Turn the work so that the appliqu fabric is to the right and the background fabric is to the left. Keep the edge of the appliqu running straight towards you at all times at the point where you are stitching.
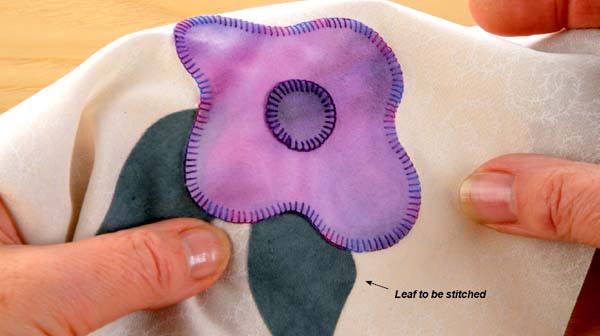
Make a knot at the end of the thread. Begin by bringing the needle up from the back in the background fabric close to the edge of the appliqu.
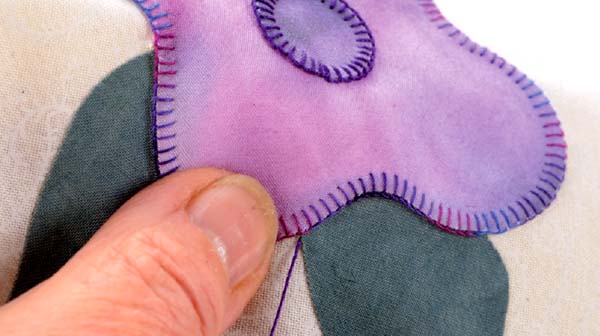
Make one stitch at right angles to the edge of the appliqu and bring the needle back up in the same place as the thread. The needle should be horizontal when making this stitch. The stitch length is your choice. I like to make a stitch a generous in (3mm) with spacing between about half this. Dont worry too much become comfortable with the stitching action and as you find a stitching rhythm your hand will settle into the spacing and size of stitch that it likes best.

Pull the thread across to the left to tighten the stitch.

Hold the thread flat with your thumb. Bring the needle back to the appliqu, making a thread loop.
Font size:
Interval:
Bookmark:
Similar books «Art Deco Rose Quilt Pattern: A Quick & Easy Quilting Project»
Look at similar books to Art Deco Rose Quilt Pattern: A Quick & Easy Quilting Project. We have selected literature similar in name and meaning in the hope of providing readers with more options to find new, interesting, not yet read works.
Discussion, reviews of the book Art Deco Rose Quilt Pattern: A Quick & Easy Quilting Project and just readers' own opinions. Leave your comments, write what you think about the work, its meaning or the main characters. Specify what exactly you liked and what you didn't like, and why you think so.