Cathy Baker - Chair Caning and Seat Weaving
Here you can read online Cathy Baker - Chair Caning and Seat Weaving full text of the book (entire story) in english for free. Download pdf and epub, get meaning, cover and reviews about this ebook. year: 1979, publisher: Storey Publishing, LLC, genre: Home and family. Description of the work, (preface) as well as reviews are available. Best literature library LitArk.com created for fans of good reading and offers a wide selection of genres:
Romance novel
Science fiction
Adventure
Detective
Science
History
Home and family
Prose
Art
Politics
Computer
Non-fiction
Religion
Business
Children
Humor
Choose a favorite category and find really read worthwhile books. Enjoy immersion in the world of imagination, feel the emotions of the characters or learn something new for yourself, make an fascinating discovery.

- Book:Chair Caning and Seat Weaving
- Author:
- Publisher:Storey Publishing, LLC
- Genre:
- Year:1979
- Rating:4 / 5
- Favourites:Add to favourites
- Your mark:
Chair Caning and Seat Weaving: summary, description and annotation
We offer to read an annotation, description, summary or preface (depends on what the author of the book "Chair Caning and Seat Weaving" wrote himself). If you haven't found the necessary information about the book — write in the comments, we will try to find it.
Cathy Baker: author's other books
Who wrote Chair Caning and Seat Weaving? Find out the surname, the name of the author of the book and a list of all author's works by series.
Chair Caning and Seat Weaving — read online for free the complete book (whole text) full work
Below is the text of the book, divided by pages. System saving the place of the last page read, allows you to conveniently read the book "Chair Caning and Seat Weaving" online for free, without having to search again every time where you left off. Put a bookmark, and you can go to the page where you finished reading at any time.
Font size:
Interval:
Bookmark:
Cane, Rush, and
Related Techniques
of Seat Weaving
Cathy Baker
Chair Caning and
Seat Weaving
Cathy Baker
Would you like to use that antique chair, but cant find anyone to reweave the broken seat?
The answer is simple. Do it yourself. The materials are inexpensive, the steps you will read in this bulletin are simple, and the results are extremely satisfying.
This bulletin provides both the beginner and the skilled crafts-person with a simple step-by-step guide to the various techniques of seat weaving. Most of the methods described are traditional, but others are relatively modern and provide ideas for variations you can try. All of the projects can be completed with simple tools that are found in most home tool boxes and supplies that can be purchased at a nominal cost.
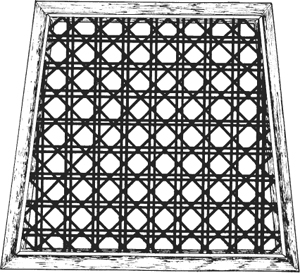
The type of cane used for chair seating is made from the outside bark of the rattan, a climbing palm of the jungles of Borneo, Sumatra, and Malaysia. When the rattan reaches the desired length and diameter, it is cut and gathered for export. The outside bark is stripped from the vine and machine-cut into various widths and thicknesses. The best cane has a brightness or luster and is smooth and shiny on one side. It should be strong but pliable, and unbroken where the eyes, the joints where the leaves were attached, were shaved smooth.
Chair cane is normally purchased in hanks. These are bunches of about 1,000 feet. Each hank will cover a woven area of about four square feet. Smaller amounts may be purchased, but the length of these will vary depending on the individual supplier.
In addition to regular cane, a strip of binder cane is needed. This strip should be about two sizes wider than regular cane, and one and one-half times the length of the perimeter of the chair seat.
Hand caning a chair is not difficult but care and patience are required. The work is done in stages. These must be started and completed in order, as each stage locks the previous one in place.
This six-way pattern is a traditional method used in the restoration of old as well as modern chairs. It may be worked in one or two sizes of cane, excluding the binder. If you chose to use two sizes, work the first four stages in one size and the last two stages in a slightly larger cane. This will give the seat a little extra strength.
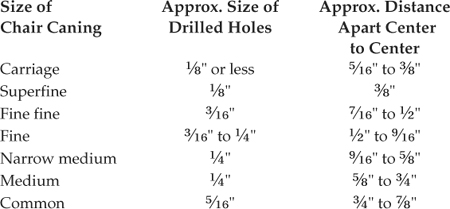
The size of cane to be used is determined by the diameter and spacing of the holes in the individual chair. The previous chart may be used as a guide.
Tools
1. A small hammer or mallet
2. A utility knife
3. Scissors or side cutters
4. Awl or ice pick
5. A clearing tool. Or use a small screwdriver, about two inches long, with the blade cut off, or with a two-inch, small-headed nail
6. Round-nosed pliers (optional)
7. Pegs. Golf tees may be used as temporary pegs, but you will need permanent ones as well. These may be whittled down from softwood, cut from a dowel, or purchased ready-made
8. A bar of paraffin (optional). If you wax the underside of the cane during weaving, it will slide along easier
9. A drill and drill bit (optional). Only if you need to remove the old pegs
10. A towel or rag to wrap the damp cane in while in use
Procedure
Stage 1
1. Clear the old cane from the seat. Cut around the inside of the seat frame to remove the center of the seat. Cut away the cane over the holes.
2. Knock the pegs out of the holes with a clearing tool and hammer. If the pegs have been glued or varnished in, drill them out.
3. Repair the chair if necessary.
4. Prepare the cane. Put a few lengths of cane into tepid water for about ten minutes, then wrap them in a slightly damp cloth. This will keep them from drying out while you are using them. Take out one piece at a time to use, and leave the rest wrapped.
5. Find the center holes in the front and back rails of the chair. Mark them with temporary pegs. If there is an even number of holes in these rails, mark the two center holes. The marked holes should be aligned from front to rear.
.
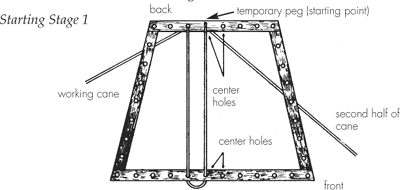
fig. 1
7. Use the cane that is on top of the rail first. Bring the strand forward to the front rail; remove the peg in the corresponding marked hole, and thread the cane down through it. Make sure that the cane is straight and firm, but not too tight, and that the shiny, smooth side is up. If it is twisted, you will not be able to correct it later. Refer to .
8. Peg the cane in place with a temporary peg. Peg each hole after you have run the cane through it so that it is held firmly in place while you go on to the next hole. The pegs can be moved along as you work. The only pegs that should be left in place are the ones holding the ends of the cane in place which are left under the seat.
9. Thread the cane up through the next hole to the left on the front rail, and bring it back to the corresponding hole in the back rail. Continue in this manner until all of the holes in the back rail, except the corner holes, have cane in them. Refer to .
10. If you have extra holes in the front rail, complete them as shown in . If at any time you run out of cane, peg a new piece in the corresponding hole in the opposite rail to the one you have just finished with a temporary peg. This may be removed and replaced when you run later pieces of cane through the hole. Always leave about a three-inch end below the seat.
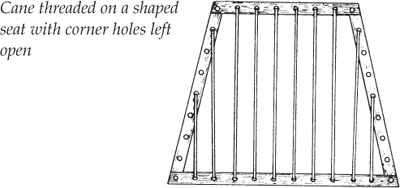
fig. 2
Stage 2
11. Stage 2 is worked from side to side. The steps are exactly the same as in Stage 1. The cane is run on top of the first stage canes. Again leave the corner holes open. See .
Stage 3
12. Stage 3 repeats Stage 1. It is worked on top of Stage 2. As you work, try to move the cane from Stage 1 slightly to the left so that the cane in this stage will lie just next to it on the right and not on top of it. This places the cane in the proper position for Stage 4. See .

fig. 3
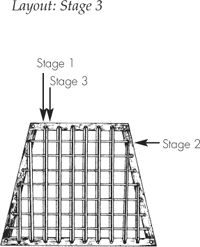
fig. 4
Stage 4
13. This stage is woven from side to side working from the front to the back. Start at the right side, as you face the front of the chair. Peg a piece of cane into the first hole from the corner in the front. It will help if you wax the back of the cane for this stage and the next two for ease in weaving.
.
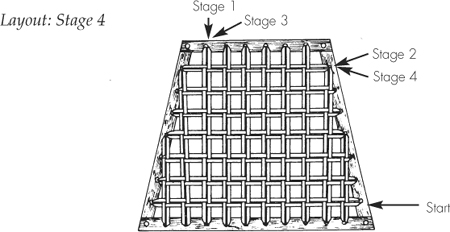
fig. 5
15. When you reach the left side rail, bring the cane down through the corresponding hole, peg it, and then bring it up through the adjacent hole. You can clear the holes a bit with your awl.
Font size:
Interval:
Bookmark:
Similar books «Chair Caning and Seat Weaving»
Look at similar books to Chair Caning and Seat Weaving. We have selected literature similar in name and meaning in the hope of providing readers with more options to find new, interesting, not yet read works.
Discussion, reviews of the book Chair Caning and Seat Weaving and just readers' own opinions. Leave your comments, write what you think about the work, its meaning or the main characters. Specify what exactly you liked and what you didn't like, and why you think so.