

Lecien Introduction
The earliest examples of embroidery date from ancient Egypt, Iron Age northern Europe, and the Zhou Dynasty in China. Initially embroidery was used to embellish items for high society. Young girls from wealthy families learned to embroider. By the late 1700s the popularity of embroidery had spread to the general population. Today embroidery is widely used to decorate a variety of items, including clothing, small personal items, table linens, and quilts. Lecien was established in Japan in 1933 as an importer of French laces.
In 1950 Lecien began to manufacture COSMO embroidery floss for the Japanese market. In 1979 the company began importing cotton quilting fabric from the United States. Twenty-one years ago Lecien began manufacturing original fine cotton fabrics and started selling them in the United States and other countries about ten years ago. The company began exporting its embroidery floss to the United States and other international markets in 2009. Today Lecien products are available in many countries around the world. Leciens COSMO embroidery floss is made from the best grade of Egyptian cotton available, and its texture and sheen are equal to that of silk.
Due to specialized dyeing techniques, the floss has a superior level of color retention and does not deposit color on fabric. COSMO floss does not twist and tangle, and it easily separates into individual strands for stitchery projects. COSMO glides smoothly through the fabric and does not fray or knot during stitching. COSMO floss is available in 443 colors, which were inspired by the changing seasons and other elements of nature. The wide range allows for subtle changes from one color to the next. Art & Hobby Division, Lecien Corporation
Bird Family
 An intimate group of feathered softies is a simple project, and ideal for either a first-time crafter or a more experienced sewer. Art & Hobby Division, Lecien Corporation
Bird Family
 An intimate group of feathered softies is a simple project, and ideal for either a first-time crafter or a more experienced sewer.
With a small amount of fabric, felt, and thread, and a handful of embroidery stitches, this little family of birds will spring to life. I used patterned fabric from Leciens Centenary collection by Yoko Saito; micro mini round buttons from Dress It Up; and lightweight paper or tracing paper for drawing the templates.by Amy Adams of Lucykate CraftsFinished sizes: adult bird, 4 3; baby bird, 3 3; egg, 1 2
Materials and Supplies
ADULT BIRD
5 12 piece of felted wool (or any fabric of your choice) for body 4 8 piece of craft felt for eyes, beak, chest, and wings 4 5 piece of print fabric for wings 4 small buttons for eyes and to attach wings Embroidery floss: Dark (COSMO #364) Light (COSMO #714) Stuffing Small pebble to weight bird
BABY BIRD
4 8 piece of felted wool (or any fabric of your choice) for body 4 6 piece of craft felt for eyes, beak, chest, and wings 2 5 piece of print fabric for wings 4 small buttons for eyes and to attach wings Embroidery floss: Dark (COSMO #364) Light (COSMO #714) Stuffing Small pebble to weight bird
EGG
3 6 piece of craft felt for egg 1 1 square of craft felt for decoration 1 small button for decoration Embroidery floss: Dark (COSMO #364) Light (COSMO #714) Stuffing Embroidery Stitches
Instructions
Template patterns are available to print from http://tinyurl.com/10939-patterns.Birds
The adult and baby bird are made using the same process. The construction can be done by hand or machine. Use 2 strands of floss for all embroidery. Trace all the template patterns onto paper and cut out on the traced lines. Using the template from Step 1, cut 1 body from the felted wool; flip the template over and cut another body shape. Pin, right sides together, and sew around the edge approximately in from the edge, leaving an opening for turning right side out.
Turn the body right side out and stuff. Wrap a small pebble in stuffing and insert it at the base of the bird. Use the templates to cut out the chest, 2 eyes, and a beak from the felt. Hold the chest piece in place, covering the open base of the bird, and sew it in place with random straight stitches using the dark embroidery floss around the outside of the stomach. Add the eyes by sewing a button on top of a felt circle on each side of the head. 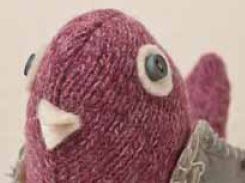 Figure 1 Cut 1 wing from the print fabric; flip the template over and cut another wing.
  Figure 1 Cut 1 wing from the print fabric; flip the template over and cut another wing.
Cut 2 wings from the felt. Pin a fabric wing, right side out, to a felt wing and buttonhole stitch around the edge, using the light embroidery floss, to join the pieces. Repeat with the other wing. For the adult birds wings, embroider a flower in lazy daisy stitch near the top, using the light embroidery floss. Add a button to the center of the flower to attach each wing to a side of the bird (). 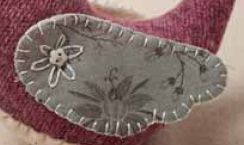 Figure 2 For the baby birds wings, embroider small random straight or seed stitches onto the wing area, using the light embroidery floss.
Attach the wings to the sides of the bird with small buttons (). 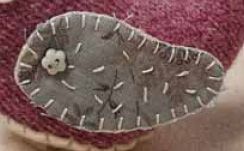 Figure 3
Egg
Use the template to cut 2 eggs from the felt. Decorate 1 piece with a flower in lazy daisy stitch using the dark embroidery floss. Add a circle cut from the craft felt, attached with straight stitches using the light embroidery floss, and a button in the center. Embroider some light and dark seed stitches randomly around the egg. Pin the 2 felt eggs, with the embroidered side out, and sew around the edge in buttonhole stitch using the light embroidery floss.
Just before you finish, insert a little stuffing into the egg and continue sewing to close the gap (). 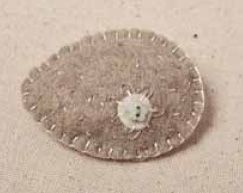 Figure 4
Wool Felting
Theres no big secret to felting wool; its more of a happy accident. First you need to find a suitable garment, which needs to be about 80% wool in content. Secondhand is the most economical way to go, so try thrift shops or yard sales, or raid your familys closets for any woolen sweaters, cardigans, scarves, and so on. To felt the piece, place the item in the washing machine on a warm wash / cool rinse cycle with some detergent and keep your fingers crossed! It doesnt need to felt very much, just enough to stop the wool from fraying when its cut.


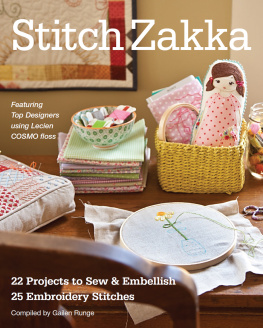


 An intimate group of feathered softies is a simple project, and ideal for either a first-time crafter or a more experienced sewer. Art & Hobby Division, Lecien Corporation
 Figure 1 Cut 1 wing from the print fabric; flip the template over and cut another wing.
  Figure 2 For the baby birds wings, embroider small random straight or seed stitches onto the wing area, using the light embroidery floss.
 Figure 3
 Figure 4