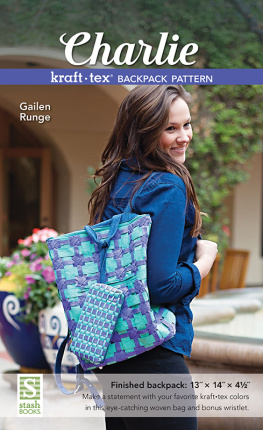
Publisher: Amy Marson Creative Director: Gailen Runge Editor: Liz Aneloski Technical Editor: Linda Johnson Design Direction: Kristy Zacharias Cover Designer: Kerry Graham Page Layout Artist: Casey Dukes Production Coordinator: Zinnia Heinzmann Production Editor: Jennifer Warren Illustrators: Tim Manibusan and Linda Johnson Style photography by Mai Yong Vang and instructional photography by Gailen Runge of C&T Publishing, Inc., unless otherwise noted Published by Stash Books, an imprint of C&T Publishing, Inc., P.O. Box 1456, Lafayette, CA 94549 Charlie krafttex Backpack Finished backpack: 13 wide 14 high 4 deep 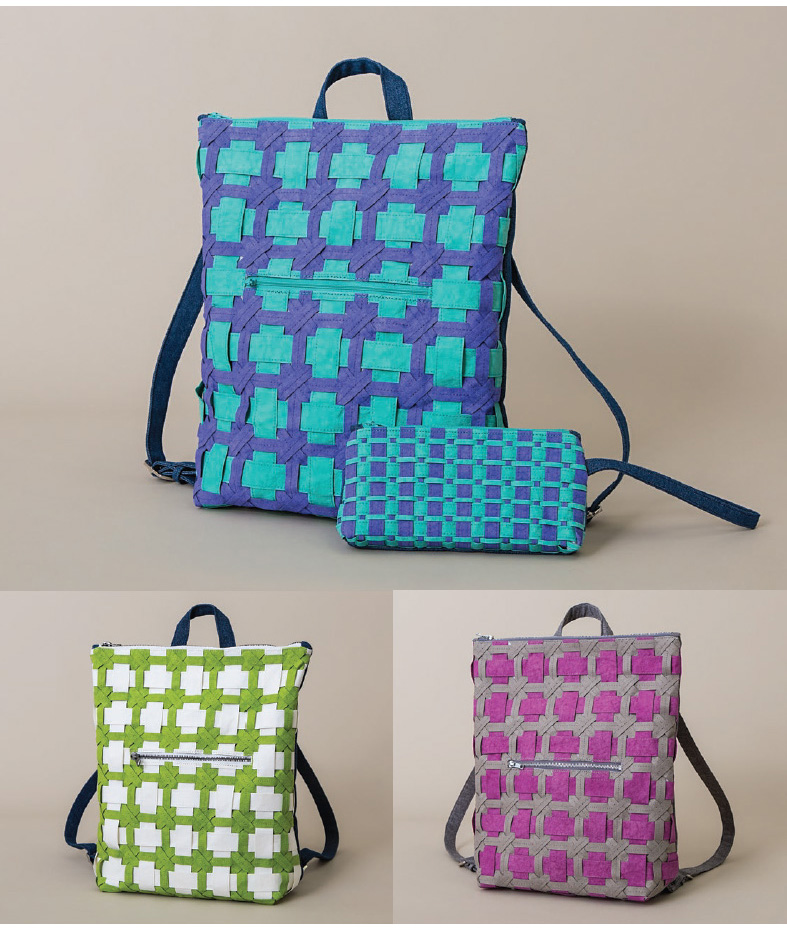 This pattern is all about the preparation, with much of the work done to individual components before final assembly. That makes this a great project to do in stages. (Of course, if youre impatient like me, you can stitch it all in one sitting.) Once you have the weaving finished, the pockets added to the lining and outside pieces, the straps sewn and trimmed, the buckles placed, and so forth, sewing the backpack together is amazingly quick! Ive given instructions for a few different material options. The main backpack as shown has a woven krafttex front. The Greenery and White Charlie backpack has a heavy (eleven-ounce) denim for the other outer material.
The Blue Iris and Blue Turquoise Charlie backpack has a lighter-weight (seven-ounce) denim. The Radiant Orchid and Stone Charlie backpack uses suiting-weight fabric. If you are using quilting-weight cottons, Ive included instructions for additional interfacing to stiffen things up. If youre using pleather (one of my favorite materials for bags of all kinds!), Ive given instructions that eliminate seam allowances on the straps and so forth. As a bag maker, the single resource that improved my abilities and my final results more than anything else was reading Nicole Mallalieus book The Better Bag Maker (by C&T Publishing). What a revelation! I encourage you to check it out.
MATERIALS Yardage includes enough for the wristlet as well as the backpack. krafttex 1: 1 roll krafttex 2: 1 roll Front fabric (use only if not weaving with krafttex): yard or 1 fat quarter Back fabric: yard Lining fabric: 1 yards Fusible interfacing (midweight to stiff): 3 yards (I use Pellon 931TD.) (When using a lightweight fabric for the back, increase to 3 yards.) Fusible fleece (use only if your exterior is pleather): 3 28 Base material, such as plastic canvas: 8 10 12 zipper: 1 for top opening 7 zippers: 3 (1 for exterior pocket, 1 for interior pocket, 1 for wristlet) Purse feet: 4 1 buckles: 2 Small swivel hook: 1 Eyelets: 10 (with eyelet setter) CUTTING NOTEFor a solid front instead of a woven one, cut 1 piece 16 17 for the front. Front fabric krafttex 1 Cut 2 strips 27 for weaving. Cut 4 strips 25 for weaving. Cut 4 strips 22 for weaving. Cut 16 strips 20 for weaving. Cut 4 strips 19 for weaving.
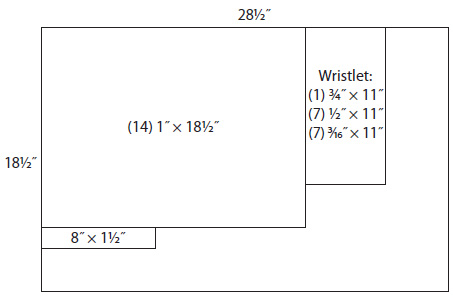
Cut 4 strips 15 for weaving. Cut 4 strips 12 for weaving. Cut 4 strips 9 for weaving. Cut 4 strips 5 for weaving. 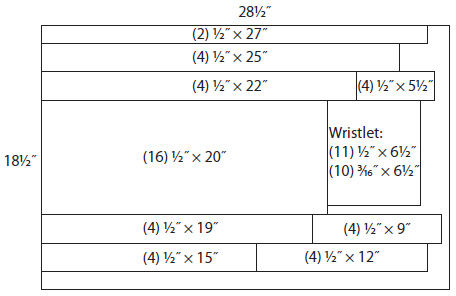 krafttex 2 Cut 14 strips 1 18 for weaving.
  Back fabric Cut 1 piece 16 17 for the back.
  Back fabric Cut 1 piece 16 17 for the back.
Cut 3 strips 3 28 for the straps. (When using pleather, cut 6 strips 1 28.) Cut 1 piece 3 9 for the strap anchor. (When using pleather, cut 1 piece 1 9.) Cut 2 squares 2 2 for the zipper tabs. (When using pleather, cut 2 rectangles 1 2. When using denim, cut them from lining fabric or cut 2 strips 2 from krafttex.) Cut 1 square 2 2 for the key-hook strap. (When using pleather, cut 1 strip 7.) 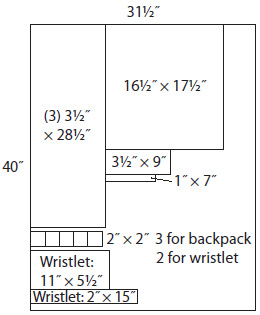 Lining fabric Cut 2 pieces 17 16 for the front and back lining. (When using pleather, cut 1 strip 7.)
  Lining fabric Cut 2 pieces 17 16 for the front and back lining.
Cut 2 pieces 8 5 for the zipper pockets. Cut 2 pieces 8 6 for the zipper pockets. Cut 1 piece 15 15 for the compartment pocket. Cut 1 piece 9 11 for the base wrap. (Optional: Use scrap fabric instead of lining fabric for this piece.) 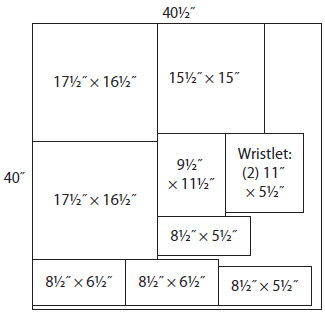 Interfacing Cut 4 pieces 16 17 for the fronts and backs. (When using a lightweight fabric for the back, double your interfacing by cutting 5 pieces.) Cut 2 pieces 8 6 for the zipper pockets.
Cut 2 pieces 8 5 for the zipper pockets. Cut 1 piece 15 7 for the compartment pocket. Cut 3 strips 3 28 for the straps. (Strap interfacing is not necessary if your fabric is heavy denim.)  Fusible fleece When using pleather for the straps, cut 3 strips 28. Base material Cut 2 rectangles 4 10. Tools and Notes This bag uses a variety of purse findings and sewing notions such as buckles, zippers, eyelets, purse feet, and swivel hooks.
Its also constructed with krafttex, which has its own minor stitching challenges. The backpack can definitely be sewn using your standard tools and supplies. That said, I find that adding a few different tools really makes it easier to construct. Sewing feet: I am constantly switching between my edge-stitch, zipper, and open-toe foot. With the edge-stitch foot, the edgestitching on the woven krafttex strips is so fast and easy! (I actually use my blind-hem foot instead of investing in a designated edge-stitch foot.) Glue and staples (Staples?): Because you cant pin through krafttex without leaving holes, I recommend glue tacking the pieces together. I prefer Fabri-Tac because it instantly holds the pieces together.
Be very careful not to let the glue press out onto the visible sections; it is permanent glue. You can use tacky water-soluble glue, if you prefer, or binder clips where possible. If Ive used a heavyweight fabric like denim, I will use staples to baste the front, back, and bottom together when stitching the boxed corners on the outsides. Once the seam is sewn, I remove the staples. Hole cutter: When setting the eyelets in the straps, you will need to cut through four layers of fabric and interfacing. My eyelet hardware came with a heavy-duty hole cutter.
On heavier fabrics where I cant make the hole cutter work, I end up using small, sharp-pointed scissors to nip away at the little circles. Patience is needed, but it works every time. Sewing with krafttex: When stitching krafttex, use a sharp needle and lengthen the stitches. (I use length 3 on a BERNINA.) Weaving Edgestitch both long edges on the 1 krafttex 2 strips and set aside. Using the weave template as a guide, lay out 8 of the 20 krafttex 1 strips on the vertical strip 1 lines. 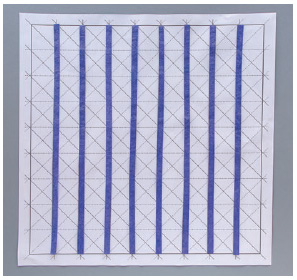 Lay out 8 of the 20 krafttex 1 strips along the horizontal strip 2 lines.
Next page



 This pattern is all about the preparation, with much of the work done to individual components before final assembly. That makes this a great project to do in stages. (Of course, if youre impatient like me, you can stitch it all in one sitting.) Once you have the weaving finished, the pockets added to the lining and outside pieces, the straps sewn and trimmed, the buckles placed, and so forth, sewing the backpack together is amazingly quick! Ive given instructions for a few different material options. The main backpack as shown has a woven krafttex front. The Greenery and White Charlie backpack has a heavy (eleven-ounce) denim for the other outer material.
 krafttex 2 Cut 14 strips 1 18 for weaving.
  Back fabric Cut 1 piece 16 17 for the back.
  Lining fabric Cut 2 pieces 17 16 for the front and back lining. (When using pleather, cut 1 strip 7.)
  Interfacing Cut 4 pieces 16 17 for the fronts and backs. (When using a lightweight fabric for the back, double your interfacing by cutting 5 pieces.) Cut 2 pieces 8 6 for the zipper pockets.
 Fusible fleece When using pleather for the straps, cut 3 strips 28. Base material Cut 2 rectangles 4 10. Tools and Notes This bag uses a variety of purse findings and sewing notions such as buckles, zippers, eyelets, purse feet, and swivel hooks.
 Lay out 8 of the 20 krafttex 1 strips along the horizontal strip 2 lines.