
 I dont have a famous love story of how I learned to crochet from a well-known designer or from a loving relative, but my story is personal, and it is what inspires me to design every day. My daughter had received a how-to-crochet-a-scarf kit for Christmas one year and wanted me to teach her how to crochet. I had no idea where to start, but luckily a three-step learners guide was included, so I taught myself to crochet so that I could teach my daughter. Once I started, I was hooked! I loved teaching her to crochet and watching the single strand of yarn turn into something I could use. I soon realized how much I enjoyed crocheting and designing new items. Through my newfound hobby, I created a top-selling online pattern business, RAKJpatterns, with the goal of offering fresh, creative designs using basic stitches.
Since teaching myself and my daughter how to crochet, I have taught countless friends and thousands more via the Internet. I even started an online subscription site, Inspired Crochet , to encourage others to crochet and try new patterns and techniques. I enjoy designing with fun colors and mixing different stitches to create one-of-a-kind items that are perfect for the sweet new baby in your life or to give as thoughtful, hand-stitched gifts at baby showers for friends and family. I want this book to be a go-to guide for someone who has never crocheted before, so in addition to the patterns, Ive included everything you need to know to crochet them. At the back of the book, you will find photo tutorials for everything from holding a crochet hook to making a chain stitch to double crochet decreases to stitching crocheted pieces together. Youll find patterns for all different levels of crocheters in this collection.
But no matter the level, each pattern is designed to be irresistible! Whether youre a beginner or an experienced crocheter, every pattern you make should be a delight, and the designs in this book are guaranteed to be just that! I have five children, so I understand that buying cute clothes and hats that your baby will outgrow in just a few months is an indulgence not everyone can afford. But when you can crochet them yourself, and they are this quick and easy to make, the sky is the limit! So pick up your hook, and get ready to crochet! Some Tips for Reading the Patterns When a number is before the command, such as 3hdc, you will work in the SAME stitch. When a number is after the command, such as hdc3, you will work that command in that number of following stitches. The number in parentheses at the end of a round or row is the TOTAL number of stitches for that round or row. 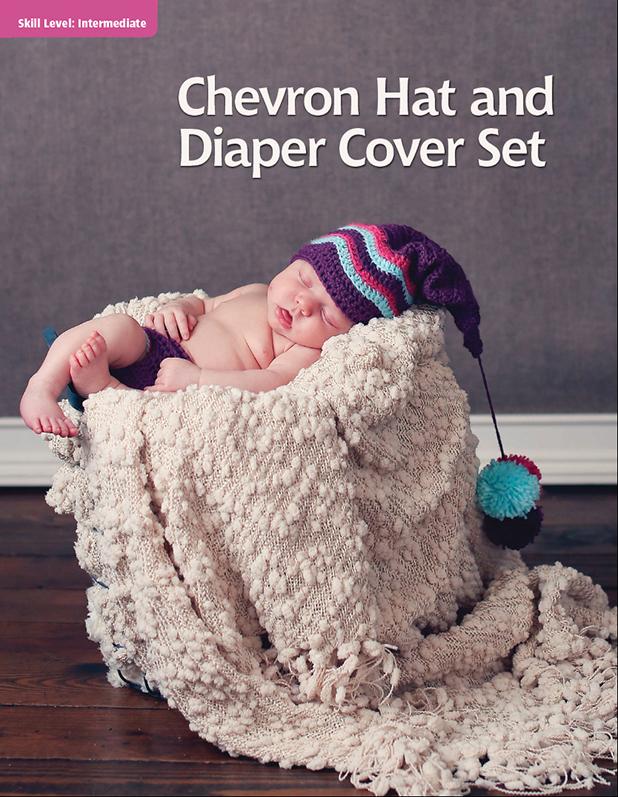 The chevron pattern is simple and easy to create, and this hat and diaper cover will be perfect accessories for your new little one.
  Finished Measurements Newborn: Hat circumference, 12"; Hat height, 10" Diaper Cover: Waist, 12.5" (For other sizes, see .) Yarn Baby Bee Sweet Delight Baby Yarn, light worsted weight #3 yarn, 60% acrylic/40% polyamide (377 yd/4 oz per skein) 1 skein #90 Grape Jelly (Color A)1 skein #33 Little Princess (Color B)1 skein #70 Infant Teal (Color C) Hook and Other Materials H-5.0mm hook or size needed to obtain gauge Yarn needle Gauge 18 sts and 10 rows in sc = 4" square Hat Notes 1.
  Finished Measurements Newborn: Hat circumference, 12"; Hat height, 10" Diaper Cover: Waist, 12.5" (For other sizes, see .) Yarn Baby Bee Sweet Delight Baby Yarn, light worsted weight #3 yarn, 60% acrylic/40% polyamide (377 yd/4 oz per skein) 1 skein #90 Grape Jelly (Color A)1 skein #33 Little Princess (Color B)1 skein #70 Infant Teal (Color C) Hook and Other Materials H-5.0mm hook or size needed to obtain gauge Yarn needle Gauge 18 sts and 10 rows in sc = 4" square Hat Notes 1.
The hat is worked in rows. 2. The ch3 at the beginning of row counts as a stitch. 3. When you change yarns, you will carry the old yarn, not fasten it off. That will allow you to simply pick the yarn up later, with no ends to weave in.
For a tutorial, see . 4. See for making a pom. 5. The hat size can be naturally altered, using the same pattern, by a) using a larger hook, b) using a heavier weight yarn such as medium worsted weight #4, or c) using both a larger hook and a heavier yarn weight. 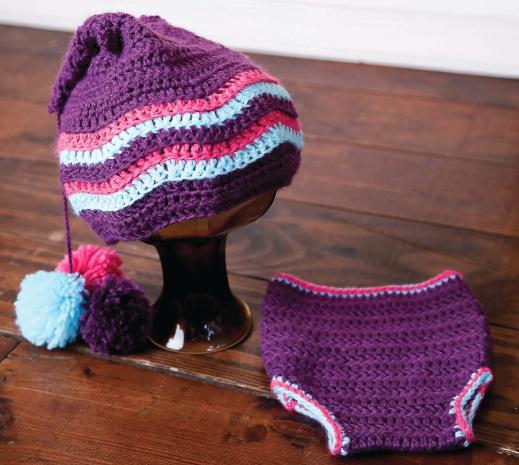 Diaper Cover Notes 1.
The diaper cover pattern is worked in rows, as a single panel. 2. The ch3 at the beginning of each row counts as a stitch. 3. See for tutorial on Double Crochet Decrease (dc dec). 4.
After the panel is complete, you will sew the 2 sides together to form the base of the diaper cover. 5. The leg opening and waist details will be added after the panel is sewn together. 6. If you tightly slip stitch around the leg holes and waist, the fabric will be tight and difficult to stretch. 7.
The size of the diaper cover can be naturally altered, using the same pattern, by a) using a larger hook, b) using a heavier weight yarn such as medium worsted weight #4, or c) using both a larger hook and a heavier yarn weight. Special Technique At times you will be instructed to work in the front loop only (flo) or the back loop only (blo) of a stitch. Doing this creates texture in the fabric. See for a tutorial. Hat Using Color A, ch75. Row 1: Turn, dc in fourth chain from hook, dc in each chain to end (72 sts).
Row 2: Turn, drop Color A (see ) twice, dc3, *2dc in next 2 stitches, dc3, dc dec twice, dc3, repeat from * to second to last stitch, 2dc in last stitch (72 sts). Row 3: Turn, drop Color B, join Color C, ch3, dc in same stitch as ch3 in flo (see ), dc3, dc dec twice, dc3, *2dc in next 2 stitches, dc3, dc dec twice, dc3, repeat from * to second to last stitch, 2dc in last stitch (72 sts). Row 4: Turn, drop Color C, join Color A, ch3, dc in same stitch as ch3 in blo, dc3, dc dec twice, dc3, *2dc in next 2 stitches, dc3, dc dec twice, dc3, repeat from * to second to last stitch, 2dc in last stitch (72 sts). Row 5: Turn, drop Color A, join Color B, ch3, dc in same stitch as ch3 in flo, dc3, dc dec twice, dc3, *2dc in next 2 stitches, dc3, dc dec twice, dc3, repeat from * to second to last stitch, 2dc in last stitch (72 sts). 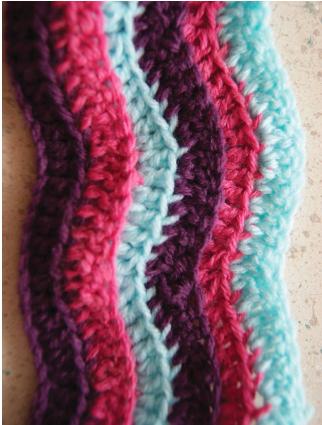 Current progress at the end of Row 6. Row 6: Turn, drop Color B, join Color C, ch3, dc in same stitch as ch3 in blo, dc3, dc dec twice, dc3, *2dc in next 2 stitches, dc3, dc dec twice, dc3, repeat from * to second to last stitch, 2dc in last stitch (72 sts).
Row 7: Turn, drop Color C, join Color A, ch3, dc in same stitch as ch3 in flo, dc3, dc dec twice, dc3, * 2dc in next 2 stitches, dc3, dc dec twice, dc3, repeat from * to second to last stitch, 2dc in last stitch (72 sts). Continue with Color A to the end. Row 8: Turn, ch3, dc5, dc dec, *dc6, dc dec, repeat from * across (63 sts). Row 9: Turn, ch3, dc in next stitch and across (63 sts). Bottom row of hat has been completed. Fasten off.
Next page





 I dont have a famous love story of how I learned to crochet from a well-known designer or from a loving relative, but my story is personal, and it is what inspires me to design every day. My daughter had received a how-to-crochet-a-scarf kit for Christmas one year and wanted me to teach her how to crochet. I had no idea where to start, but luckily a three-step learners guide was included, so I taught myself to crochet so that I could teach my daughter. Once I started, I was hooked! I loved teaching her to crochet and watching the single strand of yarn turn into something I could use. I soon realized how much I enjoyed crocheting and designing new items. Through my newfound hobby, I created a top-selling online pattern business, RAKJpatterns, with the goal of offering fresh, creative designs using basic stitches.
 The chevron pattern is simple and easy to create, and this hat and diaper cover will be perfect accessories for your new little one.
  Finished Measurements Newborn: Hat circumference, 12"; Hat height, 10" Diaper Cover: Waist, 12.5" (For other sizes, see .) Yarn Baby Bee Sweet Delight Baby Yarn, light worsted weight #3 yarn, 60% acrylic/40% polyamide (377 yd/4 oz per skein) 1 skein #90 Grape Jelly (Color A)1 skein #33 Little Princess (Color B)1 skein #70 Infant Teal (Color C) Hook and Other Materials H-5.0mm hook or size needed to obtain gauge Yarn needle Gauge 18 sts and 10 rows in sc = 4" square Hat Notes 1.
  Diaper Cover Notes 1.
 Current progress at the end of Row 6. Row 6: Turn, drop Color B, join Color C, ch3, dc in same stitch as ch3 in blo, dc3, dc dec twice, dc3, *2dc in next 2 stitches, dc3, dc dec twice, dc3, repeat from * to second to last stitch, 2dc in last stitch (72 sts).