HomeMade
HomeMade
101 EASY~TO~MAKE THINGS FOR YOUR GARDEN, HOME, OR FARM
By Ken Braren & Roger Griffith

The mission of Storey Publishing is to serve our customers by publishing practical information that encourages personal independence in harmony with the environment.
1977 by Storey Publishing, LLC
Designed, with cover, by Trezzo/Braren Studio Illustrations by Ken Braren
All rights reserved. No part of this book may be reproduced without written permission from the publisher, except by a reviewer who may quote brief passages or reproduce illustrations in a review with appropriate credits; nor may any part of this book be reproduced, stored in a retrieval system, or transmitted in any form or by any meanselectronic, mechanical, photocopying, recording, or otherwithout written permission from the publisher.
The information in this book is true and complete to the best of our knowledge. All recommendations are made without guarantee on the part of the author or Storey Publishing. The author and publisher disclaim any liability in connection with the use of this information. For additional information, please contact Storey Publishing, 210 MASS MoCA Way, North Adams, MA 01247.
Storey books are available for special premium and promotional uses and for customized editions. For further information, please call 1-800-793-9396.
Printed in the United States by Versa Press
40 39 38 37 36 35 34
Library of Congress Cataloging-in-Publication Data
Braren, Ken, 1934
Homemade: 101 easy-to-make things for your garden,
house, or farm,
p. cm.
ISBN 978-0-88266-103-2
1. Building. 2. Do-it-yourself work. I. Griffith, Roger,
1919- joint author. II. Title.
TH153.B65
690.8 77.2887
Contents
Part 1
EASY~TO~MAKE THINGS POR TOUR HOME
Part 2
EASY~TO~MAKE THINGS FOR YOUR GARDEN
Gates
Part 3
EASY~TO~MAKE THINGS FOR YOUR FARM
Dedication
To anyone with a green thumb who has ever held a hammer.
Introduction
This is a book about saving, written to help you save money, resources, and that most precious of all of your possessions, time.
It will be a success if, as you look through it, you stop several times and say, Thats for me. I need it. And then, of course, you build it and find it works just as you hoped it would.
Never should you say: Id like that, but I never could build it. Have faith in your own abilities, and test them as well. Most of these projects are simple to build. You dont need the skills and experience of a carpenter, nor his array of power tools. Common sense is helpful, and should steer you as you fit some of these ideas to your own individual needs. As for tools, the basic hand tools are all that are needed.
Perhaps you will study one of these pages, then say to yourself, I know an even better way of building that. Or, after you look through this book, you may say, They should have included a... boxtrap or a childrens swing or something else used in the home or garden or on the farm. You may remember some favorite project and wish it could have been included in this book. What do you do if this happens? Write to Garden Way Publishing, Pownal, VT 05261. In that way you can be a contributor in our next printing of this book.
Only two of us are listed as authors of this book, and that listing is not quite true. Friends, neighbors, relatives, Garden Way Publishing authors, all have contributed, in the hopes that these ideas and solutions to problems will be passed along to you, and make your life a little easier or more pleasant. To all of them we owe our thanks.
KEN BRAREN
ROGER GRIFFITH
Part 1
EASY~TO~MAKE THINGS FOR YOUR HOME
Sawhorse
Before you go too far into this book, selecting projects that will simplify life for you, look over the next few pages. There are some suggestions that might make work on those future projects a little easier.
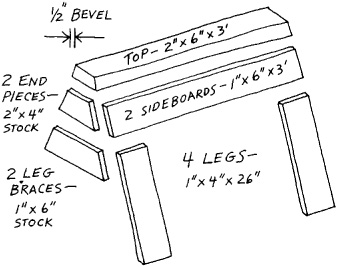
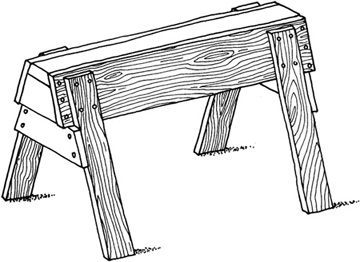
The first one is this sawhorse. Theres nothing fancy about it, but it has several good points. And one of them is that the legs are braced in two directions. That makes it a steady sawhorse, guaranteed not to wiggle and twist when youre sawing on it.
For a sturdier model, make the legs of 24s, and inset them one inch into the 26 top.
Two of these can be handy, as legs for a temporary workbench, or to hold lengthy lumber for sawing.
Carpenters Tool Box
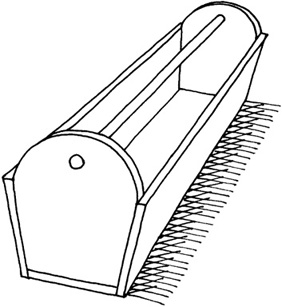
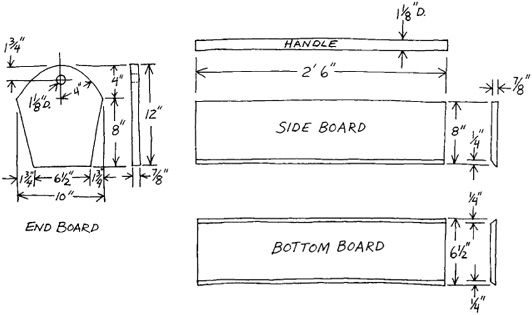
Scrap one-inch lumber and a sturdy dowelor a section of a broom handleand youre ready to build this carpenters tool box. Load it up in your workshop with the tools you need for that job at the other end of the house, or somewhere outside, and chances are you will save yourself a trip or two back to the shop. Designed by the Extension Service at Michigan State College, this tool box is strong, pleasing in appearance and a good sizea saw will fit in comfortably.
The dowel can be fixed into place by drilling holes through the end pieces, then glueing the dowel in position.
If youre the kind who loses tiny tools such as drill bits, make a compartment or two at one end of this tool box. If the partition for the compartment is no more than three inches high, it will not interfere with the placement of larger tools.
Workbench
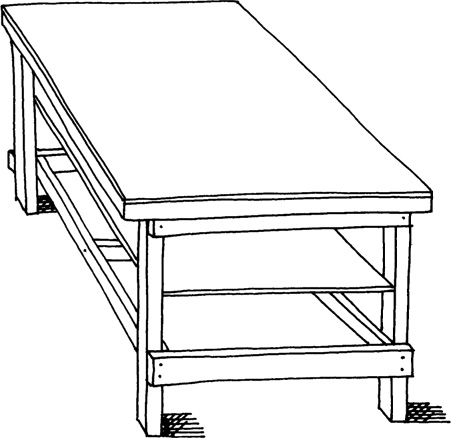
A workbench is a must. It should be big enough to handle a variety of jobs, sturdy enough so that you never think about its strength, and not so fancy that you hesitate to use it for fear you may mar it.
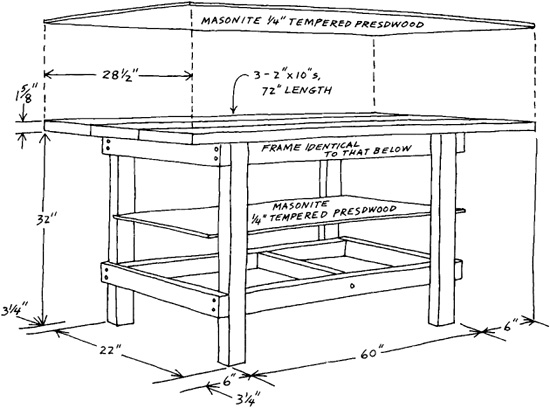
This one fills all of those requirements. It is six feet long, 28 inches wide, which is a good working size. If you bolt together the 24 frame, instead of using nails, it will be sturdy. And the Masonite quarter-inch tempered presdwood top and shelf will take a lot of abuse, and can be cut from one 46 panel.
As you will note in the drawing, all of the lumber required for this is easily obtained, being either 24 or 210. Three pieces of 210 each six feet long, are needed for the top.
Basement Closet
That space under the basement stairs is usually wasted, or is a catchall for unwanted or unmended articles.
A common way to get maximum use from this closet is to install shelving in the rear, leaving the front open for storage of larger things.
Drop a plumb line from the top end of each stringer, and mark the spots on the basement floor as the front corners of the closet. Use 24s, with the four-inch side down, to outline the base of the closet. Secure them with expansion bolts in the concrete. Uprights, again made of 24s, are placed from the end of the base to the top of the stringers, with the top of the 24s cut at an angle to fit to the slant of the stringer. If a door is to be included, its framing should be built now. Also uprights should be placed about midway the length of the closet, again cut at a diagonal on top to fit the slant of the stringer. Careful placement of them will eliminate non-essential cutting of plywood or hardwood sides which will be 48 sheets. Unless stairs are closed in, a slanting closet back should be fitted in under the stairs. Before closing in closet, nail 24s between uprights, on either side, and use one-inch tongue-and-groove stock for shelving where it is desired. Installation of a light fixture will dramatically increase the convenience of this big storage space.
Next page


