Milligan Charity - 23 Mini-Makeovers: Simple DIY Projects for Your Home
Here you can read online Milligan Charity - 23 Mini-Makeovers: Simple DIY Projects for Your Home full text of the book (entire story) in english for free. Download pdf and epub, get meaning, cover and reviews about this ebook. year: 2013, genre: Home and family. Description of the work, (preface) as well as reviews are available. Best literature library LitArk.com created for fans of good reading and offers a wide selection of genres:
Romance novel
Science fiction
Adventure
Detective
Science
History
Home and family
Prose
Art
Politics
Computer
Non-fiction
Religion
Business
Children
Humor
Choose a favorite category and find really read worthwhile books. Enjoy immersion in the world of imagination, feel the emotions of the characters or learn something new for yourself, make an fascinating discovery.

- Book:23 Mini-Makeovers: Simple DIY Projects for Your Home
- Author:
- Genre:
- Year:2013
- Rating:5 / 5
- Favourites:Add to favourites
- Your mark:
23 Mini-Makeovers: Simple DIY Projects for Your Home: summary, description and annotation
We offer to read an annotation, description, summary or preface (depends on what the author of the book "23 Mini-Makeovers: Simple DIY Projects for Your Home" wrote himself). If you haven't found the necessary information about the book — write in the comments, we will try to find it.
Milligan Charity: author's other books
Who wrote 23 Mini-Makeovers: Simple DIY Projects for Your Home? Find out the surname, the name of the author of the book and a list of all author's works by series.


23 Mini-Makeovers: Simple DIY Projects for Your Home — read online for free the complete book (whole text) full work
Below is the text of the book, divided by pages. System saving the place of the last page read, allows you to conveniently read the book "23 Mini-Makeovers: Simple DIY Projects for Your Home" online for free, without having to search again every time where you left off. Put a bookmark, and you can go to the page where you finished reading at any time.
Font size:
Interval:
Bookmark:
mini-makeover s
simple DIY projects for your home
by

Amber Hollowood and Charity Milligan
Table of Contents
An Entry Makeover from Garage Sale Finds
A Mirror Makeover
2 Simple Ideas for 1 Cute Lamp Makeover
Makeover Those Bare Front Door Windows with Curtains
How to Cover and Protect Your Bar Stools
A Usable Makeover of a Yankee Candle Jar
My Bedroom Makeover with a New Window Seat
A Lego Bathroom Makeover
Garage Entry Makeover
How to Makeover a Tray with a Table Cloth
A Five Dollar Good Will Chair Makeover
A Game Room Makeover
An Easy Desk Chair Makeover
A Thrift Store Mirror Makeover into a Chic Side Table
A Laundry Room Makeover on a Budget
A Pringles Can Makeover
A Picture Frame Makeover with a Bow
Makeover a Closet into a Bedroom
A Beautiful Pantry Makeover
Unique Makeovers Using a Shower Curtain
A Cute TV Tray Makeover
A Clean Mudroom Makeover
A Simple Bar Stool Makeover
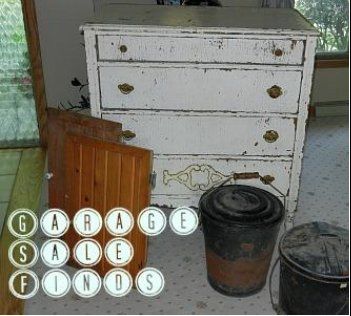
An Entry Makeover from Garage Sale Finds
I So Love it when I hit a great garage sale! Here is how to make a new entry with garage sale finds. I almost didn't make my good friends sale because I ran out of gas. But I did make it and I am so glad. Here are my things that I found that day.
So, I decided to use this dresser at my front entry. I could paint it and someday I may do that. But I thought it had a lot of character so I just sanded some of the rough spots and cleaned it up. I used one of the metal pails for some cut hydrangea. I love how it turned out!
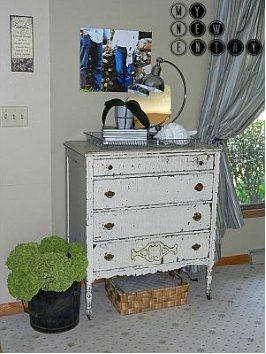
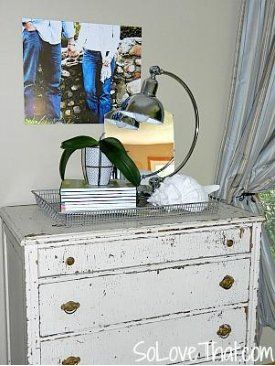
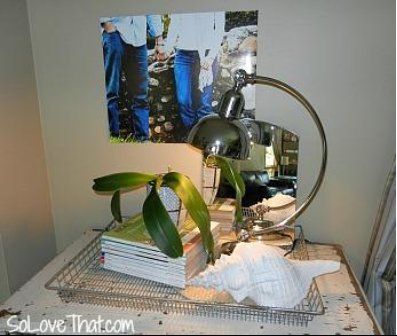
My friend took this picture of my husband and I and I So Love It! It was blown up and attached to a foam board with spray adhesive. The mirror was a find at another sale for $1. The lamp was from the clearance shelf at TJ Maxx for $12. The shell and orchid were a gift from friends and then there is my trusty Real Simple magazines. In doubt, stack them high! :) The metal tray was a dumpster dive find! I love it how it all came together.
Fall is upon us, so get out to a garage sale and find something that you just So Love!!!
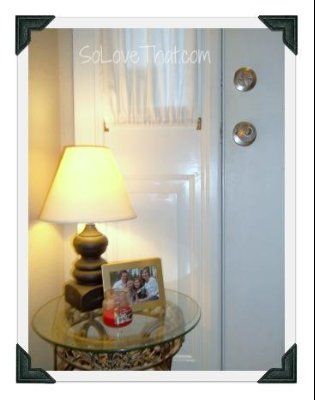
. A Mirror Makeover

If youre ever driving down the road and things piled up in peoples trash catches your eye, then you know what its like to rescue something with dreams of a makeover. I drove past this several times before I had the courage to grab it. Its one of those stand up mirrors. The mirror was missing and the frame was detached from the base.
Heres what I did to makeover this mirror into a piece of wall art:
1. I sanded down the frame and the plywood back just to clean it up and smooth it off.
2. I spray painted the frame with white paint.
3. I spray painted the back plywood with a black chalkboard paint.
4. Make sure you follow the directions and allow the chalkboard paint to dry completely.
5. I used a staple gun to attach the plywood to the back of the frame.
6. To hang it on the wall I took a binder clip a part and staple gunned it to the back.
I had a few ideas of how to use this mirror/chalkboard. I thought to hang it vertically or prop it on a table or the floor. Heres where it ended up. This is my front entry way. These pictures are ones weve taken from different places that weve been. Im amazed at the beauty of Gods creation. I think what I love best is the versatility of the many uses of the chalkboard and the versatility of the display options. I so love how it turned out!
. 2 Simple Ideas for 1 Cute Lamp Makeover
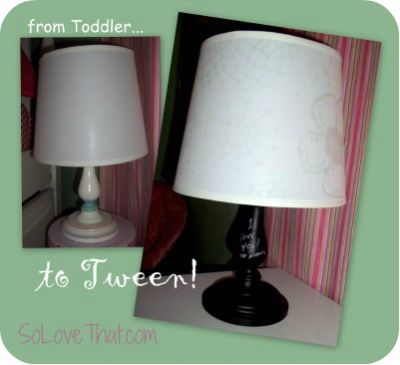
I so love this makeover! I took this lamp fro m Toddle r t o Twee n . Yes, this lamp was in my daughters nursery the day she came home from the hospital. Shes now 10 and it was definitely time to give this lamp a makeover or buy a new. Why buy a new one when you can update the one you have that works perfectly? Youve guessed which one I chose... MAKEOVER!
Heres what I did to give this lamp a simple makeover:
Base :
1. I lightly sanded down the lamp base.
2. I spray painted the base with leftover black chalkboard paint.
Shade :
3. I took this lamp shade from another lamp because I liked the shape.
4. I used Elmers glue to draw flowers that matched her bedspread onto the shade.
5. Be careful to allow a section to dry fully before you move to the next section.
Thats it! Her bedspread is black & white with funky flowers and pink with white polkadots as accents. It looks so cool and she loves that she can write on it too! So if youre going to makeover a lamp think about using one of these ideas... or both!
. Makeover Those Bare Front Door Windows with Curtains
We lived in this house for about 3 years when my husband says, "I wish we had some curtains or something to cover the front windows" . We always knew when our sweet little neighbor friend was coming to play, because we'd see her cute face peering through the window. :)
Here's what I did for these front door curtains...
Steps for front door curtains:
1. Purchase (2 sets in a pack for $2-5)
2. Attach the brackets with a screw driver (make sure to place them even and below the glass window so your hem will not be seen from the outside)

3. Purchase your fabric (simple is best)
4. Cut the fabric for the width (you want it wider than the window so it will bunch/gather up some)
5. Hem both sides
6. Put a hem at the top but wider to create a tube for the sash rod to slip through
7. Hang the sash rod and the curtain on the top rod to measure the length for the bottom hem
8. Hem the bottom to create a tube for the sash rod at the bottom (remember you want it to fit the window just right so it will be somewhat tight
9. Hang the curtain on both rods and youre done - privacy and pretty all at once :)
10. We actually have 2 windows, so I repeated the same steps for the second window
I so love when I can do something myself that is practical for a great price and adds to the beauty of my house too. Love it!
. How to Cover and Protect Your Bar Stools
I so love this tall glass table and chairs. This is one of my favorite places to read with a yummy bowl of cereal early in the morning when the house is still quiet. When we bought this my kids were younger and messy, and before I knew it the seats were dirty. The answer was to have covered bar stools.
Next pageFont size:
Interval:
Bookmark:
Similar books «23 Mini-Makeovers: Simple DIY Projects for Your Home»
Look at similar books to 23 Mini-Makeovers: Simple DIY Projects for Your Home. We have selected literature similar in name and meaning in the hope of providing readers with more options to find new, interesting, not yet read works.
Discussion, reviews of the book 23 Mini-Makeovers: Simple DIY Projects for Your Home and just readers' own opinions. Leave your comments, write what you think about the work, its meaning or the main characters. Specify what exactly you liked and what you didn't like, and why you think so.