Andrew bunnie Huang - Hacking the Xbox: an introduction to reverse engineering
Here you can read online Andrew bunnie Huang - Hacking the Xbox: an introduction to reverse engineering full text of the book (entire story) in english for free. Download pdf and epub, get meaning, cover and reviews about this ebook. City: San Francisco, year: 2003;2014, publisher: No Starch Press, genre: Romance novel. Description of the work, (preface) as well as reviews are available. Best literature library LitArk.com created for fans of good reading and offers a wide selection of genres:
Romance novel
Science fiction
Adventure
Detective
Science
History
Home and family
Prose
Art
Politics
Computer
Non-fiction
Religion
Business
Children
Humor
Choose a favorite category and find really read worthwhile books. Enjoy immersion in the world of imagination, feel the emotions of the characters or learn something new for yourself, make an fascinating discovery.

- Book:Hacking the Xbox: an introduction to reverse engineering
- Author:
- Publisher:No Starch Press
- Genre:
- Year:2003;2014
- City:San Francisco
- Rating:5 / 5
- Favourites:Add to favourites
- Your mark:
Hacking the Xbox: an introduction to reverse engineering: summary, description and annotation
We offer to read an annotation, description, summary or preface (depends on what the author of the book "Hacking the Xbox: an introduction to reverse engineering" wrote himself). If you haven't found the necessary information about the book — write in the comments, we will try to find it.
Andrew bunnie Huang: author's other books
Who wrote Hacking the Xbox: an introduction to reverse engineering? Find out the surname, the name of the author of the book and a list of all author's works by series.


Hacking the Xbox: an introduction to reverse engineering — read online for free the complete book (whole text) full work
Below is the text of the book, divided by pages. System saving the place of the last page read, allows you to conveniently read the book "Hacking the Xbox: an introduction to reverse engineering" online for free, without having to search again every time where you left off. Put a bookmark, and you can go to the page where you finished reading at any time.
Font size:
Interval:
Bookmark:
Installing a Blue LED
Now that you have taken the cover off of your Xbox, it is time to do a couple of starter projects. The next chapters walk you through some elementary modifications and repairs that you can perform on your Xbox. These projects are designed and written for readers who have little or no experience with hardware hacking. More advanced topics on the Xbox can be found in later chapters.
In this chapter, you will learn how to replace the normally green LED in the Xbox front panel with a blue LED. This project requires minimal soldering; most of the effort is in removing the front panel and the LED circuit assembly. Lets get started!

A stock Xbox uses a green/red combo LED, but the red LEDis only used to indicate error conditions. The proceduredescribed in this chapter will convert your Xbox front panelindicator into a blue-only LED. The proper substitute wouldbe a blue/red combo LED (T-1, 3mm diameter lens). However they are difficult to find, so the instructions here donot use them. The instructions will give the necessary background knowledge for you to improvise and incorporateyour own LED solution if you are so inclined.
The following is a list of the equipment that youll need to complete this project:
Low-wattage soldering iron with a fine point tip
Solder
Flux and soldering iron tip cleaner (optional)
Smal flathead screwdriver
T-10 bit Torx driver
Two low voltage (3 volt) blue LEDs in a T-1 (3 mm) case
Masking tape for holding parts in place during soldering
You can substitute any color LED that you like, but it must turn on at a voltage of around 3 volts and have a T-1 style case. Pay attention when buying your LEDs, because many blue and white LEDs are rated to work only at 5 volts. The LED used here is a Lumex SSL-LX3044USBC which you can buy through Digi-Key (www.digikey.com); part number 67- 1747-ND. (For the budget-conscious, Digi-Key can send the LEDs via United States Postal services first class mail. Note that there is a $5 handling fee for orders through Digi-Key that are less than $25.)
If Digi-Keys minimum order restriction is a problem for you, Mouser Electronics (www.mouser.com) also has a line of blue LEDs, and they have no minimum order. An example part is the Kingbright blue LED in a T-1 case with a water clear lens; the Mouser stock number is 604- L7104PBC/H for the brighter, slightly higher voltage version, or 604- L7104QB/D for a version that operates at a lower voltage but with a lower rated brightness.
You can also use a bi-color LED if you would like to maintain the error condition LED functionality as well. The Xbox requires a common-cathode bi-color LED in a T-1 case with three leads. Unfortunately, bi-color LEDs with a blue element in the smaller T-1 case are very difficult to find.
The Xbox front panel is a molded piece of ABS plastic that is held in place with four T-10 torx screws and three molded friction locks. The electronics in the front panel connect to the Xbox motherboard through a single nine-wire connector that winds its way through a hole in the metal electromagnetic interference shield.
Open the Xbox as instructed in Chapter 1. Lift and move the hard drive and the DVD drive up and toward the back of the box just enough to expose the front edge of the Xbox motherboard. You should not have to undo any of the disk drive cables. Figure 3-1 illustrates how your Xbox should look after these steps.
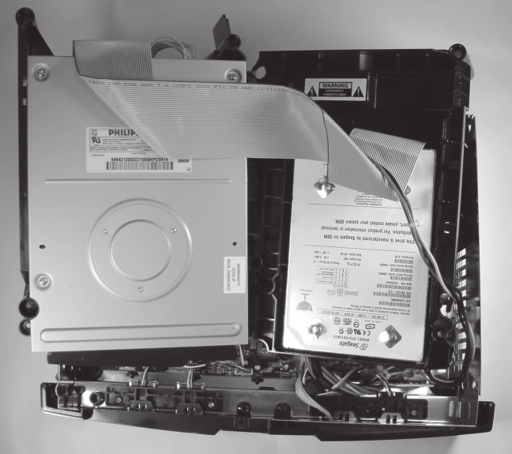
Figure 3-1: Position the disk drives so that the front edge of the motherboard is exposed.

Older Xbox models will have a vertically mounted PC board near the front of the Xbox. This PC board can be removed by grasping the board and pulling it out of its socket. You may find that removing the vertically mounted PC board is helpful when trying to release the middle friction lock of the front panel. Do not forget to replace the PC board when you are done!
Remove the four screws that hold the front panel assembly in place (see Figure 3-2).
Detach the front panel wire connector from the Xbox motherboard as shown in Figure 3-3. A firm, steady force is all the connector should require. (Do not jerk the connector out, because you may damage the wires.)
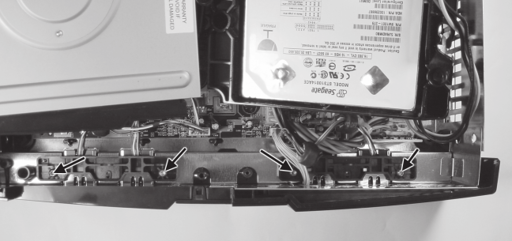
Figure 3-2: Location of the four retaining screws on the front panel assembly.
Now for the tricky part: the friction locks. A friction lock is a hook made out of plastic that holds parts together. The hook is shaped so that it is easy to insert, but difficult to extract. Releasing a friction lock typically requires some kind of bending or pushing on the plastic.

Figure 3-3: Detach the front panel wire connector from the Xbox motherboard.
Three friction locks hold the front panel in place: one on either edge of the front panel, and one in the middle poking through the metal electro magnetic interference shield. First, loosen the friction locks on the edge using a thin-bladed flathead screwdriver as shown in Figure 3-4. These locks are very tight, and you may have to release it in sections, starting with the top section. Insert the screwdriver tip into the space along the side between the panel and the main case body, and pry until you feel a slight give. Remove the screwdriver and repeat the process near the bottom of the case. You may need to try several times before the lock is free. Do not apply excess force to the case, as you could crack or nick the plastic. When the edge of the front panel is free, you will be able to flex it away from the case. Repeat this process for both edges.
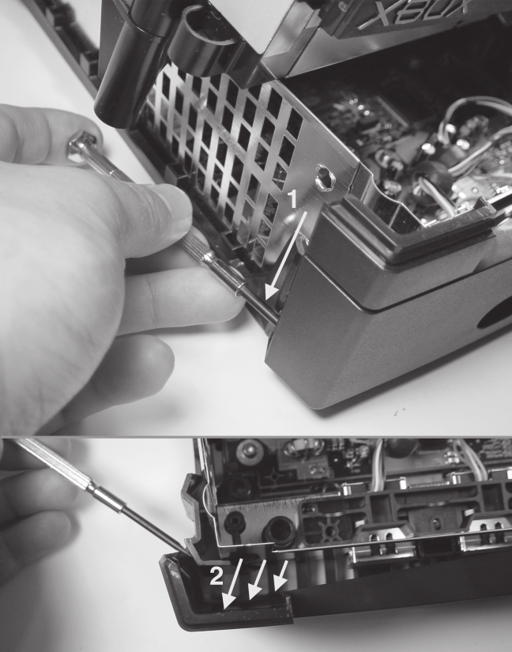
Figure 3-4 : Loosen the edge friction locks with a flathead screwdriver. (1) Start working from the top and move down; (2) once the panel is free, it should bend outward from the case.
Once both edges are free, pull up on the middle friction lock (shown in Figure 3-5), and the front panel should pop off.
Once the front panel is free, thread the front panel wire connector through the hole in the metal electromagnetic interference shield and lay the panel flat on a table with the outer face down.
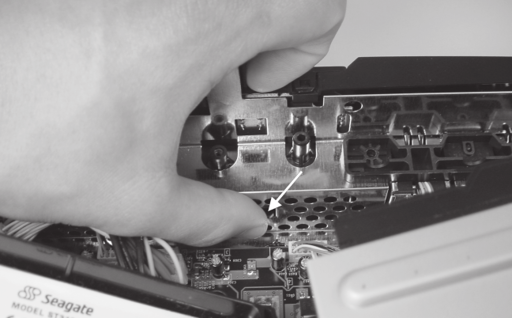
Figure 3-5: The thumb is pressing on the middle friction lock.
The front panel assembly of the Xbox contains a small circuit board, held in place with a single friction lock retaining clip, as shown in Figure 3-6. Use a finger or a screwdriver to push down on the friction lock and pull the front panel circuit board assembly out of its cradle.
Font size:
Interval:
Bookmark:
Similar books «Hacking the Xbox: an introduction to reverse engineering»
Look at similar books to Hacking the Xbox: an introduction to reverse engineering. We have selected literature similar in name and meaning in the hope of providing readers with more options to find new, interesting, not yet read works.
Discussion, reviews of the book Hacking the Xbox: an introduction to reverse engineering and just readers' own opinions. Leave your comments, write what you think about the work, its meaning or the main characters. Specify what exactly you liked and what you didn't like, and why you think so.